Old School RuneScape uses the British convention for floor numbering: Ground floor, first floor, etc.
This article is a condensation of all subpages of the Treasure Trails/Guide page. It simply transcribes everything from the subpages. For this reason, this may lead to inconsistencies or things being repeated twice.
The 'level' of a clue scroll relates to its difficulty. There are four levels of clue scroll, Easy, Medium, Hard, and Elite. A clue scroll (easy) is a low difficulty treasure trail, with a low reward yield. A clue scroll (medium) is a medium difficulty treasure trail with a more substantial reward yield. A clue scroll (hard) is a hazardous Treasure trail which can be very rewarding. A clue scroll (elite) is the most dangerous clue scroll to receive and complete. However, it has the greatest and most expensive rewards.
Length
Level 1 trails can be between 1 and 5 clues long with few or no quest requirements.
Level 2 trails can also be between 1 and 7 clues long with some quest requirements.
Level 3 trails can be between 1 and 8 clues long, with multiple enemies to defeat and can have high-levelled quest requirements.
Level 4 trails can be between 5 and 10 clues long, with multiple fights, and puzzles every step.
Use proper armour to protect yourself and deal decent damage in combat
Quests
Having a high amount of quest points is beneficial when doing treasure trails. Many higher-level trails will lead a player into areas which are locked by quests. If this is the case, the player must do the quest, up to where access to the area is granted, if they wish to complete their trail. If the player hasn't done the needed quest yet, but they have the requirements or are in a position to get them quickly, it is recommended that the player (trains and) does the quest, rather than getting rid of the clue scroll.
Treasure Trail rewards
Treasure trails can be the single most lucrative thing a player ever does. However it is akin to winning the lottery. A player may emerge from a clue with a Willow Shortbow and a Leather Coif, or they could gain a Zamorak page, a 3rd Age Armour Piece, and assorted Rune Armour all from the same clue. The value of the rewards garnered depend heavily on the level of the clue scroll completed. Players completing level 3 clues will never see a Willow Shortbow no matter how many clues they complete, likewise players completing a Level 1 Clue will never be rewarded with a 3rd age armour piece. Once completed, the rewards given by a clue are absolutely random and unaffected by any factor provided elsewhere in the game, except the ring of wealth.
Higher level clues generally give better rewards but, due to the randomness of rewards given, there is a very large variance in value or the rewards. As an example, for all levels of clues, players can get random pieces of melee amour. The type of armour received differs based on the level of the clue completed, with level 1 clues generating Black armour, level 2 clues generating Adamant, and level 3 clues generating Rune armour. Similar trends exist with other reward items such as bows, and ranged armour. Although generally speaking the reward from a higher level clue will be worth more than a lower level counterpart, there are some notable exceptions (such as rune nails as opposed to an adamant platebody) where a high level clue generate a low yield. These instances of poor rewards range from rare to mildly uncommon.
A clue scroll could generate well over 120 million gold pieces worth of items, depending on the current prices of the various pieces of 3rd age armour, as well as the brand new Dragon Masks which are the most valuable things that a player can get from a clue scroll. Other rewards include the God Armours, the gilded and trimmed armours, the heraldic armour, as well as several unique items such as sleeping caps, boater hats, animal staves, and animal masks.
For a complete list of the items which can only be obtained from a clue scroll see the Treasure Trails Rewards Guide. Be aware that there are items that can be obtained from a clue scroll that are not unique to treasure trails. These items are also listed in the Rewards Guide and so will not be detailed here, but include items such as various bows, ranged and melee armour, and weapons.
The update along with elite clue scrolls made a mechanism to make sure that each clue scroll will generate at least one item that is a unique treasure trail item. This unique item can vary, from being as little as one coloured firelighter, to a part of the Third-Age Druidic Equipment.
Chest Keys
Chest keys are 'step two' of a clue. Sometimes, a clue will lead the player to a locked chest or drawer. A key will be needed to open it, which will be dropped by a specific monster. A clue will tell which monster to kill. These chest key clues are usually found on lower level trails. The key will disappear when used to open the chest or drawer. Before and after the trail, the monster will no longer drop the key.
Anagrams
An anagram is a string of letters which have been purposefully scrambled. For example: od olpe is, unscrambled, poodle. Anagrams can appear in level 2 and level 3 clues. Below is a complete list of anagram solutions. If one is missing, please add it to the list.
The solution of an anagram is always the name of an NPC. Once the solution is found, the player can get their next clue by talking to that NPC.
When the player talks to the solution NPC in a level 3 trail, they will receive a challenge scroll or a puzzle box. Solve the puzzle box and talk to the NPC again, or tell the NPC the answer to the challenge scroll, to receive the next clue.
List of solutions
Old School RuneScape uses the British convention for floor numbering: Ground floor, first floor, etc.
Following is a list of all known anagrams and their solutions. It is also listed whether or not you receive a puzzle box or challenge scroll, and the answers to the challenge scrolls.
Note: The amount of letters in the anagram Them Call Came and Cam the Camel are not the same; Them Call Came has 2 Ls and Cam The Camel has only 1, however, it is still the correct solution.
North Witchaven next to the row boat. After Sea Slug Quest is found wandering the coast. After finishing Kennith's Concerns quest, Caroline may be found from upstairs of her house directly west from the church.
Before A Fairy Tale Part II she can be found just north of the bank in Zanaris. Between A Fairy Tale Part II and A Fairy Tale Part III, however, players must get the certificate from the potion shelf (located in the room north of the fairy bank) and use the fairy rings in this order "AIR", "DLR", "DJQ", "AJS". After A Fairy Tale Part III she can be found just North of the bank again.
Challenge scrolls are logical problems posed to the player by an NPC. They appear in Medium and Hard clues in Treasure Trails and have two steps to it: first the player has to find the right NPC to speak to (when they get a cryptic or anagram clue), and then they have to solve the riddle, to advance along their trail. Thus, challenge scrolls don't count as a regular clue.
To complete the scroll, view the question on the scroll, then speak to the NPC which gave it to provide the answer. When the correct answer is provided the challenge is complete, and the player will receive either the next clue, or the reward. It is also possible able to obtain more than one challenge scroll by asking the NPC players got it from with a full inventory. Every time players talk to the NPC, another appears on the ground that they can pick up. However, if they already have one in their inventory, they cannot pick another one up.
List of solutions
The following is a list of all known challenge scrolls and their solutions. The riddles are usually fairly simple, but sometimes call on trivial facts such as 'How many animals are in the Ardougne Zoo?' This list will allow players to bypass counting animals.
Simple clues are exactly what it says on the tin. They are almost invariably found in level 1 trails. These clues tell precisely what to do; either the player has to talk to someone or search a specified location. They do not require the player to perform an emote; for those types of clue please see the list of emote clues.
List of clues
Following is a list of all known simple clues.
A
Clue
Notes
Level
A crate found in the tower of a church is your next location.
Hemenster is the small area between Seers' Village and the Fishing Guild. Search the building on the water's edge, north-west of the range guild and west of Grandpa Jack's.
Down a set of stairs and go south.Down a set of stairs and go south.It's in a stack of crates directly south of the ingots troughs for the cart tracks.
1
Search the boxes in one of the tents in Al Kharid.
The tent south of Ali Morrisane's stall and west of the cactus farming patch.
1
Search the boxes in the Goblin house near Lumbridge.
The box to the right, just inside the door as you enter. The house is located east of Lumbridge, just across the river.
1
Search the boxes in the house near the South entrance of Varrock.
It's the house just south of the sword shop.
1
Search the boxes just outside the Armour shop in east Ardougne.
South of the market, just next to the Spice stall and north of the Armour shop.
1
Search the crates in the house in Al Kharid with racks of silk.
Found in the house attached to the gem stall. Search the boxes in the southwest corner.
(Since the Al-Kharid update, the chest is no longer on the first floor. It is on the ground floor in the northeast room. This may be an oversight by Jagex.)
1
Search the crate in the left-hand tower of Lumbridge castle.
It's not IN the castle, it's part of the southern tower near the entrance.
Horvik is the armour shop east of the main square in Varrock.
1
Search the crates in Gunnarsgrunn (Barbarian Village) helmet shop.
Go to the shop Peksa owns and search some crates there.
1
Search the crates in the guard house of the northern gate of East Ardougne.
Search the Crate. It is East of the East North Bank.It's inside the small building just slightly north of Handelmort Mansion, but not quite outside the gates.
1
Search the crates in the northernmost house in Al Kharid.
On the second floor of the house on the green spider island east of Yanille. Use Fairy Ring code CLS for quick access. The challenge scroll answer is 6,859 Note: This clue is impossible to complete after While Guthix Sleeps.
Old School RuneScape uses the British convention for floor numbering: Ground floor, first floor, etc.
Cryptic clues are common riddle clues in higher level clues, but they can be found in lower level clues on occasion. They will lead the player to an NPC to talk to, crates to search, or to a location where they are to dig. Hard level clues which lead the player to an NPC will normally result in a puzzle box.
Some clues require the player to obtain a key from a nearby monster to access the needed location. These chest key clues are usually found on lower level trails. Oddly, if there is a key involved in the clue, it is possible to get the key beforereading the hint, which could save the player some time.
46 is my number. My body is the colour of burnt orange and crawls among those with eight. Three mouths I have, yet I cannot eat. My blinking blue eye hides my grave.
Solution
Image
Level 46 Wilderness. Dig on the spot of the sapphire. The sapphire is located at the centre of the mountain of brown spiders, north of Red Dragon Isle. Beware of Player Killers!
After a hard day of spraying back the vegetation, you mite want to pop to the nearby forge and search the crates.
Solution
Image
The Zanaris forge (furnace, north-western corner of Zanaris) west of the slayer monsters (fungi). Search the crates. (Need Lost City Quest for this clue.)
Aggie I see, Lonely and southern I feel, I am neither inside nor outside the house, yet no house would be complete without me. The treasure lies beneath me!
Being this far north has meant that these crates have escaped being battled over.
Solution
Image
Search the crates behind and a little north-west the round prison building that holds the 2nd tracking gnome in the Battlefield south of West Ardougne.
Speak to Heckel Funch in Tree Gnome Stronghold in the south-east corner of the Grand Tree on the first level above the ground. You will be given a puzzle box.
Go to the village being attacked by trolls, search the drawers while you are there.
Wait till I get my hands on Penda, he's nicked the key again. - Go to the pub in Burthorpe and kill Penda.
Solution
Image
Go to the weapons shop in Burthope and When you try to open the drawers it says "wait till I get my hands on Penda, he's nicked the key again." Go to the house directly east and kill Penda for the key. Then open and search the drawers.
Go to this building to be illuminated, and search the drawers while you're there.
I'm guarding the key at the market - Go to Rellekka and kill one of the Fremennik Guards.
Solution
Image
Kill a Fremennik market guard, aquire a key, then search the drawers in the Lighthouse west of Rellekka (If you don't kill the market guard, then the drawer will say "I'm guarding the key at the market") Requires Horror from the deep to enter the lighthouse and the completion of Bar Crawl miniquest.
I am a token of the greatest love. I have no beginning or end. My eye is red, I can fit like a glove. Go to the place where it's money they lend, And dig by the gate to be my friend.
Solution
Image
Dig next to the gate, under the west bank of Varrock (the Tele-grab spot with coins and a ruby ring).
If you didn't want to be here and in danger, you should lever things well enough alone.
Solution
Image
Pull the Ardougne or Edgeville teleport lever and dig with a spade. Wearing an Ardougne cloak 2 or better and teleporting from the Ardougne lever gives a short immunity period against player killers. Beware of player killers!
I lie lonely and forgotten in mid wilderness, Where the dead rise from their beds. Feel free to quarrel and wind me up, and dig while you shoot their heads.
In a town where everyone has perfect vision, seek some locked drawers in a house that sits opposite a workshop.
Don't forget to feed the chickens - Head north of Seers' Village in the Sinclair Mansion and kill the chickens.
Solution
Image
Go to the house in Seers' Village south of the house with the anvils. The drawers will be locked, follow the road north to the Sinclair Mansion. Kill a chicken to get the key for the drawer.
In a town where thieves steal from stalls, search for some drawers upstairs of a house near the bank.
It's a guard's life - Go kill a level 20 Ardougne guard.
Solution
Image
Search the drawers in the first floor of the house near the north bank in Ardougne. Jerico's house, where the pigeon cages are, if you have done Biohazard. You must kill a guard for the key.
Go to Ardougne Manor (southeast of the north bank) and kill one of the guard dogs for the key. Then go to the Flying Horse Inn Pub just north of the Ardougne castle, search the drawers that can be found upstairs.
Search the boxes on the northwest side of the small building in the fenced-in area southwest of the coal trucks in Seers Village. Use the agility shortcut to get past the river to get in the area.
The beasts to my east snap claws and tails. The rest to my west can slide and eat fish. The northern are silly and jump and wail. Dig by my fire and make a wish.
The beasts to my east snap claws and tails. The rest to my west can slide and eat fish. The force to my north will jump and they'll wail, Come dig by my fire and make a wish.
The dead, red dragon watches over this chest. He must really dig the view.
Barbarians rule ok - Go to the Barbarian Village and kill a male barbarian. Female barbarians will not drop the key.
Solution
Image
Go to Gunnarsgrunn (Barbarian Village) or barbarian outpost and kill a male barbarian and collect the key he drops. Go to the Exam centre south of the Digsite and search the chest under the red dragon's head in the main building.
The socks in these drawers are holier than thine, according to the tonsured owners.
You'll never get these drawers open now! - Zamorak Monk. - Go to the Chaos Temple north-west of the Goblin Village and kill a Monk of Zamorak.
Solution
Image
Drawers in the north east corner of the Monastery, downstairs. You will need to kill a Zamorak monk to get a key. (Chaos Temple south of Goblin Village is one location.)
The treasure is buried in a small building full of bones. Here's a Hint: It's not near a graveyard.
Solution
Image
In the small building near the Odd Old Man from the Rag and Bone Man quests. Just northwest of the limestone mine east of Varrock. Dig in the centre of the building.
This village has a problem with cartloads of the undead. Try checking the bookcase to find the answer.
Solution
Image
Go to Shilo Village and search the bookcase in the building just north of the bridge across the river. Search the north-west bookcase by the door. (The start point of the One Small Favour quest.)
Try not to step on any aquatic nasties while searching this crate.
Solution
Image
Go to the Fishing Platform by talking to Holgart or Jeb in Witchaven, east of Ardougne, and then search the crate in the shack on the south-west part of the Fishing Platform. (If you have not already visited the Fishing Platform, you must talk to Caroline and bring Swamp paste).
When you get tired of fighting, go deep, deep down until you need an antidote
Solution
Image
Go to Yanille dungeon and fall into the place with the poison spiders, either by repeatedly walking across the balancing ledge (level 40 agility required) or praying at the altar of Zamorak. Search the crate by the stairs leading up.
You don't need to go hopping mad - or take steps - to get to this treasure: just be totally shellfish.
Solution
Image
Dig on the small shell between the basalt rocks (north of Barbarian Assault) and the small obelisk. The shell is small and pinkish, on the north-western tip of the area.
You'll need to look for a town with a central fountain. Look for a locked chest in the town's chapel.
Property of the Clocktower Monastery - Go to the Monastery south of Ardougne and kill a monk.
Solution
Image
Go to the north church in Varrock and search for a chest. The chest says 'Property of Clocktower Monastery'. Go to the Monastery southeast of the Clocktower (south of Ardougne) and kill a Monk for the key.
You will need to wash the old ash off of your spade when you dig here, but the only water nearby is stagnant.
Solution
Image
Go to Braindeath Island and dig next to the stagnant lake on top of the mountain behind 50% Luke's gate. You will need to complete most of The Rum Deal quest to get to this area.
You'll need to have Doug Deep into the distant past to get to these sacks
Solution
Image
Search the northwest sacks near Doug Deeping. He is down the northeastern winch at the Digsite. You will need a rope the first time you do this. Just 'operate' the winch to go down. (Must have completed most of The Dig Site Quest to enter winch)
Emote clues involve equipping certain items in a particular location and performing an emote. They were first introduced to treasure trails in August 2008. These types of clues are featured in all levels of clue scrolls, and most (but not all) items required for the emote clues can be obtained in shops, although using the Grand Exchange is recommended. Once the emote has been performed, an NPC called Uri will appear and usually give the player a scroll box. If Uri is giving the player their reward rather than another clue, he will give the player a casket. If the player has been requested to do another emote before talking to Uri, and they forgot to do it, he will say, I don't believe we have any business... but will not leave. The player can then complete the second emote and finish the clue. Level 1 clues require doing 1 emote, level 2 clues require doing 2, and level 3 clues require doing 1 emote and fighting the double agent.
Many of the items asked for in these clues are obscure. The Grand Exchange is the simplest way to obtain them, but often not the cheapest. As a result of demand by players doing treasure trails, most of these items have been driven up in price considerably above what they would be otherwise worth. In many cases, emote clue items may be bought from shops for considerably less money, or even be player made with little difficulty. Note that wearing any version of a required item different than the standard one will not work (for example; a rune platebody(t) will not work in place of a basic rune platebody).
For level 3 clues, doing the emote will not summon Uri but instead an aggressive NPC known as the double agent, which uses only melee attacks. If the agent appears, the player must kill him and perform the emote again, with all the original items from the clue equipped. Note: If the items for the clue are equipped upon killing the double agent, Uri will appear automatically, without having to repeat the emote. The player can change equipment to take out the double agent but must change back after killing him in order to make Uri appear. Normally, the double agent is level 108, but in the Wilderness he is considerably weaker at only level 65. Note that it can still be dangerous, since the player can encounter player killers in the Wilderness.
For players that do treasure trails frequently, it is often economical and time-saving to keep the items for the clue level(s) they do most often in their bank. It is not recommended, however, to keep items for all emote clues banked, as a total of 94 items are used across the three clue levels.
Green chaps are sold in the Champions' Guild, and the mithril helm may be bought in Gunnarsgrunn. The ring of duelling is either player made or bought from the Grand Exchange. Tai Bwo Wannai is easy to reach by using Fairy ring code CKR, or via the charter ship to Brimhaven or the House teleport to Brimhaven, or teleport to Tai Bwo Wannai by using the new teleport scrolls, or use the karamja teleport from a amulet of glory then going to the far left gate and going south after that. Players need to be standing within the large red fenced area where Gabooty is before performing the emotes.
The snail that drops the required shell is located in The Hollows near the entrance to the Myreque hideout. An iron pickaxe can be obtained underground at the location via operating the Winch, bought in the Dwarven Mines or player made with 2 iron bars (Perils of Ice Mountain and 20 Smithing required). The snakeskin boots can be made with a Crafting level of 45 from 6 tanned snake hides, which can be most quickly acquired by killing the poisonous snakes in the Mos Le'Harmless jungle. The fastest ways to get to the clue area are Digsite pendant, a Gnome glider, or the Balloon transport system. First do the beckon emote, then Uri will appear. Bow or curtsy before talking to him. This clue will only work with the pointed version of the snelm. By the pointed version of the snelm, it means the snelm made out of the pointed version of the Blamish red shell. You can use a chisel from your Toolbelt to craft it.
It is recommended to turn Auto Retaliate off so that players do not waste a mud pie when retaliating against the double agent. The fairy ring (CKR), the Karamja gloves 3, or a charter ship to Brimhaven followed by a cart ride on the Shilo Village cart system or a run to Shilo Village place players in or near clue location. Obtaining a splitbark helm can prove to be difficult, but many players will lend their helms either for free or for a small charge at the Shilo Village bank (the enchanted version will not work). Vyrelords and vyreladies may also drop the helm for those that have started The Branches of Darkmeyer. Mud pies are made by obtaining a pie shell (pie dish with pastry dough added), then filling it with normal compost, water, then dry clay in that order. Cook the pie on a range to finish it. The rune platebody can be bought from the Grand Exchange or from Oziach in Edgeville.
The rune warhammer is a rare drop from ice trolls and a rarer drop from Troll Generals, Warped tortoises and the Kalphite Queen, but it is easiest to buy one on the Grand Exchange. It is advised to make the elemental shield yourself, as it is rarely sold on the exchange. The chaps can be made if the player has a fairly high Crafting level, but they too may be purchased from the Grand Exchange. The Fishing requirement to enter the Fishing Guild (68 Fishing) means that some players may not be able to complete this clue. Players can get into the guild at level 63 or higher by boosting with an admiral pie (level 63 min.) or fishing potion (level 65 min.). The guild can be reached via a charged skills necklace, or the Ardougne Teleport.
A player can easily make a coif and leather gloves from basic leather, and just as easily buy them. Iron platebodys can be purchased from Horvik's Armour Shop in Varrock, player made, or purchased on the grand exchange.Keep Le Faye can be found south of Seers' Village, and can be reached via the Camelot teleport or by using Fairy ring code BLR.
Players with high crafting levels may choose to craft the dragonhide armour, or it may be purchased from other players or through the Grand Exchange. The lyre teleport followed by a run to the west, or the games necklace to barbarian assault followed by the crossing of the basalt rocks north are the quickest methods to get to the lighthouse. Note: Blue spiky vambracesdo not work.
File:Emote clue Bow Curtsey Duel Arena ticket office.pngIron chainbody can be found at the chain store in southern Falador. Leather chaps can be found in the Ranging Guild, made, or purchased on the Grand Exchange. Coifs can be found at the Champions' Guild and the Ranging Guild, and are very cheap on the Grand Exchange due to their low level of usefulness and ultra high supply. The ring of duelling, or Home teleport to Al-Kharid will get you closest with relative ease. Alternative means of getting to the arena include using an Amulet of glory or a Gnome glider.
You can buy the iron platelegs and oak longbow in Varrock, at the armour and ranged stores. You will need to make or buy the unenchanted amulet yourself. The Legends' Guild has a fairy ring (code BLR) very close by. Alternatively, teleport to Ardougne and head northeast to the guild. Do the emote outside the main gate.
The Burthorpe Games Room can be found at the bottom of Burthorpe Castle, and easily reached with the games necklace. Please note that you have to be in the part of the games room with the board games tables. Note: This does not work in the global worlds for the Games Room.
An air tiara can be made by using an unenchanted tiara on the Air altar with an Air talisman in your inventory, or it can be bought from the Grand Exchange. A bronze 2-handed sword can be bought in the sword shop in Taverley or made. A gold amulet can be crafted at level 8 Crafting, received as a drop from monsters in the Lumbridge Catacombs, or bought from the Grand Exchange. The druids circle is north of Taverley. The best way to reach it is to teleport to Burthorpe using a Games necklace or by using the Lodestone network and head south, or to teleport to Falador and head north. Alternatively, one can take a Mine cart to White Wolf Mountain (requires Fishing Contest) or use the Balloon transport system (requires Enlightened Journey, normal Logs, and a Tinderbox). You can also teleport with a Taverley tablet(with the completion of Love Story and 77 Magic) and then walk northeast.
A steel plateskirt can be bought in Al-Kharid or made, coifs can be bought at the Ranging Guild, Grand Exchange, or made. Sapphire necklaces can be crafted by the player, or bought from other players or the Grand Exchange but are fairly expensive due to the demand for games necklaces. The easiest ways to reach Port Sarim are to use the cabbage-port from Explorer's ring 3 or 4 or a teleport to Draynor Village from an Amulet of glory. Alternatively, players can teleport to Falador and run to the port. You should be able to do this emote any where on the dock, as long as you are east of the bank deposit.
Steel platebodys can be easily purchased from the grand exchange, as well of maple shortbow, as both of these items are in huge oversupply. Bronze boots can be purchased from the Grand Exchange or obtained as a drop from Cave crawlers, which are very poisonous and require level 10 Slayer to kill. The agility arena is at the Barbarian Outpost. A games necklace will come in very handy as the Barbarian Outpost is rather remote.
Green dragonhide armour is sold in the Champions' guild. The steel sq shield can be made or purchased from the Grand Exchange. There is also a shield shop in Falador which sells this. The ogre pen is located in the Combat Training Camp, just north of West Ardougne, also you will have to squeeze through a gap in the railings located on the west of the pen to get in with the Ogres. Use the ardougne teleport, or spirit tree to the gnome stronghold and head southeast to reach the area. You need to have completed Biohazard to get into the combat training camp and Dragon Slayer in order to wear the body.
Leather gloves can be bought at the Varrock clothing store near the general store. You can buy Blue flowers in the Grand Exchange or obtain them by planting Mithril seeds. The amulet must be either player-made at level 50 Crafting or bought from the Grand Exchange. The exam centre is south of the digsite, use the digsite pendant or a gnome glider to reach the area.
An iron medium helmet spawns near the Khazard battlefield, but can also be purchased from Peksa's Helmet Shop in Gunnarsgrunn or player-made. An emerald ring is player made at Level 27 Crafting, or purchased/traded. The gloves spawn just south of the bank in Edgeville, and can also be crafted. Causeway is another name for Bridge. Use fairy ring code DIS, an amulet of glory, cabbage port, Wicked hood or Lumbridge Teleport to reach the area.
Emerald rings can be player-made at level 27 Crafting or bought from the grand exchange. The wood camo top can be bought from the grand exchange or made by bringing two Common kebbit furs and 20 coins to the fancy dress shop in Varrock. Tiaras are crafted by players, but purchasing them on the grand exchange is far cheaper. Ardroune teleport then head north, it's in the farm area, or use Skills necklace to teleport to Fishing Guild.
Green d'hide chaps can be purchased at the Champions' Guild. Steel Kiteshield can be found at the Falador Shield Store. Ring of Forging is an enchanted ruby ring, and must be player made or purchased. Use a Spirit tree teleport to the gnome stronghold, or Ardougne Teleport and head northwest to the gnome stronghold. You need to partially complete the agility course then do the two emotes in sequence. A painted herald steel kiteshield will not work. (Note: The emotes are actually performed on the south-west tree. This may be an oversight by Jagex.)
An adamant 2h Sword can be bought in Taverley (2-handed sword shop held by Gaius, at the very north of Taverley) or made at level 84 smithing. Rings of life and amulets of glory can be bought from the Grand Exchange or player-made at level 43 and 80 Crafting, respectively. A level 108 Double agent will attack. Sophanem is in the far southern desert, and requires partial completion of Icthlarin's Little Helper to enter. The cat-doored pyramid is located just south of the Pyramid Plunder pyramid. The most direct way is using Jalsavrah teleport with pharaoh's sceptre which teleports to the Pyramid Plunder pyramid; or use the magic carpet service to reach the city. Alternatively, a Ring of Slaying teleport to Sumona with a run across the desert or use of the magic carpets is an option. After Love Story, a house teleport tab to the Pollnivneach portal could also be used.
An iron chainbody can be bought at the chain store near the southern Falador entrance. Sapphire Rings are player made or purchased on the Grand Exchange. A longbow can be found in any range store, such as the one in Catherby or the Ranging Guild, or is in overstock on the grand exchange. The explorers ring 3 cabbage port, amulet of glory teleport, or Home teleport to Draynor will put you in the area.
Mithril platelegs are available in the Al-Kharid platelegs store and can also be made. The 2-handed sword can be purchased in Burthorpe, or is player made, and the spiny helm can be bought from a Slayer Master such as Mazchna, who is very close to the location. Use Fairy ring code C-K-S, the Canifis house portal, or the ectophial.
The steel full helm and Steel Platebody are in oversupply on the grand exchange, but can also be bought from stores or player-made. The iron plateskirt can be made or purchased in the Al-Kharid plateskirt store. The Party Room in Falador is best reached by the Falador Teleport.
The Bronze Dagger can be found on a table on the first floor of the Lumbridge Castle, player-made, or bought from the Grand Exchange. The iron full helm can be smithed or purchased on the grand exchange. A gold ring can be crafted or purchased on the grand exchange.
Polar Camo Top is made by bringing 2 Polar Kebbit Fur's to the Fancy Clothes Store in Varrock with 20gp or purchased on the Grand Exchange. Leather boots and gloves are easily crafted from basic leather or purchased. Use Lumbridge teleport,then enter the pass way you will need 10gp to get past. Then head north to the mine.
The fishing guild is located between Seers' Village and Ardougne. You'll need a sapphire amulet, an emerald ring, and a bronze chainbody. You do not need to go inside of the guild to get the reward. Make sure you use the jig emote, not the dance emote. The jewellery must be unenchanted, otherwise it won't work.
The snelm may be player-made at level 15 Crafting, or, more uncommonly, bought from the Grand Exchange. The pointed blue snail itself may be found just north of the fairy ring in Mort Myre (code BKR). A staff of air can be bought at the staff shop in Varrock or received as a monster drop. The bronze square shield may be player-made, received as a drop from Goblins, or bought from the Grand Exchange or the shield store in Falador. Shantay's awning refers to the Shantay Pass. Make sure to use the pointed snelm and not standard round one. The Broomstick from Swept Away places you almost exactly there. The magic carpet system can be used form the desert, otherwise the lodestone teleport to Al Kharid is probably best.
Iron boots can be obtained as a drop from a Cockatrice or Cave slime or bought in the grand exchange, the unholy symbol can be made or bought from another player or from the grand exchange, and a steel hatchet may be purchased from bob's axes or made. The beehives are just west of the Catherby bank, in the fenced in area. Use the Camelot teleport or Catherby lodestone teleport to get to the area.
No stores in the game sell these items, so they must be bought from the Grand Exchange, player-made through Crafting and Smithing, or received as drops from monsters. Note: Rune full helm (e) or any other variation of blue d'hide chaps (i.e. trimmed, gold-trimmed, Blessed, etc.) will not work. The Mountain Camp is east of Rellekka. Take a rope to get into the camp if you haven't done the quest Mountain Daughter. North of Fairy Ring (A-J-R). Teleportation via Slayer Ring is also an option.
P
Clue
Requirements
Notes
Panic in the heart of the Haunted Woods. Beware of double agents! Have no items equipped when you do.
None
One location considered as "The heart of the Haunted Woods"The location depicted is located south-east of the Fairy Ring (A-L-Q) and south of the farming area. There are two short mushrooms east and within sight (3/4 of the way to the edge of the minimap) of the fairy ring which the player can stand in between. Standing between these mushrooms is the location where the emote is to be done. Directly west of this clump of vegetation is a 'live tree' which will attack. Players should wear armour for this clue and bring food as they will need to fend off leeches and vampires until they reach the location. Stat restore potions are suggested for players under level 105 combat as the leeches may slightly reduce their stats. A level 108 Double Agent will attack, so equipping armour and a weapon again to kill him is recommended. Be sure to un-equip all items again only when it is safe to do so.
Bronze platelegs can be bought in Al Kharid, steel pickaxes in Dwarf Mines pickaxe shop, and steel helms in Gunnarsgrunn. The limestone mine is in the valley east of Varrock, near the odd old man. Use a Varrock teleport, a Digsite pendant, a Gnome glider, or the Balloon transport system to get to the area.
Mithril platelegs are found at the Al Kharid plateleg store or smithed at level 66. A Ring of Life is an enchanted Diamond Ring, which is bought from other players or crafted. Rune hatchets are bought from other players or smithed at level 86. Use the gnome glider, or Camelot teleport and Mithril Crossbow and Grapple to get to the area. If you've completed Love Story, you may use a chipped POH teleport to Taverley and go west to get there. You may need to kill the level 73 Big Wolf (and some of the other wolves if your combat level is low) before you perform the emote due to their aggression and their large hunt radius. A level 108 Double agent will attack.
Panic on the pier where you catch the Fishing Trawler. Have nothing equipped at all when you do.
None
The fishing trawler is in Port Khazard, north of Yanille. Panic on the dock where you board the trawler by the gangplank. Make sure to un-equip all equipment while performing this emote.
Mithril plateskirt can be purchased from Ranael in Al-Kharid or made with 66 Smithing (make sure it is a plateskirt), and a maple longbow can be purchased from Lowe in Varrock or made with 55 Fletching, don't forget to remove your boots. This clue is a bit vague, you actually need to panic on the mausoleum. The quest "Creature of Fenkenstrain" is required to reach it. The mausoleum is the small island where the player dug up various body parts. You cannot go directly as the bridge is broken, go to the graveyard east of the castle and push the eastern memorial to pass through the Experiment dungeon. Go north and west following the tunnel to the end and up the ladder. Use the ectophial, a Canifis teleport, or the fairy ring network (code ALQ) to reach the area.
S
Clue
Requirements
Notes
Salute in the banana plantation. Beware of double agents! Equip a diamond ring, amulet of power and nothing on your chest and legs.
None
An unenchanted diamond ring must be crafted at level 43 Crafting or purchased from the Grand Exchange. The amulet of power can be purchased or crafted with 70 Crafting and 57 Magic. The fastest way to get here is use the Amulet of Glory Karamja teleport, it puts you right inside the plantation. Players can also charter the Port Sarim ship to Musa Point or use Fairy ring code B-L-P to go to TzHaar City and head through the Karamja Volcano.
Bronze spears are very common drops from minotaurs and hobgoblins, and an even more common drop from goblins. Gold necklaces and rings can be either crafted, purchased from the Grand Exchange, or received as drops from the monsters in the Lumbridge Catacombs. The large mining pit is southwest of Falador and slightly northeast of Rimmington. Cabbage-port, Falador teleport, or use a Rimmington Tablet to get to the area.
Bronze platelegs can be made or purchased from the Grand Exchange or the platelegs store in Al-Kharid. Iron platebodys can be made or purchased from the platebody store in Varrock or Ardougne. Blue dragonhide vambraces (Blue spiky vambracesdo not work) must be either crafted at level 66 Crafting or purchased from the Grand Exchange. The clue refers the chaos temple in level 13 wilderness south of the Graveyard of Shadows, surrounded by lava, with a Bloodwood tree nearby (Do not go to the temple in level 38 wilderness or the entrance to the Chaos runecrafting altar). A level 65 Double Agent will attack. Note: Having Hartwin escort you seems to make this emote not work, so be prepared to walk. Warning: The area is multicombat, and player killers may attack you while you fight the Double Agent.
The sapphire necklace can either be crafted by using a gold bar, one cut sapphire and a necklace mould on a furnace, or buying it on the Grand Exchange. The Polar camo legs can be made in the Fancy Clothes Store in Varrock by bringing 2 polar kebbit furs and 20 gp. Oak shortbows can be purchased from ranging shops, made, or from the Grand Exchange. Teleport to Lumbridge or run from Draynor Village to reach the area.
A mithril chainbody can be purchased from Wayne's Chains in south Falador, smithed, or purchased on the Grand Exchange. Green dragonhide chaps can be purchased at the Champions Guild, or crafted. The (unenchanted) ruby amulet must be crafted or purchased from the Grand Exchange.Use a Ring of Duelling to get to Castle Wars, run north over both bridges, then north-northeast to reach a small collection of three houses. Climb down the stairs in the west building to enter the Observatory dungeon. Some poisonous spiders reside here, so taking some measure against their poison is advised. Use the Observatory Dungeon map to find your way through and up the stairs to the Observatory main building. Once there, head upstairs and perform the emote under the end of the telescope.
Leather chaps can be bought at the Ranging Guild or made. Yellow flowers can be made by planting Mithril seeds, or they can be bought from other players. The (unenchanted) sapphire ring can be made using the Crafting skill or bought from the Grand Exchange.
Iron platebody and studded leather chaps can be found in the Varrock armour shop. Bronze full helmet can be bought in Gunnarsgrunn. All three are easily crafted or smithed. Draynor manor, north of Draynor Village. Cabbage port, Lumbridge teleport, or amulet of glory to the area.
Players can smith an iron hatchet using 1 iron bar or buy one from Bob's Axes in Lumbridge. Steel kiteshields can be purchased from the shield store in Falador, or smithed. Mithril full helms can be player-made or purchased at Gunnarsgrunn or the Grand Exchange.The bridge spans the river between the Grand Exchange and Gunnarsgrunn. Varrock teleport, amulet of glory to Edgeville, or invoke the skull sceptre to get to the area.
Gold rings and leather chaps may be bought from the Grand Exchange or crafted with level 5 and 18 Crafting, respectively. Gold rings require a gold bar and a ring mould while leather chaps require leather along with a needle and thread. Steel maces may be bought from Flynn in Falador, bought off the Grand Exchange, or made using the Smithing skill with level 32 Smithing and 1 steel bar. Mudskipper Point is south-east of Rimmington, south of the house with the anvil in it. Use the cabbage port, fairy ring code AIQ, or Falador Teleport, or run South of the Port Sarim Lodestone teleport to reach the area.
Leather chaps and a hardleather body can either be crafted or bought at the Ranging Guild, Lowe from the Varrock Range store or the Grand Exchange. Bronze hatchets may be bought in Lumbridge from Bob's Brilliant Axes, the Grand Exchange, or can be player-made with 1 bronze bar. The lumberyard is northeast of Varrock and may be reached using a Varrock Teleport, a digsite pendant, a Lumberyard teleport scroll, or the balloon transport system. It is right in front of the sawmill operator.
An (unenchanted) ruby amulet must be crafted or purchased from the Grand Exchange. A mithril scimitar can be purchased from Zeke in Al-Kharid, smithed, or purchased from the Grand Exchange. An iron square shield can be player-made or bought from the shield store in Falador. The fastest and recommended way is to teleport using a Ring of duelling to Castle Wars. Alternatively, one could cast Watchtower Teleport, use Fairy rings, or use the balloon transport system to get to the area.
The holy symbol and leather vambraces (Spiky vambracesdo not work) can be made using the Crafting skill. An iron warhammer can be either made with the Smithing skill or purchased from the grand exchange. The Varrock Library is inside Varrock castle, on the north side. Use a Varrock teleport or a Spirit tree to reach the area.
File:Emote clue Yawn rogues' general store.pngAn iron sq shield can be made with the Smithing skill or bought from the Grand Exchange or the shield shop in Falador. Blue dragonhide vambraces (Blue spiky vambracesdo not work) can be made with level 66 Crafting or purchased from the Grand Exchange. An iron pickaxe spawns near the rock crabs by Rellekka, but it can also be purchased from the Grand Exchange, bought from Nurmof in the Dwarven Mine, or player-made after Perils of Ice Mountain. The general store is in the Wilderness Bandit Camp level 23, in the western wilderness. After yawning you will fight a level 65 double agent. Warning: This is a multicombat zone, and player killers may attack you whilst you are killing the agent.
During a Treasure Trail, a coordinate clue is a clue-scroll that contains a set of coordinates. Much like the real-world longitude & latitude geographic coordinate system, coordinates in RuneScape indicate a precise point somewhere on the surface where the next clue scroll, or potentially the treasure casket, is buried. Coordinate clues will only appear in Treasure Trails of medium or hard difficulty. The coordinates are presented in the following format:
In RuneScape, one square of space is roughly equivalent to two minutes (exactly 1.875 minutes). As there are sixty minutes in a degree, each degree is roughly equivalent to thirty-two squares. (Note: The above location is the exact centre of the Observatory and is not actually a coordinate clue location.)
After receiving a coordinate clue, players must locate the exact position (more precisely, the exact square) that the clue scroll indicates, using a chart, sextant and watch. Players can get these by going to the Observatory, talking to the professor. Brother Kojo, in the Clock Tower, gives the player a watch. The sextant can be collected from Murphy in the docks of Port Khazard. Players must have a chart and watch in their inventory or on their toolbelt, and a sextant and spade in their inventory, or summoned meerkats with scrolls or they will not be able to complete the clue. On that point, the next clue, or the treasure casket if the Treasure Trail is complete, can be dug up with a spade. Coordinate clues may take players all over RuneScape, to nearly any geographic region in the game (including the deepest levels of the Wilderness), although coordinate clues will never point players underground or into dungeons or buildings.
Saradomin/Zamorak Wizards
On hard Treasure Trails, digging on the correct spot will cause a Saradomin wizard to appear, which must be defeated before the next clue scroll or the treasure casket may be dug up. If the coordinates are located in the Wilderness, a weaker Zamorak wizard will appear instead. Saradomin wizards are poisonous and use both melee and the Magic spell Saradomin Strike, whereas Zamorak wizards use only the spell Flames of Zamorak. Players who use the special ability of meerkats to dig for the scroll or casket will receive it without triggering a Saradomin or Zamorak wizard.
Due to the current threat of player-killers, if the coordinates for your scroll is near level 36 wilderness it is advisable to use the waka canoe which requires 57 Woodcutting. This can take you to level 36 wilderness so that potential player-killers don't immediately spot you going into the wilderness and kill you. In addition, potential player-killers won't know whether you went into the wilderness or to a different area. As a result, you should go to one or more different locations, and then take the waka to the Wilderness. This is because if another player spots you in the wilderness, they might attempt to kill you.
Even when fighting the Zamorak wizard in the wilderness, another player can interrupt your fight. If you are attacked by a player, you should run either directly south, or into a single-way combat area filled with aggressive monsters. Player killers in pursuit of a target can be interrupted by an aggressive monster in a single-way combat area, provided the target does not retaliate.
A good strategy to use against either wizard (all hard coordinate clues involve one of them) is to bring along a dragon dagger. A dragon dagger's special attack used 4 times can almost kill either wizard with a combat level of about 90. It is also advisable to wear armour that specifically guards against either magic or melee while praying against the other combat form.
The following map may be used to roughly determine the location of a given coordinate clue:
However, precise descriptions for each coordinate clue are listed below.
List of clues
Following is a list of all known coordinate clues and their corresponding locations. The list is organised into ascending numerical value (for example, 00:00 north first, then 00:05 south, then 00:13 north, continuing accordingly). Shorthand writing is used together with normal writing. An example: 09.34N; 25.12E = 09 degrees and 34 minutes north, 25 degrees and 12 minutes east.
Remember: You must have a Chart, Sextant, and Watch in your inventory or nothing will happen when you dig with your Spade.Although the chart and watch can be in the toolbelt, remember you must bring the spade and sextant in your inventory.
Note that some of the clues may require skill or quest requirements before you will be able to get to that location. This may be frustrating for some players, and they will drop the clue scroll. So, in order to do every Hard coordinate scroll, Regicide, Legend's Quest, Nature Spirit, The Grand Tree and Watchtower must be done or partially completed to do the coordinates. Note that some coordinates will need a skill level to do, though the required stat is low.
In Tirannwn, dig by the western spawn point of the roving elves, near the Tyras Camp. Watch out for the stick trap.
From Tyras Camp: go north past the dense forest, walk a few steps east and go south past the stick traps.
From Lletya: go out of the city, past the trip wire, south over the leaf trap, past the elf tracker, west through the dense forest, over a second trip wire, north through another dense forest, then west and south past the stick trap.
On Karamja, west of the general store in the free-to-play section of the island, in the middle of the two small lakes. Currently there is an "undergrowth" on the location. However the reward can be obtained by digging 1 space south of it.
In an area with a pond directly north of the catapult used in Regicide, dig by the north-east edge of the pond.
From Lletya: Pass the tree, go west across the tripwire, continue west through the dense forest, continuing west past the Elf musician. Turn north and up the path to Prifddinas. Before the bridge and the water, head west through the dense forest. Then go west past another stick trap.
From Port Tyras: Go north through dense forest then east; go south through dense forest; step over tripwire; go east through the dense forest then northwest; jump leaves. Finally, continue west till you arrive at a elven lamp next to mushrooms. Head south down the small path to the pond. Pass the stick trap and dig by the north-east edge of the pond.
This clue can be annoying due to the frequency of activating the stick traps, which deal 80 damage. There is a better success rate of passing the trap by turning off run and walking past the trap.
Duel Arena in combat area. You will need to duel another player with Obstacles turned on to get to this spot. You will not get the Saradomin Wizard here. You cannot bring Meerkats familiars into the obstacle arena, so bringing a sextant and spade is required.
In the centre of the mine, north of Shilo Village. This is not the gem rock mine, but rather the one just northwest of the Nature altar, where you find Volencia moss during the Jungle Potion quest. Dig two spaces northwest of a mithril rock.
In the Ogre City. You must have started the Watchtower quest to gain access. After crossing the fourth bridge, stand next to the tree there and dig. Note: First time crossing you need 20gp and a rock cake.
On the island where Gorad is located. From Castle Wars, go east past Jiggig. At the southwestern side of Gu'Tanoth is a cave, enter this cave and you will end up on the island. Dig on the east side of the island, near a spear wall.
In Mort Myre swamps, over Nature Spirit's grotto, dig to the north of the grotto tree. Bear in mind that this is a Summoning-free zone, which means the Meerkats' special move cannot be used here. Warning: Druid pouches are recommended, because ghasts may rot your food.
On Cairn Isle, Karamja, (Fairy Ring - CKR is very close) dig in the centre of the hut with the broken walls, near one of the chameleon egg spawns. Remember to switch run mode off when crossing the bridge.
On the southern part of East Karamja, just north of some stepping stones across a waterfall. Dig in the brown patch of ground near the Jogres. The Gnome glider or the Juju teleport spiritbag destinations are close to the area.
In Mort Myre Swamp. Next lake south of the 2 most western fishing spots. Dig west of a rotting tree. Note: There are Ghasts in the swamp, be sure to bring a Druid Pouch or an Ouroboros Pouch.
South-west of BKR fairy ring (more precisely WSW) and slightly north-east of the fishing spot (the one just south-west of the words Morytania on the map), in the centre of Mort Myre swamp. Dig between the farthest east and middle logs. Warning: Bring druid pouches to prevent Ghasts from rotting your food.
In the south-west part of the Herblore Habitat area. A quick way of getting to the Herblore Habitat Area is to buy special teleports from Bettamax in the centre of Taverley for 2000gp.
In the south-west corner of the Kharazi Jungle on Karamja. Dig north of a skeletal corpse. Remember to bring a hatchet and a machete (and your Radimus notes if you have not finished Legends' Quest) to cut through the jungle.
At Tree Gnome Stronghold, in the south-west section you'll find a bridge, and a pen containing Terrorbirds. Open the gate by them and go to the edge of the river as far east as you can and dig there.
Go to the Baxtorian Falls, board the log raft, use a rope with the rock to get to the second island with the tree and dig in the centre of that island.
Near the previous location of Stealing Creation in level 11 Wilderness. There are 3 small mushrooms and lots of trees, dig in the centre of the mushrooms.
At the Bandit Camp in the level 23 Wilderness, dig south of the most northern lake in the northern-east corner, near the Giant rats. NOTE: Since the December 2011 Wilderness graphical update, this exact coordinate is covered by a wall. Digging one pace east of the northern point of that wall should yield your casket or scroll.
Level 28 wilderness, in the far east building of the Ruins north of the Graveyard of Shadows (the Summer's End farm). Dig on or near the steel platelegs spawn.
Level 29 wilderness just North-west from Bandit Camp, in the south-west section of the Forgotten Cemetery. Dig directly south of one of the graves, located in the second column from the south.
Level 34 wilderness just a little south-east of the Southern side of Red Dragon Isle by some Chaos Dwarves, you should see 4 large cave like objects. Dig almost directly in the centre of them. This place is easily accessible via the canoe system, just keep heading east from your point of arrival. Warning: This area is multicombat.
In level 36 wilderness, just north of a small lake by some moss giants. This can be difficult because of the nearby moss giants and skeletons. The wilderness canoe exit is a quick way to get here. If you start just west of the westernmost tip of the lake, walk 9 paces north and dig.
In level 36 wilderness, just beneath the lava maze, 3 paces west of the eastern most set of iron rocks in the hobgoblin mine. Dig just west of a cluster of 8 iron rocks.
Level 38 wilderness, the very west side where there is a Chaos Temple. Dig outside the building, just to the south of the altar. Warning: This area is a known hotspot for player killers, and certain areas around the altar are multicombat.
Level 41 wilderness, in with the lesser demons, west of the lava maze in the wilderness, about 3 steps west & 3 steps south of the ladder to the King black dragon. Do not enter the Lava Maze for this clue.
Southwest of two runite rocks just north of the lava maze, in level 46 wilderness. Warning: This area is a known hot-spot for player killers, and the areas surrounding it are multicombat.
At Demonic ruins level 47 Wilderness, middle of north-east room. Dig on the north-east pentagram, near one of the Burnt bones spawns. Make sure you have ground decorations turned on, or you won't be able to see the pentagrams. Warning: This area is multicombat, and a known hot-spot for player killers.
Inside the Rogues' Castle in level 53 wilderness, just north of the north-west tower. Warning: The Chaos Elemental lurks near the tower, and can hit very hard from all three corners of the combat triangle. In addition, the area is multicombat and a popular hot-spot for player killers.
A little bit north of the spider web in level 55 wilderness, north of the lever to teleport to Ardougne. Warning: This area is a known hot-spot for player killers.
Behind the Pirates' hideout in the level 56 wilderness - You have to dig directly north of the Pirate's bar - the casket is near the north-western corner.
Level 56 wilderness, dig on the north side of the magic axehut located north east of the Deserted Keep. The fastest way to get there is to pull the Ardougne teleport lever and be transported to the Deserted Keep. It helps to have Jennica's ring as you can access the Spirit Realm with the portal south of the building, and you can teleport out of the Wilderness while in the Spirit Realm.
Map clues are an image of the location the player needs to search to advance along their trail. Maps are found across all levels of clue scroll. They are rough pictures of a very local area, normally about the size of the Lumbridge Castle. If the map leads to an X, the player needs to take a spade to the place indicated on the map with the X and dig there. (The spade on a toolbelt will not work.) If the map leads to a crate, it must simply be searched. Sometimes players may find a small pile of crates, or a multitude of them. Search all of them until the next clue or the reward is found. Maps can include landmarks such as buildings, fish to indicate fishing spots, roads, rivers, bridges, and other things.
Map clues are not easy to do without help. Players will often find that they simply have no clue where the map is pointing to. A player can try to compare the maps to the world map, and they match up very well, but the area to compare is vast. It is easier to use the list below.
Digging in the location pointed to by a map clue will NEVER produce a Saradomin or Zamorak Mage, even at level 3.
List of clues
Following is a list of all known map clues with the exact locations they lead to. To make it easier to find the clue needed, it has been split up into categories: First with crates, then the maps with an X and buildings, then with an X but no buildings, and finally the maps with an X and a fishing spot.
Inside McGrubor's Wood, west of Seers' Village. Fairy ring code ALS. If approaching from outside, squeeze through the broken fence by the northern half of the hut in the centre and search the crate south of the house. Warning:Wild dogs.
North east of the Observatory, north of Castle Wars, south of Ourania Runecrafting Altar search a crate in the westernmost building of the goblin overrun houses. This house holds the entrance stairs to the dungeon below.
The Chaos Altar north of the Observatory, the entrance to the Ourania Runecrafting Altar. Stand and dig left next to the standards (flags) behind the altar.
Just south of the Wizard's tower, south of Draynor Village. Dig near the fairy ring (D-I-S), directly in front of the tower window (or just north of the fern).
Brother Galahad's house. Across the river from the coal trucks, west of Seers' Village. Follow the coal truck tracks all the way to the bridge.
Just west of the chemist's house in Rimmington. South of Falador, west of Port Sarim.
On Miscellania, one of the Fremennik Isles, just east of the castle. Fairy ring code CIP.
In West Ardougne, dig inside one of the destroyed buildings. It is in the northwest corner of the most eastern of the three destroyed housing buildings in the southwest area of West Ardougne. Head due west from the main gate and you'll get to the buildings.
South of Yanille bank. Behind the house with an anvil. It is right next to the "Mod Timbo Tree".
Just south of East Ardougne, north of the Tower of Life, near the Necromancer's tower. Dig 2 spaces north of the smaller crate that Bonafido is leaning on. Fairy ring code (D-J-P) is very close. Look for the construction worker usually counting in the mid thousands.
Start on the east side of the eastern most Magic tree east of the Ranging Guild and follow the coordinates on the map.
Maps with an X but no buildings
Map
Location
Image
North of Falador's walls next to gamer's Grotto inside the enclosure with oddly marked stones with no known purpose. Dig in between one of the large stones and the tree on the east side.
On the road between Seers' Village and Rellekka. Fairy ring code CJR. The two trees indicated on the map are oak trees. Dig in the spot indicated, just west of the fern.
When speaking to an NPC in a level 3 or 4 trail, the player may receive a puzzle box. Puzzle boxes are 'step two' of a clue: first the player has to find the right NPC to speak to (when they get a cryptic or anagram clue), and then they have to solve the puzzle, to advance along their trail.
Puzzle boxes are the RuneScape version of n-puzzles – they contain a scrambled image that players must work to unscramble by clicking on tiles to move them to an empty space. Once the puzzle box is completed, players will need to talk to the NPC who gave the puzzle to receive the next clue or the reward.
Many people find puzzle boxes daunting, but taken from the right approach they can be simple and quite fun. The game scrambles the puzzles by randomly moving pieces approximately 50 - 200 times. For information on how to solve them, go to the puzzle box guide page.
If the player wants a different puzzle, they can destroy the box (not the clue) and ask the NPC for another. If the player logs out, without finishing the puzzle, they will lose all progress and will have to start over again. However, if the puzzle box belongs to an elite clue, they will be unable to ask for another one, and must either complete the puzzle or drop the puzzle scroll box/casket.
Solution
The steps to solve a puzzle box the most efficient way without messing up the already-completed tiles.
To solve the puzzle, (refer to the picture to the right)
Begin by arranging from left to right, the first section (red) so that it matches the solution.
Repeat step one, however, with the second section (orange).
Repeat the process, however for the third section (yellow).
Correctly arrange the two tiles located in the fourth section (green).
Repeat the process as in step four, however for the fifth section (blue).
Lastly, arrange the last six tiles in the sixth section (purple).
When all of the tiles match the solution exactly, exit the interface to complete the puzzle.
Note: After a step is completed, DO NOT re-arrange any tiles in the previous step; just work with what you have.
List of puzzles
Following is a list of all known puzzle boxes. There are 7 different images for puzzle boxes. The completed puzzle also can be viewed by hovering on the Hint icon at the bottom left of the screen. When finished, simply close the box; if on a hard clue, speak with the NPC who gave you the box.
Note: Logging out with the puzzle unfinished will result in the loss of your progress and having to restart the puzzle.
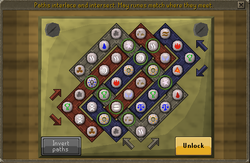
The Celtic knot is a puzzle from an elite treasure trail that must be solved in order to proceed further. It was released on 4 August2010 as part of the rework and expansion of the treasure trails reward system.<ref>Mod Mark. Behind the Scenes – July. 1 July 2010.*</ref>
To solve a real-life celtic knot puzzle, you must make the knot have rotational symmetry. A celtic knot puzzle has two solutions, as rotational symmetry can go two directions. An online interactive celtic knot puzzle can be found here.
Description
A celtic knot puzzle is based on decorative knots or chord designs, both physically and visually depicted in various art media, which usually are shown as being endless, interlaced, or continuously looping.
The RuneScape celtic knot puzzle consists of three loops, each one a different colour and with a different sequence of 16 runestones. It will appear on the screen when the player attempts to open a scroll box. The message at the top of the puzzle reads, "Paths interlace and intersect. May runes match where they meet," which eloquently describes the goal of the puzzle as well as its function. The arrows are used to move the runestones on a loop one space in the desired direction, and there is a button which can be hovered over to "flip" the puzzle, revealing the runestones hidden under the intersections. Once all runes are matched (indicated with a green circle surrounding the junctions of the loops), the knot can be "unlocked" to open the scroll box.
Strategies
There are two procedures that can be undertaken here, either manually or automatically using an online tool.
Matched intersections between the primary (red) and secondary (blue) knots.
The general algorithm to solve these puzzles is as follows:
First choose one ring. This will be your primary ring.
Choose another ring to be your secondary ring.
Choose a spot where these two rings intersect to focus on. Begin by matching all possibilities of the secondary ring to the rune of the primary ring at the intersection you are focusing on.
If, when this intersection turns green, all other intersections of these two rings are not green, turn the first ring one spot and try again. Keep doing this until all of the intersections between the first two rings are green
Finally the third knot (silver) was rotated clockwise one turn to complete the puzzle.Lastly, turn the third ring to match the first two.
If all possibilities of one intersection on this ring are tried, and the puzzle is not solved, move the first ring one space and keep trying.
When all intersections are green, click "Unlock" to solve the puzzle.
Below are simple ways to solve the puzzles. These may not be all the types
of puzzles.
6-spot intersection
Move the red knot clockwise up to 16 times. You are looking to match tA celtic knot with 6 intersections.he two intersections where the red and blue knots meet. A green circle indicates matching intersections.
If the two intersections are not matching after a full rotation of the red knot, move the blue knot clockwise once.
Repeat until the two intersections match.
Simply move the silver knot until the remaining four intersections match.
8-spot intersection
Move the red knot clockwise 16 times. You are looking to match the four intersections where the red and File:Celtic Knot.3.pngA knot with 8 intersections.silver knots meet. A green circle indicates a matching intersections.
If all four intersections are not matching after a full rotation of the red knot,
move the silver knot clockwise once.
Repeat until the red and silver intersections match.
Simply move the blue knot until the remaining four intersections match.
10-spot intersection
Move the red knot clockwise up to 16 times. You are looking to match the four intersections where the red and silver knots meet. A green circle indicates a matching intersection.
If the two intersections do not match after a full rotation of the knot, moveFile:Elite Knot02-10spot WS.pngA knot with 10 intersections.
the silver knot clockwise once.
Again move the red knot up to 16 times until the two intersections match.
Continue this process until you match the two intersections between the red and silver knots.
Next move the blue knot until the remaining eight intersections match.
A knot with 12 intersections.
12-spot intersection
Move the red knot clockwise 16 times. You are looking to match the four intersections where the red and blue knots meet. A green circle indicates a matching intersection.
If the four intersections are not matching after a full rotation of the knot, move the blue knot clockwise once.
Repeat until the four intersections match.
Simply move the silver knot until the remaining eight intersections match.
Tips
Players may rotate the knots either clockwise or counter-clockwise. The direction does not matter.
If the last knot will not match, the first two knots may not be matching correctly. Try another intersection combination.
If a particular type of Rune is on one knot but NOT another (for instance, the blue knot could have 2 Soul Runes while the red knot has none), you can immediately deduce this Rune can NOT be placed at any intersection between those two knots.
A compass pointing due North.A compass spinning when on a different layer than the clue is pointing to. (Click to animate)
A compass is a part of a treasure trail. This update was released on 4 August 2010.
When you click on the elite clue, the screen will centre north and point the direction of next clue. It only gives direction, not distance. Try teleporting to various cities to triangulate the location of the clue. Another method is to teleport to certain locations by using Fairy rings to save money and make the triangulation more precise. When you are standing in the correct location, an X will appear in the middle of the compass interface.
Note: Any of these clues can trigger a dangerous Guthix wizard. Always be prepared! Remember bringing a Meerkat familiar with the scrolls eliminates the need to kill a Guthix wizard if one spawns on the compass location.
Locations
The locations in this guide are grouped by region. The following map may be useful in consultation:
And another spot in the sheep pen south-west of the Farming Patches north of Ardougne; go to the far south of the pen, hugging close to the building nearby.
There is a location just west of the Gnome Maze, south of Ardougne, and slightly southeast of a fruit tree farming patch.
Between the Necromancer Tower and the Ardougne Zoo, there's a spot of field that goes into water.
South east of the church south of Ardougne. Next to a broken cart.
North of Camelot Castle and southeast of Sinclair Mansion, between some trees.
South of the combat training camp unlocked in Biohazard, north of Ardougne
Just north of the Seers village bank and north-east of the Hops Patch. To access it either head south from the Rellekka Poh or east, north then west from Seers village.
At the start of the path to Mountain Camp, east of Rellekka, north of the musician
A example of a scan clue when the "Read" option has been selected.
Scans are a type of Treasure Trail clue only occurring with elite clue scrolls. They were added to the game as part of the Treasure Trail update on 4 August2010. They are immediately recognisable by the orb attached to the clue scroll. Scans clues require going to a particular region and scanning in order to find the next clue (or the casket).
To start the clue, players must first right-click the scroll and select the "Read" option to find out in which region to search. Then they must go to this region and use the scroll's "Scan" option to scan for the correct spot. This may be anywhere within the stated region, so it is important to scan in different parts of the region in order to find the correct location. When the correct spot is within the orb's scan range, using the scan will detect it. When this happens, an arrow will appear above the dig location, and also on the minimap. Once the spot has been located, players must dig there to receive the next clue or the casket.
A Spade or a Meerkat familiar is needed to dig up the next clue. Using a spade, there is a possibility that a level 125 Guthix wizard (or level 110 in the Wilderness) will appear and attack the player. This wizard will need to be killed in order to successfully dig. Using Meerkats, players can avoid the possibility of having to fight a Guthix wizard.
Since the location may be anywhere within the region, scans require a certain amount of patience, since there is no quick and easy way to find the correct location. It is also advised to continually click scan as you move around, and to try not to miss any part of the area as you pass through it, taking note of the orb's scan range.
When you walk into the dungeon, head down the stairs past the vines and in to the first entrance to the north until you come to an area with moss giants and lava. Scan and you should find it.
Southern most area in the room with the greater demons.
Near the middle of the room containing Iron and Steel Dragons.
It is possible, although trivially rare, to get the same clue step up to 3 times in a row. For example, a player could be asked to speak to Zeke in Al Kharid 3 times in a row, then get the clue scroll reward, or another clue step. Although this is sure to leave a player thoroughly confused, it is normal and should not be cause for alarm or bug reporting for that matter.
It is possible to have more than one scroll as drops on the floor at the same time from two kills. The player may never pick up more than one scroll however.
If you do have more than one clue drop, it is possible to solve both by drop carrying them to each place. This however is very time consuming and requires you to finish all clues for both in order to get a single reward.
An update on 4 August 2010 allows you to now see the level of the clue in parenthesis.


.png)


.png)


_-_Level_21_Wilderness.png)


.png)


.png)
.png)


.png)
.png)


.png)


.png)


