Love Story


| |
| Release date | 5 July 2010 (Update) |
|---|---|
| Members only? | Yes |
| Quest series | None |
| Official difficulty | Master |
| Official length | Medium |
| Developer | Ashleigh B |
Love Story is the second quest in a series that involves the Wise Old Man of Draynor Village. It was announced in a Q&A and a Developer's Blog from 12 May 2010<ref name="devblog">Mod Ash. "Love Story: Return of the Wise Old Man". 12 May 2010. Developers' Blogs. *</ref>. Several things are revealed in this quest, such as why the Wise Old Man has his telescope pointing at the Wizards' Tower and more about the Draynor Bank Robbery.
Official description
| “ | The Wise Old Man of Draynor Village has retired from his long career as an adventurer, following the events of Swan Song. However, the peace* of his retirement is about to be shattered when an extremely unpleasant figure emerges from his past to wreak havoc on him (and you). Prepare to join forces with the Wise Old Man to fight, not just for your lives, but for the reputation of adventurers everywhere.
*It might have been more peaceful if he hadn't decided to rob a bank. |
” |
Walkthrough
| Start point: | ||
| Members only: | Yes | |
| Official difficulty: | ||
| Description: | None | |
| Length: | Medium/Long (30 minutes - 2 hours) | |
| Requirements: |
| |
| Items required: |
Recommended items:
| |
| Enemies to defeat: |
|
A damsel in distress

Note: You must have the required skills while talking to Mabel to start this quest.

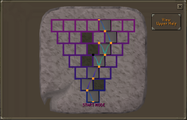
Talk to Mabel in the barn north-east of Draynor Village and north-west of Fred the Farmer. She will be crying all the time and cannot stop until she gets her ring back, which is just upstairs. She cannot get it herself because she is "too distraught". Agree to help her find the ring and climb the ladder just north-west of her. You will appear in a small maze of hay bales, with the ring at the other end. You can push one or two bales at a time to reach the ring, which is fairly easy. The solution is:
- As you arrive, go north once and push the one hay bale there all the way to the western wall.
- Standing where you are, push a pair of hay bales at your immediate south twice.
- Now, go one square east and push another pair of hay bales to the south.
- Push the single hay bale directly west of you.
- Finally, push the two hay bales to the south of you to clear the path.
As you take the ring, there will be some explosions and screaming downstairs. Climb back down, only to see Mabel hiding in sack, which she won't come out if you speak to her. There is a woman, Zenevivia walking around. Speak to her and ask everything, she will confiscate the ring. She seems to know you and recalls a few quests you've done, such as Swan Song, Garden of Tranquillity and One Small Favour. Eventually, she will set you on a task: get her a twig. Search any hay bale to get one and talk to give it to her. She will thank you and say no more. Speak to her again. If you ask if you can do anything else, she will ask for another twig, repeating this process. Asking for a reward will really trigger her anger towards adventurers who do quests for random people and expect rewards for it, after which she will reveal to know Dionysius (the Wise Old Man) and that she has been following him, but after the events of Swan Song switched to following you. Then she will challenge Dionysius and you to a battle to the death so that she can prove that she defeated the two greatest adventurers in the world. You can ask her some questions, but after accepting the challenge she will teleport away.
The Great House Robbery
| Items needed for this section:(All boosts you need), A chisel, a mithril bar, a steel bar (or clockwork), 2 oak planks, good armour, food (sharks or rocktails), an anti-dragon shield, combat gear and 2 free inventory spaces. |

Go to Draynor Village and talk to the Wise Old Man, who will know Zenevivia and reveal that they used to be lovers and he misses her a lot. A cutscene will take place of their meeting, adventures and break-up (a fight to the death).
He will tell you to meet him outside, then he will follow you to Rimmington. You must go there on foot, if you teleport he won't follow you, although it is possible to cabbageport or use a skill necklace to the Crafting Guild with him still following. Talk to him outside his house and agree to go. Talking to people like the Guard in tree results in humorous conversations. Go to Rimmington, to the house portal and talk to Dionysius. He will attempt to get into his old house but will not be able to because Zenevivia has removed it from the Teleportation matrix so that it cannot be entered (otherwise you two could enter in Building Mode and delete everything). He will tell you to meet him in the house of Hengel and Anja, "friends" of him. He will also tell you to bring a chisel. Even if you have got one already, he will go to the house (resulting in a humorous thought). Go to Hengel's house just east of the portal and talk to Dionysius (if needed, boost your Magic to 77 now). Ask about what to do. He will explain about chipping teleport tablets to reach the magic inside and modify the teleportation location. He will give you 100 tabs. Use the chisel on one of them to chip it, then talk to Dionysius, who will tell you to open the tablet. Do so, and a puzzle will appear. There are two tablet halves. Start with the bottom one. Using the connections to the right, you must lead the magic from the yellow dot at the bottom of the half to a point at the top. Black squares, dead zones, have been harmed by chipping and can no longer conduct magic. The same for the upper half, which is a bit tougher. The screen will close when the solution is correct.
-
 Bottom of the puzzle
 -
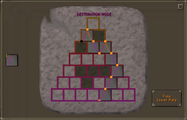 Top of the puzzle


Zenevivia's House


Note: If you leave the house at any time, you must rechip another house tablet and break it near Dionysius in Hengel's house, requiring 77 Magic.
Stand next to the Wise Old Man and break the chipped teleportation tablet. You will be teleported to Zenevivia's house, which she'd completely renovated.
NOTE: The house is NOT SAFE. If you die, your gravestone will appear in Rimmington, outside the house portal, and you will arrive at your respawn point. Thus, it may be a good idea to do this part on World 31, since that is the House Party server, and so there are many people there to bless your gravestone. The closest hub is Falador. However, an explorer's ring will always be kept on death, so it is handy to die with one, should you die.
He will comment that she has redecorated, and note that you have to go through the dungeon to reach her. Tell him to go into the dungeon (which is east of the entrance) first, and it will show a short cutscene of him getting seriously injured by a trap. He will tell you to bring a steel and mithril bar and two oak planks. If you had them already, another humorous conversation will take place. Use the steel bar on the clockmaker's bench in the workshop, just north of the entrance, to make a clockwork. If needed, boost Smithing, Crafting and Construction and talk to Dionysius about what to do next. He will suggest to make a dummy to confuse and disable all the traps. Sit behind the bench and make a dummy, with the man's instructions. Now put the dummy in the dungeon. The controls are easy: just like normal walking.
WARNING: During this part, there will be a pulsating purple light around your screen, as seen on the picture, any players sensitive to flashing lights should proceed with caution. An update on 19 July added an interface to reduce the light's frequency. If you suffer from vertigo you will still be affected and breaks may be needed.
Remember:
- The two stair rooms have one trap each, in front of the stairs.
- The rooms with pit guardians have two traps each.
- Except for the room with the pit scabarite, which has only one trap.
Deactivate all the traps by walking upon them and then return to the surface. You can attempt to use the stairs in the last room which will cause The Wise Old Man to offer to return the dummy immediately or you can choose to go through the rooms yourself and go up the first set of stairs. You can now safely enter the dungeon and fight yourself a way to Zenevivia.
The dungeon pit

Enter the dungeon and enter the first room. The monsters are not aggressive, but will begin fighting after Dionysius has attacked them, which he does almost immediately. Especially on the lower levelled monsters, but also on the dragon, he can hit high in the 100's, but rarely higher than 200.
- Pit dog (level 52) - A very easy fight. Dionysius alone should be able to kill it within 2-3 hits. Kill it, enter the next room.
- Pit ogre (level 62) - Same as the dog, easy opponent. Just kill it and enter the next room.
- Pit rock protector (level 120) - The rock protector may cause slight problems, but attacking it with crush and with help from your companion he should go down quickly. Should he hit frequently, pray protect from melee.
- Pit scabarite (level 150) - Not very accurate, but hits high. If needed, pray protect from ranged. Dionysius won't damage this one a lot, so it depends mostly on you.
- Pit black demon (level 172) - As demons are weak to magic, Dionysius will hit often. Just attack it until it's dead. Pray against melee.
- Pit iron dragon (level 204) - If you have fought metal dragons before, this should not be hard. Remember to equip an anti-dragon shield, AND drink an antifire (or super-antifire) potion. If ranging (which is convenient for the final battle), stand a few squares away and attack the dragon, along with Dionysius. He will hit fairly frequently. Attack it until it goes down. Using antifire while ranging with an anti-dragon shield will nullify all damage.
Now enter the final door and talk to Dionysius, who will want to make up with Zenevivia. If you are ready to fight, go upstairs.
After talking to Zenevivia you can teleport out to prepare for the last fight. You won't have to fight the monsters again.
Love Hurts
Talk to Zenevivia - Dionysius will try to talk to her, but she is too angry with him and starts the battle. Attempt to defeat her with the Wise Old Man. You will need melee and range or magic (ranged heavily advised) as she teleports around on top of 4 statues. She makes flames appear on the square you are standing on, so you must move around to avoid being damaged by the flames.

She will attack both you and Dionysius with Blood Barrage, which can hit high AND heals her, so pray against magic at all times. First, attack her with ranged. Remember to run around the room! She will summon flames every few seconds and if you do not get off quickly, they will very rapidly hit 30-40 life points every game tick, which cannot be blocked. Eat when necessary and continue attacking her. When she yells "Aha!" she will create a fire around her, destroy one of the statues and teleport onto it. At this point, she will use Protect from Missiles if you range and Protect from Magic if you are using spells. Dionysius can still damage her, but you cannot. Now, she will also cease attacking but summon flames about every second. Equip a melee weapon (preferably a dragon halberd, otherwise you must stand as shown in the image and get hit by a lot of flames) and attack her with one square between you, otherwise she will kick you and summon a fire under your landing spot (you cannot move for a short while after a kick). When she's lost enough health, she will teleport back to the ground. Attack with ranged again until she goes to another statue plinth. After the last statue, she will still attack with Blood Barrage, but her flames will become rarer (one every ~6 seconds), but will cover a larger area, about 6x6 squares. So run from one side of the room to another while shooting arrows at her. When she is defeated, she will be on the ground in front of the throne. Talk to her.
Tips

- Do not rely on the Wise Old Man to deal damage, because he does not hit often, although he can lower her health quite a lot if you are patient and endure long enough.
- Zenevivia cannot be poisoned, and she seems to have strong defence against melee. If you intend using melee, it is recommended to bring a super set.
- Dionysius can be damaged to make his entire health bar red, but he will never die, as Saradomin will heal him.
- Good melee fighters can finish the fight relatively quickly by standing between the statues while she is on a statue, and attacking with melee. This prevents her kicks from pushing you away, and allows you to keep attacking. She will still attack with the area fire spell, but you can alternate between eating and melee blows.
- Because Zenevivia kicks you straight back, you will cross or land on existing fires if you run straight at her for a melee attack. Run up to her on a diagonal, and you'll save a few seconds of fire damage.
- If you can't / don't use halberds, another tactic is to bring runes for any attack spell, and cast against her until she activates her Protect from Magic prayer. At that point, switch to ranged attacks. You can get 1 - 2 hits in on her before she changes prayer again.
- If you teleport out during the fight (or enter the safe dungeon pit), Zenevivia will be healed when you return. You will not have to fight the dungeon monsters again, or do the puzzle again. To return, use a chisel on a house teletab, then break it while standing next to the Wise Old Man, who will be back at Anja and Hengel's house in Rimmington.
- Be cautious about running downstairs to escape her attack, as you may receive multiple hits by the Flames of Zamorak spell. However, this has been an effective method of escape for some players.
They are lovers again. - A Zamorakian or Dragon Spear special attack will push her off the pedestals, so that you may attack her normally. It really makes the fight easier than just using a Dragon Halberd, which has a slow attack speed.
- A Ring of life may be used which will take you to your respawn point - really useful if it is Falador - where you can restock and meet the Wise Old Man back in Rimmington if you should happen to nearly die. Otherwise, you can just enter the dungeon and ask him to teleport you to Falador or the Grand Exchange.
- Moving your house to Rimmington is also useful, you can use Teleport to House to retrieve your gravestone quicker.

Robbing the Wizards' Tower

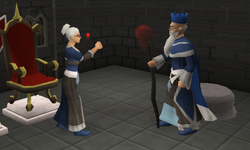
After you have defeated her, Dionysius will tell her about the Draynor Bank Robbery and that he is a self-centred battle-mage like her, and she will confess also having missed him and they forgive each other. There will be a cutscene and you will return to Draynor Village. Ask Zenevivia about Mabel's ring. She will inform you that she and Dionysius will plan to rob the Wizards' Tower to replenish their depleted supplies, and they tell you to watch from the telescope. She will also not give you the partyhat Dionysius gave her as "borrowed items cannot be traded". Go upstairs and look through the telescope and watch the Wizards' Tower Robbery. After defeating all the wizards, they are attacked by a giant familiar Thingummywut, summoned by the seemingly incompetent Traiborn. Players cannot see it, but they can see the incredibly rapid Earth Surges it uses to attack. Upon their return, ask about the robbery and then for Mabel's ring, and your rewards will be given and explained to you.
Congratulations, quest complete!
Rewards

- 2 Quest points.
- 50,000 experience in
 and
and  .
. - 40,000 experience in
 and
and  .
. - 30,000 coins.
- 2 extra spins on the Squeal of Fortune (if completed after 24 April 2012).
- Any unused House teleport tablets (as many as 99).
- Ability to make Teleport to house (chipped), allowing players to teleport to any one of the POH portals.
- Dark Stone Player-owned House decorating style (free).
- Cost of servants reduced by 25%.
- Ability to build Dungeon pits in your Player-Owned House.
- After returning Mabel's ring, Mabel gives a bankable lamp, which grants 10,000 experience in any skill over 60.
- After the quest, you can talk to the Draynor tree guard at Draynor Village and offer to chop down the tree to help him down; he will then reward you with 5,000 coins.
- Adventurers who have completed the quest may wish to travel to Keldagrim to talk to a dwarf called Runvastr (lives on Keldagrim's east side in the house directly south of the pickaxe shop. ). If you deliver his diary to the Wise Old Man back in Draynor Village, you’ll earn the ability to chip Teleport to House teletabs to take you to Trollheim as well.
Music unlocked
- Love Story - during cutscene of the couple's previous lovelife.
- Love and Hate - Dungeon pit.
- Love Bites - Boss Battle.
- Love Lost - Zenevivia's house.
Trivia
- On the first day of release in the knowledge base, the rewards were covered by the message: The spoilers were left on a hay bale a few metres away. At time of writing, no adventurers were available to get them for us.
- Zenevivia saying, "Help me, *Player Name* you're my only hope." is a reference to Star Wars.
- After completing the quest, the Adventurer's Log reads: After a lot of fighting, I reunited the Wise Old Man with his lost love.
- When the player is about to enter Zeneviva's dungeon for the first time, the Wise Old Man mentions the potential for traps. The player will then have the chat option of 'Traps. Very dangerous. You go first.' This is a reference to a famous line in the movie Raiders of the Lost Ark of the Indiana Jones series.
- Even though The Wise Old Man refers the Hengel as his friend, Hengel will say "please don't let him hurt us" upon telling him you're with the Wise Old Man.
- Upon getting to the house portal for the first time there is a reference to the I.T crowd about hooking the house up to the matrix.
References
<references />