Dragon Slayer
- "D slayer" redirects here. For the Demon Slayer quest, see Demon Slayer.


| |
| Release date | 23 September 2001 (Update) |
|---|---|
| Members only? | No |
| Quest series | Guild |
| Official difficulty | Experienced |
| Official length | Long |
| Developer | Paul Gower |
The Dragon Slayer is a free-player quest available in RuneScape. This quest is regarded as the most difficult for free-play players. Dragon Slayer is usually the last quest that free players embark on. Upon successful completion, players gain the ability to equip the Rune Platebody and the Green d'hide body. It was also the last quest in RuneScape to be released before the addition of membership.
Official description
| “ | Prove yourself a true hero. Kill the mighty dragon Elvarg of Crandor Island and earn the right to buy and wear the powerful rune platebody. | ” |
Development team
- Developer: Paul Gower
- Conversion: James B
- Audio: Ian T
- QuestHelp: Nishal K
Rework
- Developer: John A
- Graphics: Paul B, Kavi M
- Quality Assurance: Kevin D, Christopher E
- QuestHelp: Gillan M
Walkthrough
| Start point: | |
| Members only: | No |
| Official difficulty: | |
| Description: | None |
| Length: | Long (60 - 90 mins) |
| Requirements: |
|
| Items required: | For the boat
|
| Enemies to defeat: |
*Some of these creatures may have to be defeated more than once as the keys to Melzar's Maze are not a 100% drop. Of the monsters, there is only one of each that drops the required key. They can be noted by small differences stated in the guide. |
Oziach's armour

To start the quest, speak to the Guildmaster in the Champions' Guild, located just below the southern entrance of Varrock. After talking to him, you will be directed to Oziach, located in a tiny house situated just south of the Wilderness and north-west of the Edgeville bank, directly north from the Edgeville lodestone.
Oziach says that, to be able to purchase a rune platebody from him, you will have to slay Elvarg, the mighty female dragon, residing within Crandor Isle. He will tell you to re-visit the Guildmaster for information on how to kill Elvarg.
Go back to the Guildmaster. Talk to him about the map pieces, about protection against dragon breath, and about buying a boat. After speaking to him about the map pieces, he will provide you with a Maze key. (If you do not talk to him about all three things, you will not be able to move on)
The anti-dragon shield

Travel to Lumbridge and speak to Duke Horacio on the 1st floor[help] of the Lumbridge Castle. Ask him about "a shield that will protect you from a dragon's breath," and when he asks you which dragon you're going to use it to fight against, tell him that you will be slaying the fearsome Elvarg of Crandor.
He will then give you an anti-dragon shield and tell you a bit more about the story of Elvarg and the fall of Crandor.
Note: If you lose your current shield, you can always talk to him again to obtain another. It is also possible to receive multiple shields by talking to him again; there is no need to use the drop trick as he'll be happy to give you multiple shields.
It is also possible to just buy the shield from the Grand Exchange or another player because the game marks this part of the quest as completed by just having the shield equipped or in your inventory. By doing this you will save some time that would be spent getting the shield from Duke Horacio, however, getting the shield from him completes a task.
Cartography

To reach the island of Crandor, you need to obtain a Crandor map, but, for the safety of the people of Asgarnia, the map has been torn up into three pieces and stored in different places. You need to gather each map piece from these locations to complete the Crandor map. You do not have to do this in order; it does not affect the quest.
Note: It is possible to make an extra map and keep it after the quest. See the Crandor map article for a more detailed explanation.
First map piece
For this section, it is recommended that you have a combat level of at least 35 and a substantial amount of food. Prayer of 43 would be HIGHLY beneficial as it would allow the player to completely avoid all damage and level 30 to 40 defence as the higher the armour level the more chance of defeating the wizard Melzar the Mad and the lesser demon. One of the map pieces is found inside Melzar's Maze, which is south of the Crafting Guild. Bring some food and armour. To enter, use the maze key on the door.
-
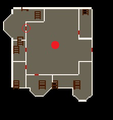 Ground floor plan
 -
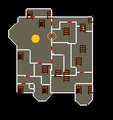 First floor plan
 -
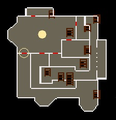 Second floor plan
 -
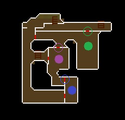 Basement floor plan


- Kill the smallest zombie rat with the long tail, and it will drop the red key. Use this on the north-west door, then go up the ladder. It is a good idea to get several keys from it.
- The orange key is dropped by ghosts. You must kill ghosts that wear the hooded shirt without cape until the orange key drops, then go through the middle door, second from the north, on the east wall and climb the ladder.
- Kill the skeleton with the small round shield (buckler) which drops the yellow key (not the skeleton with the square shield or no shield). Use the key on the south-west door and keep climbing down until you get to the zombies.
- Kill the zombies to get a blue key. Make sure to open the BLUE door, NOT the exit door. If you go through the exit door you'll have to repeat the above steps again.
- You must now fight Melzar the Mad. He primarily uses melee attacks but be cautious of his magic, mainly Fire Strike and Weaken. While you are fighting him cabbages will pop out. This is the initiation of the magic attack. Although they heal only 10 life points, picking and eating the cabbages is advised if you have low life points. When killed, he drops the magenta key. Use this key on the magenta coloured door.
Note: If you decide to rest in the room where you fought Melzar the Mad, he will revive and attack you again, so it is recommended to quickly move on to the next room.
- You now have to fight a lesser demon, which drops the final green key you need.

- If you plan to use melee attacks, it is recommended that you use Silverlight or a rune longsword.
- Lower-levelled players can defeat the demon using magic or ranged from a safespot (though you would have to move around a bit).
- It is recommended that you have a reasonable amount of food if you have a low combat level (for example, lots of lobster or swordfish).
- If you have a Magic level of at least 15, you can collect bones from zombie rats then cast Bones to Bananas, bananas heal 20 LP.
- If you need to escape you can run through the brown door on the left of the entrance, the demon is unable to attack you 3 paces away from the door.
- If you don't think you can do it, then get a higher level player to attack it, and then you can finish it off.
- Once the demon is defeated, open the final green door, and take the map piece from the chest. Check that you have the map piece in your inventory before passing through the door up the ladder or the maze will need to be negotiated again to get it. Climb the ladder and exit the building through the entrance.
Note: If you did not speak to the Guildmaster earlier about the Oracle, return to the Champions' Guild and speak to him once more before proceeding to the next part.
Second map piece


Travel to the Ice Mountain, which is west of Edgeville and north of Falador (you must speak with Oracle before attempting to open the door), and ascend to the northern-most part of the mountain and speak to the Oracle, who is standing beside a tent. She will tell you a riddle which holds the answer to the location to one of the map pieces:
| “ | "The map's behind a door below, but entering is rather tough This is what you need to know, You must use the following stuff: First, a drink used by a mage, Next, some worm string changed to a sheet, Then, a small crustacean cage, Last, a bowl that's not seen heat." |
” |
To obtain this piece of the map, you'll need :
- An unfired bowl,
- A Wizard's Mind Bomb which can be bought in Falador for 3 coins,
- A lobster pot or a crayfish cage which can be purchased in Port Sarim's fishing spot (or if you don't have enough money you can kill goblins just outside the shop, or you can obtain a free crayfish cage in Lumbridge)
- A piece of silk, which can be located in any of the shops within Al Kharid or in Varrock.

Once you have obtained all these items, venture down into the mysterious and damp Dwarven Mine, just northeast of the Falador Lodestone. Inside the mine is a room with a sealed door in the northeast part of the mines, just north of the scorpions. When you've found it, use all the items on the "Magical Door." Be sure to use the Wizard's Mind Bomb with the door, as the left-click action for it is to drink it. The items will disappear after usage.
Note: Trying to use the items on the door without consulting the Oracle results in the message "I have no idea what I should put in the opening of this door. Maybe I should just leave it for now."
When you open the chest inside the room, you get the following message:

| “ | "Here I rest the map to my beloved home. To whoever finds it, I beg of you, let it be. I was honour-bound not to destroy the map piece, but I have used all of my magical skill to keep it from being recovered. This map leads to the lair of the beast that destroyed my home, devoured my family, and burned to a cinder all that I love. But revenge would not benefit me now, and to disturb this beast is to risk bringing its wrath down upon another land. I cannot stop you from taking this map piece now, but think on this: if you can slay the Dragon of Crandor, you are a greater hero than my land ever produced. There is no shame in backing out now." |
” |
Be sure to "search" the chest after this message in order to obtain the map piece.
Third map piece
You must go to the Guildmaster and ask how to obtain Lozar's map piece. The third map piece is in the possession of a goblin named Wormbrain, who is being held in the Port Sarim Jail. Head to Port Sarim jail and talk to Wormbrain.

There are two ways to obtain this map piece:
- Beat up Wormbrain using Ranged, Magic or a halberd and cast Telekinetic Grab on the map piece (requires 33 Magic, or if your Magic level is not high enough, a Wizard's mind bomb can be used accordingly to acquire 33 Magic). Remember to only use a Wizard's Mindbomb if you are level 31 or 32 as effects don't stack.
- Speak to him and pay him 10,000 coins for the map piece.
After obtaining all the map pieces, simply use one of them on another to complete your Crandor map.
Lady Lumbridge
When you spoke to the Guildmaster, he told you that there is a ship for sale in Port Sarim. You need to buy it from a sailor who goes by the name of Klarense, in one of the southern docks in Port Sarim.
The ship will be damaged, so you will require:
- 90 steel nails (You can craft the steel nails with level 34 smithing (6 steel bars makes 90 nails) or buy them off the Grand Exchange).
- 3 regular wood planks (other variations, such as oak, won't work). Non-members can obtain them by collecting the respawns in the Western Ruins, Graveyard of Shadows, andForgotten Cemetary in the Wilderness or buy them off the Grand Exchange. Members have the extra option of cutting down 3 normal trees, and making the logs into planks at the Sawmill northeast of Varrock (300 coins will cover the cost of making the planks).
- A hammer to repair it. If you don't have a hammer, you may purchase one from a nearby general store or take the one found in the upstairs room of the Falador forge. A golden hammer can be used as a substitute for a regular one.
After obtaining and bringing all the aforementioned items, along with 2,000 coins, head over to Port Sarim and look for Klarense at the southern docks. Buy his boat, the Lady Lumbridge, for 2,000 coins. Board the ship and descend the ladder. Make sure to repair the opening in the hull by using the planks with the hole. Using each plank consumes 30 steel nails. Do this three times to repair the hole completely.
Venture forth to Draynor Village and converse with Ned, located in the house just north of Miss Schism. He sells and crafts ropes. Make sure to bring your map and ask him to captain the ship and assist you in sailing to Crandor. He agrees and asks you to meet him on your ship in Port Sarim.
The fight
Preparation
Note: There are no safespots in the cavern and Elvarg can hit up to 120 lifepoints worth of damage with her firebreath attack, even if an anti-dragon shield is equipped and far more if it isn't.
- Before setting off for Crandor Island, stop at any bank. Withdraw your anti-dragon shield, a weapon, your best armour suited for your fighting style, any potions you may need, runes/bolts (if maging/ranging), teleportation spells, and fill the rest of your inventory with food (Lobsters or swordfish for non-members and sharks for members).
- Make sure your health isn't low because Elvarg can deal up to 600 life points if you are not wearing an Anti-dragon shield. It is a good idea to light a bonfire and add logs to it to obtain a lifepoint bonus for a limited amount of time.
- Elvarg can be killed in more than one trip, so if you run out of food you can always re-bank, come back and Elvarg's lifepoints will still be the same as when you left off. However, this only applies if no other players are doing the quest simultaneously. If you leave and someone else enters the dragon's lair while you are gone, and succeeds in slaying the dragon, it will regenerate with FULL life points.
- To quickly reach Crandor, in case you are making more than one trip, you must first unlock the south secret passage wall from Crandor heading to Karamja Volcano, so you can use it to travel from Karamja to Crandor, without the need to talk to Ned or sail via the Lady Lumbridge. For obvious reasons, you can't use this passage from Karamja before reaching this point in the quest.
- After unlocking this passage, it becomes the only way to reach Crandor, as Klarense won't let you board the ship again under the excuse that it is another ship (he supports this by painting Klarense's Cruiser on top of Lady Lumbridge).
- However, if you do leave mid-battle and forget to open the secret passage, you will need another three planks of wood and 90 nails to repair the vessel. Ned will already be on board ready to sail again.
Note: A grave will appear on death, as normal.

Strategies
If your Prayer level is high enough, Protect from Melee will block Elvarg's melee attacks; a combination of Protect from Melee and an anti-dragon shield will negate melee damage and reduce fire breath damage to a maximum of 120 lifepoint damage.
Members:
- Use of antifire potion completely negates the damage from Elvarg's dragonbreath attacks, when used in combination with a shield. Players with 85+ Herblore can make use of Super antifire potions to obtain complete immunity against the dragon breath, removing the need to wear the anti-dragon shield, and they can safely equip two-handed equipment.
- Bringing prayer potions so as to be able to use prayer for the entire battle, in combination with antifire potions, is very helpful.
- If you run out of food and don't have an emergency teleport, members can enter TzHaar, via the nearby cave entrance, and use the bank there. In addition, TzHaar will become the spawn hub, in the event of death, making it much easier to reach your gravestone. Teleporting away when low on food and life points is wise, unless you can kill Elvarg in one or two more hits. Use of a ring of life, or a teleport tablet, for a quick getaway in case of emergencies, is recommended.
Players may also use a dwarf multicannon here.
Melee
Being a dragon, Elvarg is weakest to stab attacks, thus the best weapons to use are shortswords and longswords - the shortswords are one tick faster, however have less strength than the longswords; but they both have equal accuracy.
- Members who have completed Lost City can use a dragon dagger (p++) special to poison Elvarg, then follow up the rest of the battle with a dragon longsword to kill the dragon quickly and very efficiently.
- If you use a slashing weapon, such as the rune scimitar (or the Dragon scimitar), you can still defeat Elvarg but you will not hit her as often.
- Crush attacks perform only moderately well against Elvarg, therefore using battleaxes, warhammers, two-handed swords or pickaxes is not recommended for a quicker battle.
- Using corrupt dragon equipment will increase the chance of success, but it comes at a much larger cost. The best corrupt weapon to use is the corrupt dragon longsword due to its high stab attack bonus.
Note: Avoid using Silverlight or Darklight, as they do little damage and are very inaccurate, effective only against demons.
Ranged
Ranging is inadvisable for non-members due to the lack of any decent one-handed ranging weapons. If you still want to use ranged on the dragon, make sure you are using a crossbow since it is one-handed, unlike a two-handed bow, since you need to be able to equip the necessary anti-dragon shield.
- Members are recommended to use enchanted bolts. Bring plenty of bolts as the battle will not be easy, and wear your best Ranged equipment.
- A good outfit for non-members is rune chainbody, green d'hide chaps, green d'hide vambraces, rune full helm, power amulet, anti-dragon shield, crossbow and about 300-500 bronze bolts.
- As most Ranged armour do not have high melee defence, make use of the various obstacles located within the south-east area of Elvarg's lair, behind the wall of stalagmites. This won't protect you from her dragonbreath, which can hit at a distance, but will keep you away from her melee attacks.
Magic
Magic is not a recommended approach to fight with Elvarg. If using magic, use Wind Blast or a stronger spell is highly advised, however Fire Bolt is the minimal Spell to defeat Elvarg. Using Fire Blast, combined with items that boost your magic level and magic-boosting prayers, is the most recommended method when using magic.
- Mages will need to keep away from Elvarg, by hiding behind stalagmites, as her melee attack will hit very accurately. A large amount of food will likely be required.
Elvarg
Board your ship, and talk to Ned. Tell him you're ready to sail to Crandor Isle. A short cutscene will play, during which Elvarg flies over your ship in circles and sets it on fire! Cabin Boy Jenkins will start to panic. He will catch on fire, receive damage of 100 life points and, sadly, dies.

After crashing on the island shore, make your way across the island to the peak, avoiding the progressively stronger monsters (the Skeletons are level 24, the Moss Giants are level 42, and lastly the two Lesser Demons on the summit level 82). Run past the lesser demons and enter the hole into the heart of the island.
Another cutscene plays, showing Elvarg's lair, full of bones, skeletons, and a silhouette of a warrior that came before (and was burnt-down) on the wall, before moving the camera angle to Elvarg, showing her as if she was slowly moving towards you.
Move past the skeletons until you see Elvarg behind a short wall of spikes protruding from the ground on the east. Climb over it, making sure that your anti-dragonfire shield is equipped, and begin the fight.
Delivery to Oziach

Once you kill Elvarg, a cutscene will play during which you cut off Elvarg's head. It will appear in your inventory. Leave Crandor and take the head to Oziach, who will declare you a worthy member of the champion guild and give you your reward.
There are several ways to leave Crandor after the fight:
- Home Teleport can take you directly to Edgeville.
- Using the wall that you unlocked before, you can reach the Karamja Volcano. From there on, you can sail to Port Sarim, from the Karamja port.
- Members can use an amulet of glory to teleport to Edgeville.
- Using a player owned house with a mounted glory, it can be quite efficient to use a house teleport tablet as this saves inventory space, as well as all items being protected upon death in a player owned house if the teleport is at the same time as death. Here a player can use a mounted glory to Edgeville.
- Using the Edgeville lodestone can also be used for a free teleport that is located close to Oziach
Note: If you lose the head, you are not required to go back and kill Elvarg for another. Simply return to Oziach and the quest will end as normal. You can bank the head, but it will disappear after you receive your reward.
Congratulations! The quest has been completed.
Reward

- 2 Quest points
- The ability to equip a rune platebody and a green dragonhide body.
- 18,650
 experience
 - 18,650
 experience
 - Access to all of Crandor Island
- Anti-dragon shield (given by Duke Horacio in the beginning, and whenever you want another)
- Access to Melzar´s Maze (with key)
- Access to dragon crest on herald capes
- 2 extra spins on the Squeal of Fortune
Music unlocked
- Attack 2 (under Crandor)
- Melzar's Maze (music track) (Melzar's Maze)
- Dangerous Road (under Karamja Volcano)
- The Shadow (Crandor)
Required for completing
Completion of Dragon Slayer is required for the following:
- Heroes' Quest
- Karamja Tasks:
- Medium: "Back Cran-Door" and "Dungeons and Dragons"
- Varrock Tasks:
- Medium: "The Body Shop"
- Lumbridge and Draynor Tasks: (You only need to complete the section The Anti-Dragon Shield)
- Medium: "Always Be Prepared"
Trivia
- After completing the quest, your Adventurer's Log will say, "To prove my worthiness to wear rune armour and join the Champion's Guild, I travelled to Crandor and slew the dread dragon Elvarg."
- It used to be that when Elvarg died, the player would be teleported outside with the Quest Complete banner without cutting off Elvarg's head. There was no need to return to Oziach afterwards.
- Elvarg used to be locked in a cage with a door to pass through, rather than a wall to jump over.
- In RuneScape Classic, Telekinetic Grab was the only way to complete the quest after some quest items were made untradeable, as there was no option to buy the map piece from Wormbrain. Thus the quest carried a requirement of 33 Magic.
- After completing the quest, if you talk to Juna, your character will say, "...So with Elvarg the dragon dead, the master of the Champion's Guild let me in, and I was able to wear a Rune Plate!"
- Dragon Slayer is the only F2P quest with an Experienced difficulty.
- After completion of the quest, when trying to board the Lady Lumbridge, Klarense will tell you that the ship is not yours, but his new ship. Your player will point out that it has Lady Lumbridge painted out and another name on it. Klarense will deny your accusation and the conversation will be over. If looked at the right angle in the ship you can see the holes are repaired.
- When killing wormbrain, it is possible to obtain a spin ticket, so it may be worthwhile to bring a second cast of Telekinetic Grab.
| Novice |
Black Knights' Fortress • The Blood Pact • Cook's Assistant • Demon Slayer • Ernest the Chicken • Goblin Diplomacy • Gunnar's Ground • Imp Catcher • Myths of the White Lands • Pirate's Treasure • The Restless Ghost • Rune Mysteries • Shield of Arrav • Stolen Hearts • Swept Away • Vampyre Slayer • What's Mine is Yours |
| Intermediate | |
| Experienced | |
| Removed quests |
Learning the Ropes • Prince Ali Rescue • Romeo & Juliet • Sheep Shearer • Unstable Foundations • Witch's Potion • Doric's Quest |
|
Italics denote that the removed quest was later made into a miniquest. | |
Template:Featured article nl:Dragon Slayer de:Der Drachentöter pl:Dragon Slayer fi:Dragon Slayer cs:Dragon Slayer es:Dragon Slayer bg:Dragon Slayer