Icthlarin's Little Helper

| |
| Release date | 26 April 2005 (Update) |
|---|---|
| Members only? | Yes |
| Quest series | Desert |
| Official difficulty | Intermediate |
| Official length | Medium |
| Developer | Chris J |
Walkthrough
| Start point: | ||
| Members only: | Yes | |
| Official difficulty: | ||
| Description: | In the deep south of the desert, unrest is brewing... The cities of the Menaphites have barred their gates to all. An unsettling desert wanderer may know of a secret entrance though, to Sophanem - the city of the dead.
Will you become Icthlarin's Little Helper by entering? Enter into a titanic struggle for the soul of the high priest of Icthlarin in a land where the cat is top dog. | |
| Length: | Medium-Long | |
| Requirements: |
| |
| Items required: |
| |
| Enemies to defeat: |
|
Important Notes:
- It is possible to get out of the city without purposely dying, finishing the quest, or using a teleport. There is a small crack in the north-eastern corner of the wall near the locust. You can re-enter the city from a rock north-east of where the quest started, directly north-east of the tent where the wanderer is.
- It is also possible to use a Hellcat as the cat you are required to bring with you for this quest.
- 3-4 waterskins are recommended- remember, one will be taken from you by the wanderer right at the start. You will not need water within the city, and there are places to fill your water.
- Note that wearing a lot of weight will make you die faster in the desert. Take this into account- bring more waterskins if you are bringing a lot of armour and weapons with you.
- Note that jumping the pit is risky. You will not always make it, even if you have 100 run energy and nothing equipped.
- The 126 Possessed Priest and one of Apmeken, Het, Crondis or Scabaras are not hard to defeat with the help of prayer.


Deeply Into My Eyes
To start, visit the Wanderer by her tent just west of the Agility Pyramid.
The Wanderer will have a strange reaction ("Arghhh get that cat away from me. Quickly please.") to your cat if you have one. (if you don't have it with you, it won't work.) Select "Why? What's your problem with it?" as your response since this is the only one of the three options that will let you proceed with the quest. The wanderer will then tell you that if you get your cat away from her, she will tell you about the secret entrance to Sophanem. The Wanderer's reaction is rather more extreme if you have a hell-kitten. Once your character picks the cat up, the wanderer will ask for a tinderbox and full waterskin(4). Once you give them to her, she will hypnotize you and you'll enter a small cave (you can now use this passage to enter the city at any time). The entrance to that cave is north-east from wanderer's tent, in a rock. You will enter at the eastern side of the city.
You will end up outside a pyramid in Sophanem many hours later, and a Canopic jar will appear in your inventory, which you can't bank, but turns to dust if you drop it. If you wish to be insulted by the ghost you find yourself next to, you can speak to it using a ghostspeak amulet. Touch the north door of the southern pyramid to begin the first flashback.
If you ever have to leave Sophanem and want to get back in, just enter the small cave east of the wanderer. You will find yourself in the midst of some locusts. Be prepared to fight (if you need food, gather their meat) or run towards the west.
Flashback 1
Every now and again during the quest, you'll experience a flashback where you remember what you did while you were hypnotised. You need to play through these in order to progress through the quest.
Beware, dying in the flashback is no different from a normal death! Make sure to bring plenty of good food. Also, a mysterious force will block any teleports, so be careful.
You will have access to an altar, and your health will be restored, once you finish the flashback.
During the first flashback, you will need to go through the pyramid. You'll see some wall crushers. Avoid them at all costs.
Stepping diagonally will mean avoiding them. If you touch them, you will receive 80 damage to your health. Once you're past the crusher blocks, you'll find pit traps in the next hallway. If you step on the wrong spot, you'll fall into a pit and end up at the beginning of the pyramid, and dealt 50 life points. There are a series of white blocks along the wall, at which you must turn at certain points. Go along the left until you reach the first rectangle. Walk one more square forward, then walk to the right. At the next rectangle, instead turn left at it. The next turning point is right between the candlestick and the next rectangle. At that point, turn right. At this point, it is a good idea to situate your screen so the passageway is vertical, so you step in the right places. Be sure to keep auto-retaliate off so when the mummy attacks you, you do not step in a trap. The image to the right shows the path to take to avoid the traps.
You'll see Mummies (level 84). They are aggressive, but not very strong and you do not have to fight them; simply run past them. You may also see Scarab swarms (level 112) crack out of the ground. They hit extremely fast (once every game tick) for low (0-20) but very accurate amounts of damage and can poison you for 38 life points, although they move slowly. Continue to some more wall crushers. Three squares south of these wall crushers, there is a safe spot to sit and heal. If you stop right in the middle of the narrow passage before the Scarab Swarm room, you will not yet have triggered the Scarab Swarm to attack and you can rest. Past these, you'll eventually find a large pit. Jump over it with running option turned on and both hands free, (note that it is possible to jump the pit successfully with items equipped, though it is recommended to jump without) you will need at least 20 run energy to do this. If you fail to clear the pit you will return to the area right after the floor traps and take 50 life points.
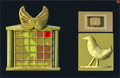
When jumping across the pit, if you find yourself constantly falling despite having the 20% run energy needed, check your weight. The more you weigh, the less likely you are to complete the jump. Using the rest feature to regain full energy may also prove helpful, but can't be used if you are poisoned. Please note that different puzzles may be presented, and that one must reset the puzzle many times to get this one. One possible solution to the puzzle is below:
-
 First get a puzzle like this.
 -
 Then click on the place where the red highlight is.
 -
 You get a picture like this. Click again on the red highlight.
 -
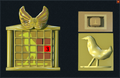 You get a picture like this. Click again on the red highlight to complete the puzzle.


Go to the left (west) door and open the puzzle door. You need to solve a puzzle. The objective is to flip all of the tiles onto their gold sides. There is no required number of flips that you must make, nor is there any sort of limit. Each time you flip a tile, the 8 tiles around it will also flip. Once you've solved it, you'll wake up, fully healed, outside the pyramid.
After Flashback 1

After you finish the flashback, talk to the Sphinx (with your cat), asking for help, and she will ask you this question: "A husband and a wife have 6 sons. Each son has one sister. How many people are in the family?" The answer is 9. If you guess wrongly, you will lose your cat! Once answered correctly you will receive a Sphinx's token so you can speak to the High Priest.
Go to the High Priest, located on the west side of the city (in the temple), and ask him about the remains. He will tell you to put them in the burial chamber, and that you will need the help of your cat. Before entering the pyramid, take note of what examine text you have when examining your canopic jar.
Remember-To enter the pyramid right click on the door and click open.
Go back through the pyramid. When you again try to jump the pit, you'll enter another flashback.
Flashback 2

You'll be starting exactly where you left off with your last flashback. Go through the door (no puzzle this time) and pick up the jar that you had in your inventory before (there are four on the ground). Depending on your jar, you will fight a different guardian god: either Apmeken (examine text has a lid shaped like an ape, level 75), Het (man, level 81), Crondis (crocodile, level 75) or Scabaras (bug, level 75). Their levels range from 75 to 81. Protect from Magic (or melee depending on the attack) prayer can make this battle quick and simple. He can also be trapped behind the table and killed with magic or range if he is using melee to attack.

Once you've defeated it, pick up the same Canopic jar. Jump back over the pit to end the flashback. If you ever find yourself out of antipoison, kill Locusts in the city and eat their meat for 30 life points each. You can also stand in the middle of a bunch of locusts and let them attack you, the meat will stack on the ground.
- Crocodile: Crondis (level 75) - She uses Magic attacks.
- Bug: Scabaras (level 75) - He uses Melee attacks.
- Ape: Apmeken (level 75) - She uses Magic and Melee attacks.
- Man: Het (level 81) - He uses Melee attacks.
After Flashback 2

After the flashback is over, you will say to yourself that you think you should put the Canopic jar back. Go to the west door. This time you have to solve a puzzle identical to the previous one. Turn all of the tiles to their gold side, then enter the room. Drop the jar where you found it and go back to the High Priest. Run back through the pyramid, and let yourself fall through the pit traps to be taken to the beginning of the pyramid. You will take some damage. At the beginning of the pyramid, there is a ladder. Take this ladder to exit the pyramid.
He will ask if you could prepare a ceremony by helping the town's Carpenter and Embalmer. Find the Embalmer to the south of the temple and talk to him. He will ask for a bucket of sap, linen, and a bag of salt. To get a bag of salt, you can either buy it from a slayer master or go to the lake north of Sophanem and use an empty bucket on it. Then use the bucket on the centrepiece inside of Sophanem in the southeast region of the city. You will pour the bucket of water into the font, and the water will evaporate, leaving salt that was in the water. Search the font and take the salt. A bucket of sap can be obtained by using a knife with an evergreen tree while you have a bucket (you can use the bucket on the evergreen if the knife is in your tool-belt). Then head to the city's eastern side to find the carpenter. Give him your willow log. (After the quest he will buy willow logs from you at 40gp each in groups of 1, 2, 5, 10, and 20.) Next, head a bit north to the linen worker, named Raetul with a purple headpiece. Buy a sheet of linen for 30gp. Then go back to the Embalmer. Give the items to him. (After the quest he will buy buckets of sap from you at 30gp each in groups of 1, 2, 5, 10, and 20.) Again, speak to the carpenter and he will give you a holy symbol (you may have to wait a bit for him to finish making it. He will not work on it while you are offline.)
Next, go back into the southern pyramid (pray at the altar if needed) and try to jump the pit. When you try, you'll enter another flashback.
Note: The carpenter will not give you the symbol until after you've given the embalmer his goods.
Flashback 3

You will find yourself outside the west (left) room and will have an Unholy symbol in your inventory. Go to the east (right) room. Enter it and use the symbol on any Sarcophagus on the walls. Go back through the door and jump back across the pit.
Searching the sarcophagi is not suggested and can result in poison gas (7 poison damage) or scarabs attacking.
After Flashback 3
You will speak to yourself again, saying that you should not have done that. Jump across the pit again and reenter the eastern burial chamber. After a cutscene, you'll learn that the Wanderer was behind it. She is really the Devourer, Amascut, an evil goddess, and she'll possess one of the priests. You will fight a level 126 Possessed Priest, who attacks using bolt spells. Use Protect from Magic prayer and kill him. This fight is very easy, if you have level 60+ stats in combat and maybe 2 or 3 salmon (or any food of preference). He will drop a 4 dose potion of either attack, strength, magic, defence, or agility.
Talk to the High Priest again then leave the room.
Flashback 4

You'll experience another flashback. This one is simply a cutscene. You will be escaping from the pyramid, and Icthlarin, god of the dead, will de-hypnotise you with the help of the previous high priest.
After Flashback 4
You will find yourself back in the eastern burial chamber. Exit the chamber, jump back across the pit, making your way back through the pyramid to the start. Return to the temple (southwest in the village) and talk to the High Priest to complete the quest. Note that if you have food and don't feel like making your way back through the pyramid, just fail the pit (by holding something in your hand - note that this may not always work) and then purposely stepping on a trapdoor to get back to the beginning with only around 100 life points lost.
After emerging from the pyramid talk to the High Priest in his temple.
Congratulations! Quest Complete!
Reward
- 2 Quest points
- 4,500
 Experience
 - 4,000
 Experience
 - 4,000
 Experience
 - Amulet of Catspeak
- Access to the city of Sophanem
- 2 extra spins on the Squeal of Fortune
Music unlocked
Required for completing
Completion of Itchlarin's Little Helper is required for the following:
Afterwards
If you wear the Amulet of Catspeak and talk to your cat, you can watch a final cutscene where you are first hypnotized by the wanderer and given the Unholy symbol. Your cat will then explain to you what the wanderer's plans were all about.
Trivia
- When you talk to the wanderer with your cat out (or let it out during the conversation), the wanderers eyes suddenly turn red, and once the cat is picked up, her eyes turn green again. This is a reference to her being the Devourer.
- Before, when the Ring of Life was used during the flashback, you would be teleported out of the flashback, but you couldn't enter Sophanem again. This bug has been fixed by Jagex.
- Even if you manage to get rid of the Canopic jar, upon entering the pyramid you'll get a message: "You see a strange jar on the floor. It seems oddly familiar, as if you'd seen it before, so you decide to pick it up."
- Most of the quest is very similar to the backstory of the play Oedipus the King by Sophocles, in which a Sphinx sets a plague on the city of Thebes and to save the city, Oedipus has to answer a riddle correctly.
- Upon the completion of this quest, one's Adventurer's Log will read: "I was being controlled through visions, but my mind is my own again, after the god of the dead intervened with the Devourer’s mind control."
- There is a glitch that after the quest you may still have a Canopic Jar in your inventory. If you try to bank it, a prompt will say "A magical force prevents you from banking that item," which is the same thing that happens when attempting to bank an XP Lamp.
- There is a glitch where if you tell your cat you're confused about what happened, after the flashback you might lose your cat. This can be fixed by logging out and in, your cat will then return.
- After completing the quest, if you talk to Juna, your character will say, "...And with the amulet I received, I could understand the language of cats!" to which she replies, "It is a rare privilege to understand the language of those beings. You should listen carefully to all that they say - but not believe too much of it."
- When going into the Sarcophagus room while the priests are doing the ritual, if you unequip an item or edit your state while your character is talking, you will appear outside of the room as it was before going in, saying to yourself that you should keep to the storyline.
- During the flashback from talking to your cat after completing the quest you remember being hypnotized, if you look in your inventory, you already have the jar, even though you haven't actually stolen it yet.
- If you try entering the pyramid again with your catspeak amulet on your cat will simply say meow
- The High Priest makes a reference to Shakespeare's The Merchant Of Venice by saying "All That Glitters Is Not Gold" when your character asks what the reward may be.