Troll Warzone
Troll Warzone is the name for the Burthorpe and Taverley area as a whole, and also the name of the tutorial sequence that takes place in the area.
Note: If you do not wish to complete the tutorial, you can open the task list, select options, and click "Tutorial is ON," so it changes to "Tutorial is OFF." This may save many people lots of time. If you change your mind, or if you've accidentally turned off the tutorial by teleporting out, the tutorial can be turned back on in the same way.
Tutorial
Stop Them In Their Tracks!
The tutorial starts when you enter the area. Higher levelled players are given the option to play through or not, while new members and lower-levelled players are taken straight to Burthorpe to start.
Note: if you originally decide not to "play through it," you may still complete it. To do so, talk to the corresponding people.

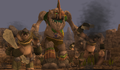
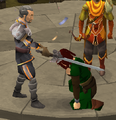
A voiced cutscene lays out the trolls' opinion on humans and their ambition to wipe them out. This cutscene can be watched again by talking to Major Corothers next to the bank chest. Linza forges a sword and people go about their daily tasks as a wave of trolls flood down out of the mountains, under fire from Imperial Guard cannons. The surviving trolls flee into a cave. The player is shown approaching the cave with two Imperial Guardsmen, where Ozan, a third guard and Linza are waiting. As Linza hands you the sword she was forging, a troll attacks, killing two guards. You enter the cave with Ozan and the remaining guard, leaving Linza outside, where you find a level 12 Troll general. You kill the general, and hear crying when you talk to Ozan; a baby troll crawls out from behind the rocks, and Ozan chooses to spare it and take it outside.
-
 It's a troll invasion!
 -
 Retreat!


Ozan tells you to go outside and speak to Captain Jute, who is by the Troll Invasion guardhouse. Jute reveals that the trolls are bypassing their defences using a tunnel from Death Plateau, and they can't collapse the Burthorpe end because it might bring down the castle with it. Jute wants you to fire the cannon on top of the roof to block the other end of the tunnel.
Use a rope ladder to reach the castle roof. Click on the middle-north cannon to fire it and block the tunnel. Then speak to Major Nigel Corothers, located south of the castle near the training circle, to tell him you've blocked the tunnel. He tells you that Burthorpe, which has been bearing the brunt of the attacks, and Taverley, which has been sending aid, are in bad shape, and he wants you to go around helping people where you can.

First talk to Corporal Keymans who is standing at the bank chest about the baby troll. Ozan has dumped the baby troll with him and he doesn't know what to do with it. He is the one that you can claim the baby troll pet from, if you want it.
Machinery Of War
Talk to Isold, south of the training circle. Trolls killed his wife and so he wants vengeance, but he has found out that the Imperial Guard hasn't got enough equipment to give to new recruits and so he only has a sword and some tools. He needs a bronze helmet and some gloves.
Find Tobias Bronzearms, west of Isold, to get a bronze pickaxe. Then you can hear someone calling for help in the mine to the west. Enter it and follow the path to the west. Click on the blocked tunnel to free Linza and two miners that are trapped. As a reward for saving them, Linza gives you the

Next go out of the mine and find Martin Steelweaver, to the east of the furnace, and get a free hammer from him. Find Jack Oval, south of the furnace, and get a free chisel, needle, and some thread. Put all the tools in your toolbelt.
Kill a cow wandering around the south of Jack Oval, to get a cowhide. Tan it at Jack Oval. Click the tanned cowhide and make leather gloves. Go into the mine and get a tin ore and copper ore, then smelt it at the furnace to make a bronze bar, then use the bar on an anvil to make a bronze helm. Talk to Isold to give him the items, and after a short cutscene he will go to find Major Corothers. You will now have the ability to fit a chisel to the Dwarven army axe and you gain bonus experience when working with clay or leather.
Hell's Kitchen
Run south to find Sister Judith, next to the flax field. Taverley is full of hungry refugees, and all their food is sent north to the Imperial Guard in Burthorpe. Judith wants help to gather some more.
Go north again and trade with Head Farmer Jones to get some potato seeds. Get a seed dibber, rake and spade if you don't already have them. Rake the farming patch to clear it of weeds, then use the potato seeds with the patch to plant them. Use the weeds on the compost bin.
Go east to find Ayleth Beaststalker, and get a bird snare from her. Set up the snare and wait to trap a bird.
A simpler way would be to kill the troll commandos, troll ranger commandos and troll mage commandos to the north, as they commonly drop cooked food. You could also get some from the bank chest in Burthorpe.
Take four pieces of cooked food to Judith and the refugees. There are cows in the field if you need extra. A permanent fire is located near Judith. after you've given the food you receive a knife that fits with the axe; it gives bonus experience when cooking as well as hunting Polar Kebbits orCrimson swifts.
The War Profiteers
Talk to Ruth Savage, located inside The Pick and Lute pub. She says that greedy merchants are hampering the war efforts. She asks you to help her do something about it. Go outside and find a Pompous Merchant and pickpocket him. Then talk to Nails Newton to start the Let Them Eat Pie quest.
Fetch an empty pot from Mess Sergeant Ramsey, go south then east to find some dead trolls with fishing bait next to them, then collect some wheat from the field south of that. Go north to the watermill and put the wheat and the bait in the hopper on the first floor, then empty the bin on the ground floor to get a pot of maggoty flour. Take the flour back to Nails. Next go north and get a raw crayfish and bury it in a field. Get a crayfish cage from Nicholas Angle to catch the crayfish. Go west to the flax field and you'll bury and retrieve the crayfish automatically. Take the manky crayfish back to Nails. Now he wants you to stick a potato in a kebbit hole. Dig up your potatoes from earlier and take one of them to the small, snowy hunting area northwest of the flax field. Use a potato on a hole, then go back to Nails with the stinking potato. Use the potato and crayfish with the pie crust, then use the uncooked pie with the pub's oven to make Terrible pie. Go back to the mill and pickpocket Foppish Pierre to get some expensive spices to disguise the smell of the pie and turn it into a mouth-watering pie. Take the pie to Rolo the Stout, on the first floor of The Pick and Lute. He will eat the pie and immediately become ill. WARNING - if the sound of vomiting makes you ill, do not listen to the full sound track. After talking to Nails, go back upstairs and steal the seal from the chest. Take it to Nails, and he will use it to stamp the letter, which he tells you to take to Pierre. Pierre reads the letter and agrees to open the food store. Go back to Nails and tell him of your success. Quest and stage complete.
The Corrupted Depths
Speak to Jacquelyn Manslaughter, across the river from the watermill, to start the next section of the tutorial. She will tell you that there are gelatinous creatures gathering in a cave to the south, and that you should talk to Turael/Spria to find out what to do next.
IMPORTANT: You must not currently have a Slayer assignment to complete this next task. Furthermore, if you have completed Smoking Kills and currently have a task, this will count as reassigning a task and hence reset your task completion streak. Therefore, it is advisable to first finish your current task or skip it using Slayer points.

Turael/Spria will ask you to kill 5 gelatinous abominations. They will give you a slayer gem. Collect some free spiked gauntlets from Jacquelyn and go east then south to the island in the middle of the lake and into the cave there. Speak to Ariane and she will join you in trying to find the source of this new threat. either kill the abominations now with her help or after the boss.
Run south and you will find Magic Stick, a Troll Shaman, near a subterranean spring. He and Ariane will start fighting. Assist Ariane. After defeating the troll, talk to Ariane and she will eventually teleport away.
The Spirit Masters

Find Magestix in Taverley to continue. He will teach new players how to summon. Make a Spirit wolf pouch and summon it. The wolf will tell you there is someone trapped in a burning building nearby. Follow the road north to a burning building, and go in. Jump over the destroyed floor. Make sure you have both hands empty and talk to Nora. She has sprained her ankle and needs you to carry her out. Jump back over the destroyed floor. There will be a cut scene of the druid's putting out the fire. Nora will give you an axe blade to fit the Dwarven Army Axe that will give you bonus xp when chopping or burning normal and oak logs.
Watery Grave
Speak to Olga by the riverbank behind the stalls. Her daughter Sophie has fallen into the river, but can't swim. Olga has tried throwing a rope to Sophie, but keeps dropping it. You have to make a bow and some arrows to fire the rope into a rock. Cut down two trees to get logs. Use a knife to fletch one into an unstrung bow and the other into arrowshafts. Get feathers from Alison Elmshaper, killing chickens or hunting crimson swifts. Get flax to make a bowstring from the flax field where you buried the crayfish earlier. There is a spinning wheel near Jack Oval north of the cow pen to spin the flax to a bowstring. To get bronze arrowtips, you can either buy them pre-made from Alison Elmshaper or mine some more tin ore and copper ore. Use the tin and copper ore on the furnace to get a bronze bar. Use the bronze bar on the anvils to make bronze arrowheads to attach to the headless arrows. The furnace and anvils are located next to Martin Steelweaver.
Once you've made the arrows, use the rope on them to attach it to one arrow. Equip the bow and run back to Olga. Use the rope arrow on the rock or Sophie. A cutscene will show Sophie climbing the rope back to safety.

she will give you a shinything, another attatchment for the axe that will give bonus xp for finishing bronze and iron arrows.
The Hand Of Guthix
Poletax, located further north along the road, will unlock Herblore for you. Speak to him, then trade with him to get a free grimy guam, eye of newt and vial of water. Clean the grimy guam to get clean guam then use it on the vial of water, and the eye of newt on the guam potion (unf) to make an attack potion.
You then are directed to start Druidic Ritual. Go and talk to Sanfew and he'll ask you to get living water, wandering wyrmwood and a stone fish scales. Go south back into the enchanted cave to where you fought the troll shaman and fill the vial. Next, go south next to the wheat field and catch a fish at the sparkling spot (click on the fish to get the scales). Go south again and wait for one of the wyrmwoods to pop out of the ground and grab a leaf
Return to Sanfew to mix the potion, then return to Kaqemeex where you will finish the quest.
Troll Warzone
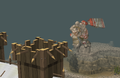
Bank any extra weapons and then continue north to find Drill Sergeant Hartman, in Burthorpe. As you approach, a giant troll named Anvil will leap down onto a building. Help Sir Owen kill it off. Grab the quickbow it drops and find Hartman to the north. Complete a lap of the Burthorpe Agility Course.
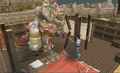
Go back to Major Nigel Corothers. He will offer to induct you into The Order of the Talon immediately for your hard work.
A voiced cutscene will play, where Corothers will explain what is going on to the Signature Heroes you've interacted with, and all of the NPCs you've helped or received help from in the Burthorpe and Taverley area. You are knighted, and Corothers gives you some supplies to help you in the future.
-
 It's a big troll!
 -
 Sir Owen fights Anvil.
 -
 Being Knighted.
 -
 Welcome to RuneScape!


Rewards
- XP bonus enhancements to Dwarven army axe
- The Dwarven army axe
- 5 Varrock teleports
- 5 Falador teleports
- 5 attack potions (noted)
- 5 strength potions (noted)
- 5 defence potions (noted)
- 5 prayer potions (noted)
- Steel full helm
- Baby Troll
- Mindspike
- Keenblade
- Quickbow
- 0-17,000 coins per task
- Note: the money reward is based on how many tasks you have completed and your level.
Trivia
- It is a common misconception that new players are required to complete the quest series before they can leave the Troll Warzone area. In fact, said player can turn tutorial mode off and walk out via the Taverley gate.
- The Hell's Kitchen part may be a reference to the reality show Hell's Kitchen, and the chef named Ramsey may be a reference to chef Gordon Ramsay.
- Ariane used to wear Roseblood robes in Troll Warzone, which is normally impossible outside Daemonheim. This has been fixed, but she still wears them in the knighting ceremony.
- When talking to Sister Judith your player says "It's grim up north in Burthorpe" which may be a reference to a Southern English saying "It's grim up north."
- There used to be a glitch where you could not proceed with the tutorial because you could not be assigned gelatinous abominations. This has been fixed.
- Three of the Signature Heroes who appear in the tutorial, namely Ozan, Sir Owen and Ariane, fights three large trolls separately which attacks with their own style (Ozan fights the ranged Troll general, Sir Owen battles the meleer Anvil, and Ariane faces the magic-using Magic Stick). However, the drops of the first two trolls have the combat style switched (the Troll general drops Keenblade and Anvil drops Quickbow).
- Hartman may be a reference towards Gunnery Sergeant Hartman from the movie Full Metal Jacket.