Mourning's End Part I
| File:Mourning's Ends Part I.png | |
| Release date | 19 July 2005 (Update) |
|---|---|
| Members only? | Yes |
| Quest series | Plague |
| Official difficulty | Master |
| Official length | Long |
| Developer | Dylan C |
Official description
| “ | It seems at last Arianwyn has need of your skills.
He believes there is more to the Mourners than meets the eye and he wishes for you to find out just what they're up to. Can you gain the trust of the Mourners? |
” |
Walkthrough
| Start point: | ||
| Members only: | Yes | |
| Official difficulty: | ||
| Description: | None | |
| Length: | Long | |
| Requirements: |
| |
| Items required: |
Recommended items:
| |
| Enemies to defeat: |
|
Mourning's Ends Part I continues the storyline begun in the Plague City quest. This quest is rated master-level by the Game Guide. It consists of the player discovering the Mourner's plots and plotting to sabotage them. The story of this quest is continued in Mourning's Ends Part II.
Note: You do not need the level requirements to start this quest, only the prerequisite quests. While finishing this quest you will unlock/partially unlock Mourning's Ends Part II
Before starting the quest by talking to Eluned, take a barrel to collect some coal-tar from the swamp below the Elf Tracker to save time in future steps.
To start the quest talk to Eluned in Isafdar. The easiest way to find her is to take a Charter ship to Tyras Camp and head east to the blue area on the map. If she isn't there simply wait a while and she should appear. After talking to Eluned, you should find yourself in a new elven village called Lletya. Talk to Arianwyn. He will tell you that the Mourners in West Ardougne are really elves from the capital city, and it's your job to uncover their evil plot. He will also tell you about the elves crossing the overpass of Arandar. You'll also get a teleport crystal that teleports you to Lletya four times (you can pay Eluned to recharge it after you've used it up, but she will only be able to give it three charges hereafter), and you'll be able to enter and exit the city at will by passing some strange-looking trees in the south-east area of the forest (one of the spawn points for the roving Elves).
The Disguise
Items needed (bank in Lletya or elsewhere): Weapons, Armour, 7 free inventory spaces, Falador Teleport or Chipped Home Teleport Tablet (Requires completion of the quest, Love Story) and (Super) Restore potion (optional)
The easiest way to get to Arandar would be to use any Spirit tree to teleport to Tree Gnome Stronghold, exit the stronghold and head south-west past the Outpost (Making History, Meeting History), until you reach a gate leading to the mountains.
Go to Arandar (the mountain pass that you use to enter the elf kingdom), with 7 inventory spaces free, and kill a level 11 Mourner. You should find some near the gate. When you start the battle, the Mourner will throw a potion at you that will reduce all of your combat stats including constitution and prayer, but not Summoning, to 20, and life points to 200. You should still be able to kill the Mourner if you have a good weapon.
Note that if you one-hit the mourner, your stats will not be reduced, so long as the mourner doesn't attack you. After the Mourner dies, you'll get seven items: a gas mask, a mourner top, mourner trousers, mourner boots, mourner gloves, a mourner cloak, and a letter of recommendation. Take all of these items. Unfortunately, you ripped the trousers and got the top all bloody during the battle.
NOTE: Make sure to pick up the mourners letter, as it is positioned under the bones when right clicking the loot from killing the mourner.
Top
Items needed: Mourner's disguise items, bucket of water
To remove the blood stains from the bloody mourner top, go to Taverley and talk to Tegid (the druid doing his laundry in the lake directly below the tree farming plot). He will tell you about his special soap, which he won't let you have, as he is still angry about you taking his dirty robes during Eadgar's Ruse. Steal the soap from his basket. With that and a bucket of water, wash the blood stains out. You can now wear the top.
Note: Even if you haven't completed Eadgar's Ruse, you will still have to steal the soap.
Trousers
Items needed: Two silks, bear fur, coins to purchase dye (at least 24 coins)
To fix the trousers, go back to Lletya and talk to Oronwen, the seamstress located in the north-west part of Lletya. Give her two silk and one bear fur. She will take the trousers to mend them, and in one minute she will give them back to you. To save yourself a trip, buy the dyes while you're in town. You will need one for each toad you wish to dye. Only one of each (yellow, red, blue, and green) is required, but it is recommended to buy more in case you need more toads later. (Skip this step if you did it earlier). Then, leave Lletya and go to the old Tyras encampment to get 2 empty barrels. Then go to where the elf tracker is and head directly south, toward the Poison Waste. Fill one barrel with tar - it will be used, along with the empty barrel, later.
Infiltration
Items needed: Mourners disguise items, Mourner Letter, Feather, Toad crunchies, Soft leather, Magic logs, Ogre bellows, Dyes (at least one of each Red Dye, Yellow Dye, Blue Dye and Green Dye [NOTE: These dyes can be purchased from the Seamstress Oronwen in Lletya ] two or more of each may be necessary)
Items recommended: Transportation to Feldip Hills (such as a ring of duelling - however using the spirit trees to get to the tree gnome village and then using the gliders is an alternative), and transportation back to Ardougne or the Fishing Guild (such as the Skills necklace)
It is easier to grab the ammunition first. To do so, grab two sets of each dye and go to the Feldip Hills where you did Big Chompy Bird Hunting. Go into the cave where the ogres children are on the East side of the hills and search the chest with the large rock placed on it to acquire the ogre bellows. (If you already have ogre bellows, or do not wish to tangle with the wolves, then there are also toads at the pools south-west of the Castle Wars entrance.) Use a dye on the ogre bellows (the bellows must be empty of air), and use the bellows on a toad to get coloured toads (toads can be found to the west of the cave entrance, around a swamp just east of the glider. WARNING: There are level 64 wolves that may attack you). You need to get at least one of each colour: red, yellow, green, and blue. It is advised to get two of each colour frog, using two dyes respectively. Now teleport to Ardougne.
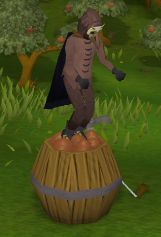
Wear the mourner suit, take off all of your other items, and go to the Mourner HQ in West Ardougne that you went to during the Biohazard quest (It's northeast in West Ardougne, the house with many yellow dots in it). You can now access the basement (go down the trap door near the stairs), where you'll find level 108 mourners (make sure you only wear the mourners outfit or the level 108 mourners will attack you) and the real Head Mourner (he is in the south-eastern room). Talk to the Head Mourner and show him your letter.
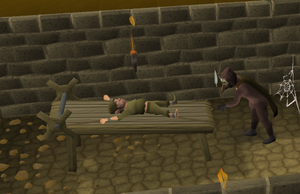
He will tell you that the mourners' job is to keep people believing in the plague. Recently, the Mourners dyed Farmer Brumty's sheep with a gnomic device. However, the colour is starting to fade and they need redying. Normally, they use a gnomic device, but it has broken down and the Gnome won't tell them how to repair it despite all the torturing they're doing to him. The Head Mourner will then give you a broken device and a tarnished key. Use the tarnished key to get into the torture room next door and talk to the Gnome on the rack.

The Gnome will eventually tell you that he hates having his feet tickled and loves toad crunchies. Use your feather on him to tickle his feet, then do it again and bribe him with the crunchies. After you get him off the rack, he will ask you for a piece of soft leather and a magic log. He will use those to fix the device (called the fixed device).
The sheep can be found in the same place as they were during Sheep Herder, to the north & north west of the north bank in East Ardougne.
Sheep
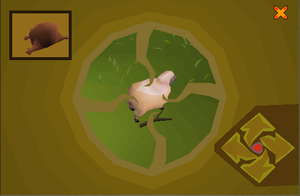
There are four sets of sheep (pale red, pale blue, pale green, & pale yellow) with three sheep in each set. Get near the sheep (a few steps away) & identify the color of the sheep each group ("examine"). Use the corresponding coloured toad on the toad launcher device, thus "loading" it, and then equip the launcher. To fire the toad launcher device open the Combat Styles interface and select "Aim and fire". Use the arrows to aim at the sheep and then press the middle "FIRE!" button. You may need to aim above the sheep or if you are close

enough & have minimised the movement options of the sheep (by pinning it up against a tree or fence) fire with the sheep directly in the middle of the crosshairs. Tip':' You may find it much more effective to attempt your shots in fixed screen, as the crosshairs may line up more precisely. One only needs to hit one sheep to dye all of the sheep in the set. Once you have dyed one set of sheep you will need to unequip the toad launching device, reload it, and then re-equip it. You can use the map on the right to find the sheep.
After you've redyed all four sets of sheep, return to the Head Mourner.
The Plague
Items needed: Barrel of coal-tar, Sieve (acquired from Elena) , empty barrel (obtainable at apple orchard), 20 or more Coal, Ardougne teleports, rotten apple, Mourner gear.
Recommended items: Falador teleport or Explorer's Ring 3 for quicker travel to Chemist's house.

Talk to the Head mourner. He will tell you that someone poisoned their stew not too long ago, causing them to get plague-like symptoms. This is actually you using rotten apple with their stew during Biohazard. He will tell you that he wants some citizens to get a version of the poison. You need to make the poison and poison two of the three food sources in West Ardougne.
Pick up the rotten apple just north-west of the Mourner Headquarters building, and go to Elena (whose house is in the Northwest of East Ardougne, Northeast of the pub, where you started the Biohazard quest). She will tell you how to make the poison after you tell her the entire plague city storyline and only if you agree that the poison will be nonlethal. Give her the rotten apple and after 50 seconds, come back to her and she will give you a sieve.
Go to the fenced-in apple orchard just south of the Gnome Stronghold (directly east of the entrance to the Stronghold) and take a barrel (there is a barrel spawn next to the rotten apples). Use it on the pile of rotten apples, and then use the barrel of rotten apples on the apple barrel machine just northwest of the rotten apples. You will mash them up. Your barrel will now become an apple barrel.
Getting coal-tar

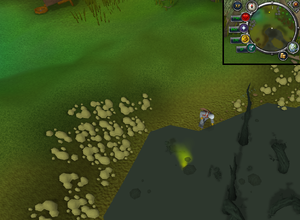
At this point, if you haven't done so or you don't happen to have a barrel of coal-tar in your bank, you need to get some. With the extra barrel from the apple orchard in your backpack, as well as super anti-poison pots & some good food & tele runes, tele using your crystal to Lletya. Leave Lletya heading west, then north & then through the trees that part for one to pass. One can attempt to jump over the pile of leaves on one route, or on the more northern choice, "pass" through the trap. Either way, use food & super anti-poison as needed. Head south & to the swamp to get coal-tar. It can be very tricky to click on the exact spot to get the coal-tar so utilise the above screenshots to minimise frustration. Once you get your barrel of coal-tar, teleport to Falador & go to the bank on the east side( or westside if you can use the agility shortcut).
Leave the bank with the following in your backpack: 24 coal, the 2 barrels (coal-tar and mashed apple), and the sieve. Leave Falador through the south exit & walk southwest or alternatively teleport via the Clan vexillum to the clan camp and process southwest. You may also use Port Sarim's teleport lodestone. Go to the Chemist's house in Rimmington south of the Crafting Guild. You will be using the barrel of coal-tar on the Fractionalizing still that is located west of the Chemist's house to get a barrel of naphtha utilzing the same method you used during the Regicide quest. (It is recommended to use the instructions from the Regicide quest.)
Using the fractionalizing still

- There are two stills. One still is a "fractionalizing still". The other still is a "lamp oil still". You are going to use the "fractionalizing still" (located outside the house).
- If you don't have a sieve you are able to get one from the Chemist.
- Use your barrel of coal-tar on the fractionalizing still.
- The fractionalizing still's control panel will pop up. You are now going to fractionalize the naphtha.
Explanation
Your goal is to get the heat into a specific range and keep the heat within that specific range as the green bar slowly fills.
The "add coal" button adds coal to the machine and adds 1 at a time. When you "add coal" the heat increases.
The "pressure valve" (wheel) on the left rotates clockwise and counter-clockwise. Rotating the pressure wheel on the left clockwise increases the pressure. Rotating the pressure wheel on the left counter-clockwise decreases pressure.
The "tar regulator" valve (wheel) on the right also rotates clockwise and counter-clockwise. When this is turned it adds and stops adding "tar".
AIt is best to follow the instructions here, as it will use less coal, and is a simple process to follow. You will have completed this task when the green bar is full. Close the control panel window and in your inventory will be a barrel of naptha (the solvent).
Use this solvent on the apple barrel to obtain a naphtha apple mix, and then use your Sieve on it to obtain toxic naphtha. Use it on a range (not a fire, as that will make it explode). There is a range in the house farthest north-east in Rimmington.
Finishing up
You will get two toxic powder heaps. Use these on two of the three grain sacks in West Ardougne. Grain sacks are found outside the General Store in the south-west corner of West Ardougne, upstairs in the West Ardougne church and in the Civic Office of West Ardougne. Of these, the civic office and the church are the most convenient as they are closest to the gate and directly across from one another.
Now grab your mourner gear and head back to the Head Mourner. He will tell you more about what the mourners are up to and that he has another task for you. You can't start the task, however, because one of the guards has taken the excavation key you need for the task to the locksmith to be copied. He tells you to come back when the guard has returned, and they shall dig further into the mountains in an attempt to resurrect the "Dark Lord".
Rewards
- 2 Quest Points
- 25,000
 Experience
 - 25,000
 Experience
 - Access to the Mourner HQ basement and the village of Lletya
- Elf Teleport Crystal
- The Fixed Device
- Full Mourner Gear
- 2 extra spins on the Squeal of Fortune
Music unlocked
Required for completing
Completion of Mourning's Ends Part I is required for the following:
Trivia
- The head mourner will tell you to re-dye the sheep, to which you will respond "You want me to go and blue-rinse a load of sheep?". A blue-rinse is a form of hair dying popular in the 1960s involving a weak colour wash throughout the hair, usually blue coloured, hence the name.
- After completing the quest, the Adventurer's Log will read: "I successfully infiltrated the mourners' hideout in West Ardougne to learn that they are trying to excavate a lost temple in the caverns below."
- There is a glitch where when you received the engine and then talk to the gnome, the gnome's head would be very small.
- The level 108 mourners will notice and attack you if you wear anything besides the mourners outfit however if you equip a ring, arrow(s) or Aura they will not attack you.
- When you use the sieve on the barrel of coal-tar, there is a glitch where it ways that you cannot use it on these apples.
- There is a bug for if you were to kill a mourner right at the Overpass before beginning the quest, it'll state in the Quest Log (after starting) that you have already received the Mourner garb.
See also
Template:Plague Series es:Mourning's Ends Part I nl:Mourning's Ends Part I fi:Mourning's Ends Part I