Zanik is missing, her fate unknown. Captain Undak, leader of the Dorgeshuun Guard, believes that a new H.A.M. plot is in progress, and the only person he can call on for help is the human adventurer who has saved the city before.
But there are more forces at play than Captain Undak realises. Goblin prophecy will be fulfilled, the destiny of the Chosen Commander will be revealed, and Dorgesh-Kaan will face its darkest hour.
A light source and tinderbox (in case your light source goes out, toolbelt will work)
Any Seers' headband, from the Seers' Village Tasks, can be used as a light source and does not require use of a tinderbox. Even the Seers' headband 1 works fine on this quest and provides some defence against magical attack.
Full H.A.M. Robe set (Obtained during quest)
5,000 coins (If players wrongly accuse an innocent merchant)
Note: The statues are all very weak to ranged attacks both during and after the quest.
Before starting this quest, it is advised to go underneath Lumbridge Castle (take a light source and a pickaxe) and make sure the wall south of Kazgar is unblocked. It must be done from Kazgar's side. Do not stand right next to the hole when using the pickaxe on it. This preparation saves a great deal of time later.
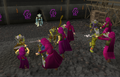
Talk to Captain Undak to start the quest. He is located in Dorgesh-Kaan north-east of the market, south-east of the bank. The quickest way to getting to the starting location is to speak to Drill Sergeant Hartman in Burthorpe, and get a recommendation, as he shall teleport you straight to Captain Undak.
Go up the nearby stairs and into the nursery (the building just at the top) and speak to Mernik. (You have to dismiss your familiar before he will follow you.)
Go back outside the Nursery and speak to Torzek. Select the calm down option first, and then the other options in any order. You'll know you're done when Captain Undak joins the conversation.
Talk to the children inside and outside of the nursery about what they ate. The children outside are sick; those inside are not. Determine which two foods are poisoned among the following:
Green gloop soup. (Note: Cave slime soup is the same as Green gloop soup; the children call it Green gloop soup but the goblin merchants call it Cave slime soup.)
None of the foods eaten by a healthy child have been poisoned. So the best way to do this is to talk to the healthy children first and find out what they haven't eaten by referring to the list above and then talk to the sick children to make sure that the two foods have been eaten by the sick children. (Tip : all children's name start with a different letter from A -> J, if you need to remember which child you've already talked to) (If you can't be bothered figuring out which merchant is responsible, just confront Walton who is south east of the market place. It's the same for every player.)
When you know which two foods are poisoned, talk to Torzek again and tell her you know which foods are poisoned.
Talk to Captain Undak (who's following you) and then head back down the stairs into the market. Look over the vendors' heads to see what food/item they are shouting/selling and find the two you need that had the poisoned food. Ask them about their human merchant suppliers (there are 2 each) and then go talk to the merchant they have in common, and arrest them. The merchants should be south of the shops. (If you are wrong, you will be forced to pay 5000 gp in compensation.)
After confronting the human merchant, choose the option to attack. When the merchant is injured enough, he turns on a protection prayer, after which Zanik appears suddenly from a portal and helps you. (if using range make sure you wear an Ava's device, otherwise the arrows on the ground will be lost)
Special note: Confront Walton. He is the one responsible for every player.
Zanik's Return
the Bandos Throne Room.
Talk to Zanik, select whatever you want the first two sets then on the last set when she asks if you want to hear her story select "Yes! What Happened?" and your perspective will change to controlling her in a scene elsewhere. (Note: If you log out while controlling Zanik, you must talk to her again and begin again from this point.)
Climb onto the short Goblin statue, which is south-west of the Ourg statue with the stone bowl, then jump to the Ork statue, and keep jumping east and then north until you are on top of the Ourg statue. A cutscene will occur.
After the cutscene, continue to hop north across statues until you reach the northern ledge and pick up the crossbow.
Grapple the spear nearest to the ledge and you will land on the throne. Pick up the pendant. You, as Zanik, will jump down from the ledge. Look into the bowl. There will be another cutscene.
The statues will now move. Walk to the west end of the room, and the many statues will move out of the way. Enter the portal. You will again be in control of your own character.
Statues moving out of the way for Zanik.
Talk to Zanik again and agree to go talk to the council so she may explain what happened.
Facing the Council/The Hunt for Zanik
Go to the north end of Dorgesh-Kaan and up the stairs. Yet another cutscene occurs. Go through the dialogue, and Zanik will kill the agent and run away.
Talk to Captain Undak and agree to look for Zanik.
Talking to Zanik.
You can find her in the cave south of Dorgesh-Kaan (go to the agility course, and take the ladder down). Make sure you bring a light source. Go to the west wall on the lower level and follow it all the way south (south of the kalphite dungeon shortcut). Sit with her and say nothing (the option is activated by clicking "Talk to Zanik"), and then go through the chat (keep saying nothing) until she agrees to go back with you.
After another cutscene at the chamber, she will be banished from the city. Talk to Zanik afterward and then to Captain Undak after she has gone and agree to help him. He will give you a set of H.A.M. robes.
In the Council room with Zanik.
The New H.A.M. Base
Bring armour, weapons and food with you for this section as you will have to fight Sigmund and then Zanik a couple of times after escaping with Grubfoot on the ramp.
Grab some Lumbridge and Ardougne Teleport runes or a Skills Necklace at the nearby bank and go to the H.A.M Dungeon west of Lumbridge. Put on your H.A.M. robe set, and take off anything else, but be sure to bring good armour and food for combat. Make sure to grab a tinderbox for after the fight.
Make sure you right click on the trap door and select the pick lock option to open. This may take several attempts. After entering find and talk to Johanhus Ulsbrecht in the corridor leading to the jail cell (south east) and learn that there is a second base near Ardougne. Be sure to ask "What are you planning to do about the cave goblins?" first or the conversation will go nowhere. Agree to go there. He will give you a password of 'Arrav' to relay to Milton the Miller later.
Teleport to Ardougne or the Fishing Guild, go into the windmill north of Ardougne square (near the Fishing Guild), and talk to Milton. He will be upset you wore your H.A.M. robe set and insist you not wear it until you are underground; however, ignore his complaint and tell Milton the password. Now go down the trapdoor to enter The H.A.M. base (Note: Do not talk to Sigmund here, as he will recognise you and will have you thrown out).
Note: If you attempt any teleports within the ArdougneH.A.M. Hideout, you will receive the message, 'The glyphs on the wall prevent you from teleporting'. Speculations have been made on what the glyphs do or come from,
probably the one making the most sense being that Sigmund made the marks, using an unknown spell.
Go to the room near the jail cell. Talk to the guard until he says what the current day is. Now read the Noticeboard on the nearby south wall and match the current day with a name.
Pickpocket the H.A.M. agent from the main room whose name matches the one on the Noticeboard, and then give the letter to the guard outside the jail cell. Enter the next room, pick the HAM Prison key up from the floor, use the key on the cell door, and talk to Grubfoot.
Tell Grubfoot to wait while you distract the guard. First you have to unlock the doors in the room opposite to the room with the jail in it. To unlock both doors, go through the kitchen east wall (click "Squeeze-through hole") then unlock both doors just by opening each of them. Now Grubfoot can go to the room west of the jail. (The kitchen is the room south of the west guard, with the sink.) When you have both doors opened go and talk to the guard while standing to the NORTH of him. Grubfoot will walk out one door and in through another. Note: If you haven't unlocked the doors, the guard will notice Grubfoot and throw you out of the hideout.
Once Grubfoot has successfully sneaked into the next room, follow him and tell him to walk to the west door (do not tell him to go through the crack or the east room or you will be caught) while you distract the next guard. He will take his position at the door. Crawl through the hole in the wall into the kitchen. Try to take a plate, which will cause the plates to crash on the floor. The guard will come into the kitchen and investigate the noise. Grubfoot will sneak into the bedroom. Note: You must talk with the guard as he enters the kitchen so that grubfoot can go into the bedroom!!.
Go into the room where Grubfoot is now hiding and tell him to follow you. Go out the side door where the guard is not located and through the small maze of crates. You will get "caught" by a guard, but Grubfoot will hit him with a spell, stunning him long enough for you and Grubfoot to escape. Walk up the ramp and out the door at the top.
The First Battle
Tip: If you do not mind not finishing the quest you can train on Zanik. When you kill her she will replenish her health and continue attacking you. This is a good way to get quick XP.
The fight against Sigmund.
As you walk out of the door, you will see Zanik and an army of goblins attacking the H.A.M. members. Sigmund will attack you, and Zanik will come to your aid. When he is near death, he will try to escape using his ring of life, but Zanik will cut off his left hand, preventing him. You will be given the choice to either agree, disagree, or give no comments about killing Sigmund. But in the conversation, Zanik says she never had the choice when she was captured by the H.A.M. group and kills him despite your reaction.
Speak to Zanik, and she will quickly tell you that you will be killed next. She will begin to attack you. (Warning! You will not be able to teleport out. Armour and food are strongly recommended. You can, however, climb up the ladder, stock up, and return to finish this part.)Using an Ancient mace with protect from melee or deflect melee and using the special attacks whenever possible can provide little or no need for food. However, as the special attack requires 100% special attack energy, it is a questionable way to complete this part.
When you finally get her health down to 0 she will comment on how she can't die and her health will be replenished. (Note that switching prayers from ranged protect to melee protect very fast will cause Zanik to not be able to attack since she's switching weapons before she has time to attack.)
If you poison Zanik at any stage of the fight, the effect will remain even on her next life when her health is replenished. Therefore it is strongly advised to use a dragon dagger p++ and spec her out at the very beginning of the fight to initiate this poison effect, which will continue to hurt her.
One safepot to fight Zanik.
You must continue to attack her. Each time her health gets down to 0, select the positive responses that encourage her to fight the mind-controlling powers she is under, and reminds her of your friendship. You can use the number of goblins and HAM agents left standing in the battle below as a gauge on how close you are. When only one goblin remains, you are finished.
After you kill her four or more times you will be able to select the option telling her to take off the pendant she is wearing. If you chose the wrong dialogue you will need to kill her again and again until you get the right dialogue. She will take the pendant off and fling it down below, where the goblin high priest will pick it up and cause an earthquake. Zanik will take your hand and teleport the both of you out of the collapsing hideaway.
Zanik leads the invasion of goblins.
Zanik cuts Sigmunds hand off.
Bandos takes over the Goblin High Priest.
Teleporting away with Zanik
Back to Normal
You will appear in a small cave. Zanik will give you an oil lamp if you do not have a light source and tell you that the teleportation must have been a bit off since there were two people travelling. Walk through the cave until there is an earthquake, and Zanik gets stuck on the other side of a rock wall. Ask her if she is alright. Then click the option that says 'Clear fallen rocks'.
Zanik grapples to the rock.
Walk through the path, and you will see Zanik on a small ledge. Tell her that she has to try to get out using her crossbow as a grapple. She will shoot it once. Direct her fire accordingly so that she hits a small rock that is jutting out of the rock wall. All summoned creatures must be dismissed before Zanik can attempt to shoot the grapple.
After saving Zanik, head out of the cave and talk to Juna. She will explain about Zanik's destiny. Now head west, climb up the rock face and continue west until you reach a cave opening. Enter the tunnel. (If you lose Zanik she can be found beside Juna.)
Now go north to Dorgesh-Kaan by first jumping over the stepping stones. Zanik will also tell you to head north to avoid the Wall Beasts. (Do not teleport or leave the Lumbridge cellar or you will have to go back for Zanik.) Warning: If you fall in the water when jumping across the stepping stone in the Lumbridge caves and did not bring a covered light source, your source will go out and you will be left in the dark if you do not have a tinderbox to relight! If you have not unblocked the wall you will need to bring a pickaxe.
Talk to Kazgar, and then head to the middle of the city and talk to Captain Undak. Go north and up the stairs to meet once again with the council.
Time Capsule
We can fight.
After the cutscene, go back to the council chamber and talk to the Goblin scribe. Agree to help put together a time capsule.
Go to the centre of town, where the obelisk is, and head east through a corridor, then north to find Tegdak. Talk to him to get a box of artefacts.
Go back and talk to the scribe. He will seal the time capsule for you and tell you to talk to Mistag. Find Mistag in the Dorgeshuun Mine, located northeast from the stairs leading to the council chamber, (near the city entrance) and ask him to bury the time capsule.
Power Station
Go back to Dorgesh-Kaan, and find Oldak in a room in the north-west corner. He tells you he needs parts from the power station south of the city.
Oldak is now at the Portal. Head to the southern end of the marketplace, to the room on the east where you arrested the poison supplier and Zanik had appeared from the portal.
Talk to Oldak. He will take the parts and give you Zanik's crossbow. Give the crossbow back to Zanik. She tells you to go check on the children at the nursery.
The Children
Go up the nearby stairs just to the west of your location, then travel north until you reach the nursery. Talk to Mernik when you get there.
She will ask you to talk with Ambassador Alvijar in the house north of the nursery.
Talk to him about sending the Dorgeshuun children to Keldagrim as refugees. He refuses, as taking refugees could endanger Keldagrim. Return to Mernik and speak with her.
Go to the bank and prepare for battle, if you haven't already.
Return to Zanik by the portal. Agree to start fighting, and you will be teleported to the throne room.
The Final Battle
The Final Battle
Noteworthy: it would be useful to range the avatar, as it won't move. The statues he summons are weak to crush. A range set up with a useful crush weapon and prayer potions might be useful. It is possible to let Zanik take most of the damage, standing quite far away and ranging. It has relatively low defence for its level, and you can manage to take only as much damage in this battle as you did fighting Zanik multiple times in the H.A.M Base, assuming for black dragonhide with a defence level of 80+. Some players may not find it worth praying at all, but pay close attention if you stand near any statues. An alternative for players who cannot wear black dragonhide is to wear good melee armour and pray against magic.
You and Zanik are in the throne room. Kill the Bandos avatar (level 125), who uses Melee and Magic. Note: you cannot use a dwarf multicannon. When he dies, command Zanik to use the special. Bandos will hit her crossbow, breaking it, and summon an Ogre statue. (Every statue you kill gives a drop of a gem, some runes or ores. You have a small chance of looting a granite mace.) Attempt to pick up the pieces of the crossbow. Note: You cannot use Telekinetic Grab to pick up the pieces. For every piece you try to pick up, you will have to defeat a statue which he will summon (3 statues in total) . Use Zanik's crossbow with either the Energy projector or the Focusing chamber to reassemble Zanik's SPECIAL crossbow. The avatar will then "kill" Zanik. (Note: the bone bolts can be picked up at any time, whether or not you are being attacked, but remember to pick up the bolts or else you can't kill the avatar.)
Defeat the avatar again (Warning: once you defeat him, do not interrupt the chat or you will have to fight him again!!). Talk to him, and choose to use Zanik's crossbow's special attack on him (you cannot wield the crossbow; the special attack is a dialogue option). He will die.
Zanik smashes the pendant.
Select talk to Zanik, then sit down next to her, then say nothing. She will revive, and destroy the pendant.
If you are still being attacked by a statue when you kill the avatar for the last time, the conversation will be interrupted and the avatar will regenerate, although you can trap the statue behind the avatar. (One way to prevent this is to kill the statue a few steps from the avatar and turn on protect from magic so the avatar cannot affect you. If you are using the strategy below, just stand at the same spot and continue to attack the boss.)
A good strategy is to stay in one spot a few squares from the avatar, turn on protect from magic, and range/mage it to death.
A good melee strategy is to bring a prayer potion or two, and get up close praying Protect from Melee, and kill it that way.
The gathering of the citizens
After you step through the portal, a rather long cut-scene will follow, summing up all the previous quests in the series.
Upon completion of The Chosen Commander, Juna has some interesting dialogue for you the next time you attempt the Tears of Guthix activity. Juna will tell you that you have betrayed the gods by helping Zanik defy Bandos. However, Guthix will still allow you to collect its tears, as it (Guthix) believes you will 'serve the gods well in the future.'File:Juna Betrayal proof.pngJuna saying you have betrayed ALL of the gods.
After the quest, the HAM leader says that they have given up direct action because of the goblin attack on Sigmund's base but they will continue occupying caves and pestering the government.
After completing the quest, when you talk to Duke Horacio, he will tell you that they found Sigmund's hand.
After completing the quest, Zanik can occasionally be found wandering around the world.
If you talk to the Goblins' High Priest in the cave next to the Fishing's Guild and choose the option "Didn't you die?", the Goblin High Priest will tell you that the High Priest from The Chosen Commander has indeed died, and that he was chosen in the traditional, goblin way - Goblin Priests from different tribes go into a room to "discuss it", and the last one standing is the new High Priest. This probably means he's either defeated or killed all the other priests from the other tribes and took the place as the new High Priest.
Upon completion of the quest, when you talk to Captain Undak, you can still ask the question "Who are you?", as if you haven't started the quest.
On the first day of release, the RuneScape screen was changed to reflect the symbol of Bandos, and 2000 limited edition Chosen Commander hoodies were released on the Jagex Store to honour the quest.
On the day of release, the spoiler read: The rewards are concealed in a parallel realm and protected by stone guardians. You'll have to excuse us if we're a bit wary about retrieving them before tomorrow.
When the quest was released, about 5 minutes after the update, the servers crashed and no players could log in. This server blackout lasted approximately 50 minutes.
During the beginning of the quest in the out-of-body ability experience with Zanik, the Bandos troops seem to represent the Statues of the Chinese Warriors made by the Chinese emperor Qin Shi Huang, the Terracotta Army.
When helping Grubfoot escape the new H.A.M. hideout, you clatter a pile of plates in the sink. When the second guard asks you what you are doing, you have the option to say "Making myself a ham sandwich." This is an obvious reference to the group's name.
You can ask the same guard why he hates monsters so much, which can lead to a humorous conversation about how he lost his marbles.
The guard's marbles being stolen by imps is a reference to the Imp Catcher quest.
The Scribe tells the player the archaeologist can be found in a house to the North-East, on the first floor. This uses the American English version, as the archaeologist's house is found on the ground floor in British English. This has been updated to mention the ground floor.
After release of the rewards, the Game Guide article stated the quest gives one quest point. It has been corrected by Jagex.
You can change your statue to one of seven different poses by speaking with Ur-Vass (See Dorgesh-Kaan Statue).
During the revelation of the Dorgesh-Kaan Statue at the end of the quest, Zanik exclaims "They built a statue of us". This may be an inside reference as this is a line from the Regina Spektor song "Us", which Mod John A has cited as one of the inspirations for Zanik.
If you just completed Forgiveness of a Chaos Dwarf, riding the final mine cart without speaking to the commander, and have not logged out, Captain Undak won't follow you to the nursery because you have a "familiar" following you (even though you can't see the commander). You will need to log out to proceed, seeing the commander flashing in your chat-box the phrase he would've said if you spoke to him properly.
When the quest was released, it had a rating of Master, however, Jagex has changed this to Experienced.
Upon the completion of this quest, one's Adventurer's Log will read: "The god Bandos tried to take command of all goblins, using Zanik as his avatar. It looked hopeless, but, in the end, we beat him."
Right before Sigmund is killed and Zanik takes his ring of life, Zanik tells Sigmund he cannot just teleport and "treat this like a game." This may possibly be an ironic reference to the fact that they are in a game.
When fighting the Bandos avatar, the player can ask the avatar why it continues to pursue the goblins. The avatar will tell the player his reasons and plan, similar to tv shows and movies where a bad guy will share his evil plot with the hero out of pride before the hero eventually thwarts their evil scheme.
After the quest, the player can speak to Oldak about returning to the Bandos throne room. When asked by the player if he worries about Bandos, Oldak will tell the player that because the pendant held much of Bandos' power and has been destroyed, Bandos is "gone for good" though he may exist in another form. This is similar to what happens to Sauron in the Lord of the Rings. After the One ring is destroyed, Sauron still continues to exist though much of his power is destroyed with the ring and he no longer can take physical form.


 Zanik leads the invasion of goblins.
 Zanik cuts Sigmunds hand off.
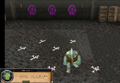 Bandos takes over the Goblin High Priest.
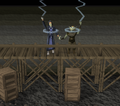 Teleporting away with Zanik


 Experience
 Experience
 Experience
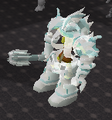 Bandos Avatar in detail.
 The banner shown on RuneScape homepage when the quest was released, featuring Zanik with her crossbow and the Bandos Avatar.
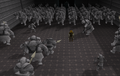 The army of Bandos statues.
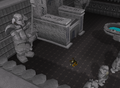 A mysterious room.
 The statue with bowl.

