Death to the Dorgeshuun
- "Dtd" redirects here. For the item, see Deathtouched dart.
| File:Death to the Dorgeshuun.png | |
| Also called? | DttD |
|---|---|
| Release date | 21 June 2006 (Update) |
| Members only? | Yes |
| Quest series | Dorgeshuun (#2) |
| Official difficulty | Intermediate |
| Official length | Medium |
| Developer | John A |
Official description
| “ | Humans have been visiting the Dorgeshuun mines for some time now, but no Dorgeshuun has visited the surface since the signing of the Lumbridge-Dorgeshuun treaty.
The Dorgeshuun Council fears that the HAM group may be planning another attack, and want to send an agent to the surface to investigate. But they do not want to send someone to the surface without a guide... |
” |
Walkthrough
| Start point: | ||
| Members only: | Yes | |
| Official difficulty: | ||
| Description: | Humans have been visiting the Dorgeshuun mines for some time now, but no Dorgeshuun has visited the surface since the signing of the Lumbridge-Dorgeshuun treaty. The Dorgeshuun Council fears that the H.A.M group may be planning another attack, and want to send an agent to the surface to investigate. But they do not want to send someone to the surface without a guide... | |
| Length: | Medium - Long | |
| Requirements: |
| |
| Items required: |
Recommended Items:
| |
| Enemies to defeat: |
|

What's With The Cabal?
Go to the Lumbridge Castle basement, using the trapdoor in the kitchen. Take a light source, like a lantern, and enter the cave to the rear of the basement. Walk to the first intersection inside the dungeon and talk to Kazgar, who will show you through the caves to the mine.
Next, talk to Mistag, who fears that the H.A.M. leaders are plotting an attack on them. To check the threat, the Dorgeshuun clan plans to send an agent to their headquarters. As the Dorgeshuun have never seen the RuneScape surface before, Mistag requests you to guide their agent and give her a tour of Lumbridge. He finally tells you to obtain a pair of disguises so that you can blend amongst the H.A.M people.
Get 2 sets of H.A.M. robes any way you can (thieve them, buy them from other players or kill H.A.M Guards for them). This means the entire set - (shirt, robe, hood, cloak, logo, boots and gloves). Once you have these, return to the Lumbridge castle cellar and talk to Zanik.
If you lose Zanik at any time, by teleporting or by any other means, she will go back to the Lumbridge Castle cellar.
Lumbridge Safari
After talking to Zanik, she will take one set of robes off you, and ask you to show her around Lumbridge. She tends to get stuck behind walls and doors, but if you get too far away from each other, she will teleport directly to you so it won't be a problem. Even if she is stuck somewhere at the moment, talking to the various NPCs listed below will work as expected. As soon as you initiate conversation, she will teleport to a nearby square.
The following steps can be done in any order; however, these are put in order to make it faster:
- Talk to Duke Horacio upstairs in the castle.
- Talk to any Man or Woman. There is a man on the same floor as Duke Horacio. (Lachtopher, Donnie, or Hans will also work)
- Take Zanik outside the castle. (When you first leave the castle, there will be a brief dialogue where Zanik talks about seeing the sun for the first time. You must click through this dialogue in order to proceed with the quest)
- Take her to see a level 2 Goblin (there's several across the bridge, just east of the castle, but it's better to take her to the ones near the general store). Examine the goblin to get him to talk.
- Talk to either the general store manager or the assistant; Zanik will buy off a bucket, hammer and a newcomers map.
- Talk to Explorer Jack - west of the Lumbridge general store.
- Talk to the Lumbridge Sage, outside the Lumbridge castle.

- Talk to Father Aereck in the church just opposite the castle.
- Talk to Xenia in the graveyard.
- Talk to Bob in his axe store.
After you have spoken to the required people, you may ask Zanik about the mark on her forehead. She tells you about the origin of the 'mark' - she received it whilst doing Tears of Guthix, and that she is destined to do something great.
After this, she will suggest going to the H.A.M. headquarters. Put on your set of H.A.M. robes and walk to the H.A.M. headquarters, west of Lumbridge.
Requiscate In Pace
Once you are at the headquarters' entrance, you need to pick a lock on the trapdoor that leads to the dungeon. Climb down the ladder and talk to a regular HAM member or guard. They will tell you that the leaders, Sigmund and Johanhus, are planning something big in order to get rid of the Dorgeshuun, but they won't reveal the details to any regular members.
One of the H.A.M leaders, Johanhus Ulsbrecht, can be found in the south-east corner room. Talk to him about the cave goblins, but as the member informed you, Johanhus doesn't want to share his ideas with you. Wander around to the southern corner of the main H.A.M. room, where Zanik will spot a trapdoor.
Pick the trapdoor — you need 23 Thieving — and go down . You are now in a storeroom.
In the following section, if any of the guards catch you, you will be sent to jail, which is located on the floor above. Do not worry though; Zanik will pick-lock the door to the jail, but you will have to kill the guards with Zanik all over again

- The first senior guard will see you and tell you to go back upstairs, as regular members aren't allowed down there. Pay no attention and walk past the guard. When the guard turns to stop you, Zanik will shoot him with her crossbow.
- Over to the west side, squeeze through the crack in the wall — level 23 Agility is required — to get into the bottom-left room. Then, emerge through the crack in the opposite wall, but only while the guard in that corridor has his back turned. Move behind the guard to the left and talk to him, and Zanik will use her crossbow.
- You'll see a guard patrolling the central corridor. Call "Now!" when his back is turned. Zanik will snipe him.
- Move to the end of the central corridor, on the east side, and talk to Zanik. Tell her to "wait here", then RUN out and south down the room making the north-east guard follow you. Zanik will shoot him as he passes the central corridor.
- For the final guard, go to the end of either the west or east passages and talk to Zanik again. Tell her to wait there, then go to the other passage, via the central corridor, and distract the guard whilst she shoots him.
Finally, when all the guards have been laid to rest, listen at the door. A few people are clearly having a conversation inside the large hall, although it is inaudible for your ears. Zanik, however, has sharp hearing skills and she informs you that they are talking about some machine being planned to use for evil. As Zanik tries to further explain, a senior guard will catch you and throw you into jail.
Divine Resurrection

When you wake up, you find that Zanik has not suffered the same fate as yours. Talk to Jimmy the Chisel, who says that Sigmund had taken Zanik outside. Pick the lock to escape the jail.
Leave the H.A.M. hideout and you'll find Zanik near the entrance. You notice that although she isn't breathing, the strange mark on her forehead is glowing, which she had obtained while doing the Tears of Guthix minigame. Pick up her body.
If you have unblocked the opening from the Lumbridge Castle cellar, into the Lumbridge Swamp dungeon, you can enter as you would going to the Dorgeshuun mines, but instead of going through the tunnels, head through that opening to the south and onwards to the Tears of Guthix cavern. (If you have not opened it, you will need a pickaxe to create a passageway. You cannot use the Dwarven Army Axe, or your toolbelt pickaxe)

After reaching the Tears of Guthix location, talk to Juna. She will ask you to collect 20 tears, which can restore Zanik to life. (This does not count towards your weekly Tears of Guthix progress, and it gives you no experience) A cutscene will follow after you collect the tears, where Zanik will explain what she had heard in the H.A.M. meeting room.
Johannus, Sigmund, the HAM Deacon and a Senior Guard were talking about building a drilling machine, with the help from the dwarves of H.A.M, at the Lumbridge water wheel, causing the swamp caves to flood with water from the River Lum.
To Be Continued...

After the cutscene, get to the Lumbridge Watermill. A quick way to reach the watermill is by home teleporting to Lumbridge, and asking Zanik to follow you again from the cellar. With Zanik following, go across the bridge to the east bank of River Lum and travel north until you find a cow pasture on one side of the road and a farm with Chickens on the other.
Once you reach the farm, you see a trapdoor leading from the side of the watermill. You must be wearing the full H.A.M. outfit for this to work - talk to the dwarf guarding the trapdoor and say you're there to help.
Talk to Zanik and then search an empty crate, south of the dwarf. She suggests hiding herself in one of them whilst you carry it into the dungeon. Pick her up and go down the ladder. You can remove the HAM robes and wear your armour now.

Go west. Sigmund, who is level 50, will appear, along with three level 22 Senior Guards. Sigmund will use a protection prayer based on the attack you are using, so focus on his henchmen first. After they're dead, Zanik will range him. He will switch to protect from ranged. Attack him with melee or magic. At 10 LP, he will escape with a ring of life, but curses you and promises to strike back at your goblin friend. Should you die or leave the area while fighting, Zanik will remain there, wating for you to return. However, once you return, all three guards will have respawned and Sigmund will have regained his health.
After clearing the area, smash the drilling machine to foil their plans. Go down the southern tunnel and exit there, and you'll find yourself back with the Dorgeshuun leaders. Finally, talk to Mistag. Congratulations, quest complete!
Rewards

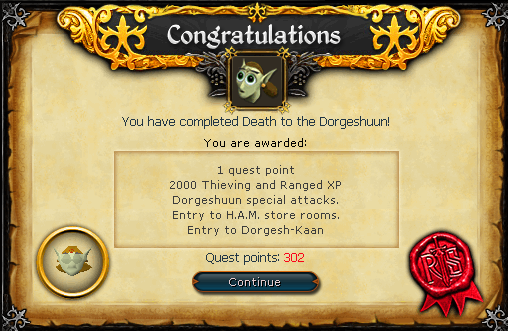
- 1 Quest point
- 2000
 Experience
 - 2000
 Experience
 - Access to the HAM storerooms, where you can loot items.
- Access to Dorgesh-Kaan, the Dorgeshuun city.
- Access to Dorgesh-Kaan South Dungeon and a route to Kalphite Lair from there.
- Access to the watermill tunnel (Dartog will appear there, and you'll be able to freely travel between the Lumbridge Castle cellar, the Dorgeshuun Mines and the watermill tunnel).
- Ability to use Dorgeshuun crossbow and Dorgeshuun Dagger special attacks.
- 2 extra spins on the Squeal of Fortune
Music unlocked
- H.A.M. Fisted - H.A.M. storerooms
- Sigmund's Showdown - During the battle with Sigmund
- The Power of Tears - In the Tears of Guthix cavern
Required for completing
Completion of Death to the Dorgeshuun is required for the following:
Transcript
Trivia
- Previously, when examining Zanik at certain points later in the quest, the message "She's kicking HAM ass." would be given. This caused some anger amongst some players who either thought it was offensive, or just hypocritical of Jagex. It has been changed to "A goblin fighting for her city".
- When you talk to Sigmund during the quest, he says, "And I would have gotten away with it if it wasn't for that pesky adventurer...". This is a reference to the famous line at the end of every episode of Scooby-Doo.
- The quest shows how different people react differently to new occurrences.
- Citizens who are friendly to Zanik: Cook, Lumbridge Sage, Xenia, Hans, Duke Horacio, Father Aereck, Fred the Farmer, Donnie, Shopkeeper/assistant, Combat tutors, Millie the Miller and Father Urhney.
- Citizens who are neutral to Zanik: Goblins, Sir Vant (racist at first, then realises his mistake, recognising the treaty), The Lumbridge Guardsmen and the Doomsayer (Who predicts Zanik's DOOM).
- Citizens who are racist to Zanik: Lachtopher, Sergeants, Man/Woman, Explorer Jack, the Al Kharid border guards and Bob (the most racist of all; he actively refuses to trade with Zanik, forcing the player to bail on her if they want to buy axes in his company. Bob also references a line from Star Wars: Episode IV when he sees that Zanik is accompanying you: "We don't serve their kind here!")
- Citizens who make no comment on Zanik: Seth Groats, Roddeck, Hank, Musician, Adverturers from Lost City, Mabel, Banker.
- While you are carrying Zanik in your inventory and choose to "Tell-story" to Juna, you will get this message "Zanik's dead, yet you're trying to tell stories? You should tell Juna what happened!"
- When talking to Zanik, after you have given her the H.A.M Robes, you cannot have a pet, as Zanik says, "it will just slow us down".
- During the last cutscene when the player is watching Sigmund talk to some H.A.M. cult members he is holding his steel longsword over his shoulder, a way of holding any sword that is not available to players yet.
- During the last cutscene players are not wearing what they were when the meeting was going on, but rather what they are wearing as Zanik is telling the story.
- During the quest after one finds Zanik's dead body one can, albeit disturbingly, put Zanik into their bank.
- Upon completing this quest one's Adventurer's Log will read: "I met Zanik, the cave goblin adventurer, and we stopped Sigmund's plot against Dorgesh-Kaan. Zanik died, but a strange force brought her back."
- After completing the quest, if you talk to Juna, your character will say, "...Sigmund escaped again, but Zanik and I destroyed the machine and Dorgesh-Kaan was saved!" to which she replies, "Saved, only to later rebel against its rightful ruler. But that is all past now."
- Zanik's chathead appears to have what seems to be the Bandos symbol on her forehead.
- Should you complete the quest without a light source, Zanik will give you a lit torch, as you will have ended up in the Dorgeshuun mine, where a light source is required.
Template:Dorgeshuun Series fi:Death to the Dorgeshuun es:Death to the Dorgeshuun nl:Death to the Dorgeshuun