Barbarian Assault
- This article has a strategy guide here.


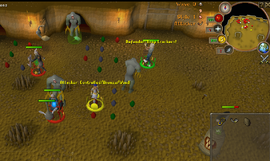
Barbarian Assault is a cooperative, team-based safe combat minigame located at the Barbarian Outpost. It was released on 4 January 2007, to members only. A team of 5 players must work together in order to defeat 10 waves of Penance monsters and, finally, their leader, the Penance Queen. Teamwork and coordination are vital in order to achieve success at this minigame. The official themed worlds for this minigame are: 6, 71 and 91.
Introduction

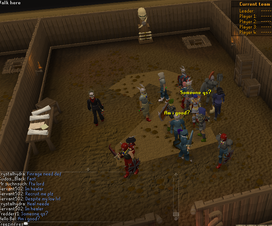
The barbarians at the Barbarian Outpost need your help to fight back the seemingly endless waves of Penance monsters. Captain Cain will brief you and your fellow adventurers on your tasks when you arrive. Without completing his tutorial, you will not be able to play. After gathering a party of five teammates, you will be allowed to head straight into the battle. After fighting back enough waves of Penance, you'll have enough Honour points to buy a variety of combat-based and cosmetic rewards.
While the Barbarian Assault arena is isolated within the RuneScape world, there are several methods by which it can be reached:
- Games necklace teleport - The quickest way to reach the Barbarian Outpost. A games necklace can be made by casting Enchant Level 1 Jewellery on a Sapphire necklace.
- Barbarian Teleport - This spell from the Lunar spellbook teleports the player to the Barbarian Outpost. Level 75 Magic, three fire runes, two astral runes, and two law runes are needed to cast it.
- Agility shortcut - At level 37 Agility, players are able to scale the tree to the north east of the Tree Gnome Stronghold (The Grand Tree quest required).
- Enchanted lyre - Teleport to Rellekka, then approach the Outpost via the Lighthouse.
- If your P.O.H. (Player Owned House) is located at Rellekka, then house teleport and run from Rellekka following the same route as the Enchanted Lyre teleport method.
- On foot - Players may journey to the Barbarian Outpost from the south, via the Baxtorian Falls.
Gameplay

Barbarian Assault is a safe minigame and, as such, players will not lose any items upon death. As combat is the minigame's main component, high Defence and Constitution levels provide an advantage. Additionally, a high Agility level is beneficial as it allows players to run for longer periods of time, providing the opportunity to evade threats. A safespot used to be behind the horn of glory, which rendered all enemies unable to attack. However, this was removed with the update to the minigame. Note: If a teammate is killed, the entire group must restart the wave.
Basics
Details information regarding creating a team, brief role descriptions, and Penance monsters that will be faced.
Gameplay
Overview of basic gameplay technique. Includes information on the gameplay interface, battlefield layout and how to complete player roles.
Strategies
Contains information pertaining to more advanced, specific, and efficient gameplay techniques.
Rewards
Note: You must choose Honour points or Experience before each wave starts, or you will continue to receive the same reward type as the previous wave.
Wave Breakdown
This breaks down every wave and tells you the amount of monsters in the wave.
Honour Points
You can trade in Honour Points in return for role level upgrades, equipment and for gambling. You may also spend Honour points on changing the colour of an abyssal whip or dark bow to blue, green, white, or yellow for 50 points in any role.
Experience Reward
You can get experience from completing waves, which is stored using your Penance horn or Penance master horn. Wielding it, you will receive double experience in Agility, Firemaking, and Mining, much like the Sacred Clay tools. Note that you don't have to be wielding the horn, or even have it in your inventory to have the points stored in it, only have the switch set to XP.
Tips
All roles
- The most important thing you need to do is call! Every 30 seconds the call will change and appear white. Make sure you call as soon as it changes every time. Even if your teammate does not call, call for them to at least speed things up a bit.
- Teams do NOT lose honour points by using the egg launcher. Many players believed that in contrast to experiments and Jagex's statements.<ref>Jagex. Postbag 39 - "Who is the greatest of them all?", Letter 4. Postbags from the Hedge. *</ref> Players gain points based on TOTAL number of penance killed; as long as a penance is killed, the player will gain points, and whoever is assigned to that particular penance (Defender=Penance Runner; Healer=Penance Healer; etc. etc.) will still get the double points, even if it is not the usual way of killing them (Runners killed with traps; Healers killed with poison food). Jagex has even added the statement, "The cannon does not make you lose points." in Quick Chat! However, using green eggs on penance healers will replace the healer's poison with a weaker poison, and this should be avoided at all costs. Also, unbeknownst to many players, the Stun eggs also do 16 damage, though it is with a delay. If using the Cannon on Penance Runners, an Explosive egg should be used in conjunction with a Poison egg if possible, as opposed to another Red, as this still kills the Runner in 2 hits while reducing the usage of the precious Explosive eggs. Usage of the Stun egg will prevent the Penance from taking any damage or doing anything in that time, and it is generally frowned upon by most players as this prevents the team members from killing the Penance in a faster way. For this cause, usage of Stun eggs should be considered only as a last resort.
- Every team member will lose points when a runner makes it to the end, so a good technique is to use the egg launcher to help the defender kill runners south of the north egg launcher rock; everyone on the team will get full points for all runners killed regardless of how they are killed. Also, runners always have 50 life points and thus die consistently quickly, whereas the life points of all other Penance types scale up with wave number, making usage of eggs on them at later waves generally inefficient.
- Players are allowed to use normal potions, with the exception of Saradomin brew; however, potions mixed using Barbarian training may not be brought into the arena. To conserve space, a cost-effective potion for Attackers to use is the Zamorak Brew. Low level players are advised to bring Antipoisons to handle damage.
- On wave 10 once all Penance creatures are dead, team members should gather near the Healing Pool. This is better for the Healers as they do not have to run far. An alternative for Waves 1 through 9 is for players to hide in one of the corners of the Egg Launcher "hills", where they can't be poisoned, ranged or meleed. This strategy does not work at Wave 10 due to the Penance Queen's ranged attack.
- It is helpful to other players if a person takes a role that is already being used, most preferably collector, and use the Horn of Glory at the south-east section of the cave, as this can be used to tell everyone what they need to do. This way players can focus on their jobs. The horn cannot be used on wave 10 when the Queen arrives.
- With a recent update, players can now see each others chat from anywhere in the room.
- It is recommended to "Quickstart" over waiting for the game to automatically set you into the wave: 1.) Select a teammate to leave the team and make them only to do this each and every wave. 2.) That teammate exits the starting room. 3.) The teammate re-enters. 4.) Your leader will make him rejoin. 5.) Your leader will start the wave. This is done in about 10 seconds, and it is shorter compared to the normal starting wait time (30 seconds). Quickstart can be performed faster by the quickstarter using the Give Thanks, Seal of Approval or Roflcopter emote at the very end of the wave, which forcibly ejects him from the team if the team leader closes the wave complete dialog before the emote completes, cutting the time required to exit and reenter the wave pen. Some players also leave the team by logging out to the lobby, then back into the game.
Attacker
- The first priority for an attacker at the beginning of the wave is to run west around the cannon. This way, you do not lure the Penance healers west with you, and it makes the healer's job much easier. Be sure you run west around the cannon during the start of a wave. Some teams may kick you if you fail to follow this general rule.
- The attacker role should always keep auto-retaliate off to prevent any penalties like injuries and loss of honour points due to having on the wrong attack style.
- It is also helpful if the attacker wears a full set of Guthan's (CAN ONLY BE USED IN DEFENSIVE/CONTROLLED STYLES), so that they do not need to be healed as often. Enhanced Excalibur's special attack also helps the healers out.
- The use of the Dragon Claws is strongly recommended as its 4 hits all have minimums of 50 when used by a Level 5 Attacker, allowing it to kill generally any penance in any wave in 1 spec each. Also, the Claws have all 4 styles available. The Dragon Dagger is also recommended for this use, as in early waves each special attack may be enough to dispatch a penance, at the cost of only 25% of the special energy bar each.
- Using the Dragon mace when being an attacker is an advantage as it has controlled, accurate, aggressive and defensive attacks, as with most weapons. Other good weapons to use include the Dragon longsword, the Dragon scimitar, and others. The Abyssal whip alone is not recommended for its lack of an aggressive attack style, unless it is used in conjunction with earth spells (preferably wave or surge spells) OR in conjunction with a weapon with an aggressive style. With the addition of the quest The Void Stares Back, Korasi's sword is also a good choice. However, do not use Korasi's sword's special attack on anything besides the Queen Spawn, as it is not considered the proper attack type and you will receive a penalty! You mainly want to consider Damage per second (DPS) over high hits. The ideal setup, if you want to switch weapons, would be a Chaotic Rapier plus an Abyssal whip for fast, strong attacks over all four styles. The fastest switch can be achieved by setting the attack style to aggressive/controlled whenever the styles reset, and using style switch if the Accurate/Defensive styles come up, or using a weapon switch if the Aggressive/Controlled stance comes up. If you don't want to switch weapons, the best choice would be a Korasi's Sword. Contrary to common belief, the Chaotic Longsword is weaker than it when in the hands of Lvl 5 Attackers due to its slower attack speed.
- If using any weapon at whip/scimitar speed, exactly 7 attacks will lapse at the start before styles switch, and 10 attacks thereafter for every later switch, assuming your collector calls within 2 seconds of the switch. Counting the number of attacks greatly reduces the chance of using the wrong attack style at the moment the styles switch on a Penance.
- For range, arrows of the corresponding type must be equipped for any damage to be dealt, even if the ranged weapon you are using does not fire arrows. Thusly, the possible ranged weapons are either those which use arrows, or those which use no ammunition in the quiver slot. Recommended range weapons include any type of throwing knife/dart to leverage on the guaranteed 50 minimum hit for Level 5 Attackers. Alternative choices include the Magic Shortbow, the Dark Bow, the Crystal Bow and the Zaryte Bow. For mage, of course, elemental Surge spells, Wave types at the weakest. Nothing besides normal elemental spells work, Ice and other Ancient Magic will not deal any damage whatsoever.
Collector
- At the start of the wave, the Collector should run to the hammer spawn and stay there until the Healer poisons the first 3 Penance Healers. This prevents the Penance Healers from venturing further west until they are first poisoned, allowing for the Healer to finish his role more quickly. This strategy is commonly known as a "Heal Block".
- The Collector may destroy eggs on purpose by picking the wrong colour, and asking the Healer to heal the lost damage. This may lead to faster points as a whole as the point deduction for egg destruction is smaller than the point gain for that amount of HP healed. This strategy is known as "Suicide Collection". However, it is not recommended for any but the most experienced of teams due to its tendency to kill the Collector.
- The Collector's primary responsibility aside from calling and picking up eggs is to load the cannon with (preferably Explosive) eggs as a backup in case the Defender requires support. Firing the cannon should generally be left to the team members who have already finished their roles to perform, not the Collector.
- On the Queen wave, if all the other members spam click the Omega egg option prior to the collector loading one egg, it is possible for up to 8 eggs to be fired from the cannon when only one is loaded. Thus, experienced teams generally collect and process only ONE egg, instead of the required eight, and add then spam clicking the Omega Egg on the cannon. With three team members spamming the cannon in this way, one egg is needed, with only two team members spamming the cannon, this can still be accomplished with two eggs. This not only increases the speed at which the Queen is killed, but also reduces the chance she has to kill the weaker team members.
Defender
- You can stand in front of the lure cave to block runners from passing by. (Note that a runner can get through if you are walked on by another player). However, this simply slows the team down.
- The fastest possible way to Defend on certain waves (the waves where only one runner needs to be killed before the others arrive, such as waves 1 and 2) is to drop two correct baits next to the eastern trap and two wrong baits a few spaces north of the eastern cannon and within four spaces of the runners when they come out of the cave. The Defender must do this quickly, so it is very beneficial if the Defender is recruited either third or last. This way, the Defender will spawn near the machine at the start of the each game. After the bait is laid, the player should quickly run back to the trap and stand over the bait. If done correctly, only the first runner should have been killed (the second runner usually halts for a moment after the first runner eats a bait), and the Defender will not need to repair the trap when the rest of the runners follow.
- On waves where two runners must be killed before the rest arrive, such as wave 3, a different strategy is needed. The player should lay these baits in order: two wrong baits just northwest of the eastern cannon, two wrong baits east of the hammer spawn and south of the eastern cave, a correct bait north of the eastern trap, two or more correct baits next to the eastern trap, a wrong bait on the hammer spawn (grabbing the hammer and logs as well), and finally two correct baits within four spaces of the eastern cave. By this time the trap will be broken (because the initial two runners will have been killed), so the Defender can repair the trap and stack the rest of the runners. It is crucial that the first few baits are laid quickly, or the runners will get past.
- Defenders need the hammer spawn to repair the trap. At this time, the hammer in the toolbelt is unable to perform this task.
Healer
- At this point in time, due to the recent chatbox update making it expandable in non-fixed mode, the chatbox partially obscures the HP interface for Healers, so Healers need to be alert to ensure team members don't die.
- Penance Healers only take poison damage from the most recent poison source. Many poor Healers make the mistake of spamming the poison pack on the Penance Healer in the hope that the stacking poison will kill them faster, but this merely restarts the same poison counter over and over again, making it counterproductive. In the lower waves, 1 pack is enough to kill any Penance Healer, but in waves 8 and 9 it may be important to use 2. In this case, Healers should only use a second poison pack when the Penance Healer's health reaches 50% to maximise the kill time per pack used. This allows a good Healer to wipe out all Healers on even wave 9 without ever having to restock on Poison Packs.
- Notably, because only the most recent poison source works, and Cannon Poison eggs only do 16 poison damage, Poison eggs should NEVER be used on Penance Healers.
- As Healers heal more using the vial than the pool, Healers should heal each other when there is more than one on a team, as opposed to using the pool directly.
- Solo healers are particularly at risk because they are generally unable to heal themselves at short notice. Thus, the use of the Enhanced Excalibur is highly recommended.

Personalities
Servers
There are three game worlds dedicated to Barbarian Assault. While it is recommended that players attempt to find their teammates here, Barbarian Assault may be played upon any member's world.
The three dedicated worlds are:
World 6 is generally the most heavily populated and players may be found during any time of the day. World 71 and 91 are known for being relatively empty at all times, so if a person does not already have a Barbarian Assault team, they are encouraged to look for one on World 6.
Music
- Legion - Outside
- Assault and Battery - Wave 1-10
- Pirates of Penance - Wave 10 queen part
Trivia
- Lots of locations can be seen from the basement using the orb of oculus. From the south-east, the Killerwatt Plane can be seen. From the south-west, one can see the H.A.M. meeting room from Death to the Dorgeshuun as well as the TzHaar obsidian mine. To the north-west, is the Easter Bunny's burrow, including the Easter bird.
- There is currently a glitch if you use the 10th anniversary cake inside the waiting area. In the chat box, it will say that you cannot do the emote, but the music from doing the emote will still play.
- It is possible to be on more than one team's scroll at once. If the player walks out of the room while their leader tries to climb down the ladder, the player will still be on the team, yet their screen will show the team list as empty, they can then join another team as well. If their old team's leader updates their scroll, such as recruiting someone or clearing it, or goes into a wave, this then affects the player and their screen, which can cause the old team's list to appear instead of the calls during a wave; this problem can be temporarily fixed by using the Horn of Glory and can only be permanently fixed by the previous leader removing the player from their scroll (or clearing it). It is also possible for the player to be taken out of a wave and thereby taking their new team with them because of this.
- The max hit of your attack while attacking does not include the bonus damage of the attacker role, therefore it will show up orange even if you are able to hit up to 50 LP higher (depending on attacker level). This also means that, for example, for low levelled accounts (who cant hit more than a 50 normally) every hit will be a 'max hit' if they are a level 5 attacker, even if they can hit more.
- There is currently a glitch where the amount of potential remaining displayed at the end of a wave shows the state of the team leader's horn, rather than that of the player. The correct amount of potential remaining can be checked through the Penance horn.
-
A glitch in the barbarian assault minigame.
References
| Game Details |
Basics • Gameplay • Strategies • Rewards | ||||||||
| Equipment |
| ||||||||
| Team games |
Barbarian Assault • Blast Furnace • Castle Wars • Clan Wars • Fishing Trawler • The Great Orb Project • Pest Control • Shades of Mort'ton • Soul Wars • Stealing Creation • Trouble Brewing • Vinesweeper |
| Solo games |
All Fired Up • Archery competition • Barrows • Burthorpe Games Room • Conquest • Flash Powder Factory • Gnome Ball • Gnome Restaurant • Impetuous Impulses • Mage Arena • Mage Training Arena • Mobilising Armies • Pyramid Plunder • Ranging Guild Activities • Rat Pits • Rogue Trader • Runespan • Sorceress's Garden • Tai Bwo Wannai Cleanup • Temple Trekking • TzHaar Fight Cave • Fight Kiln • Dominion Tower |
| PvP games |
Castle Wars • Clan Wars • Duel Arena • Fist of Guthix • Soul Wars • Stealing Creation • TzHaar Fight Pit • Crucible |
| Former games | |
