The Eyes of Glouphrie
| File:Eyes of Glouphrie.jpg | |
| Release date | 15 August 2006 (Update) |
|---|---|
| Members only? | Yes |
| Quest series | Gnome (#4) |
| Official difficulty | Intermediate |
| Official length | Medium |
| Developer | Chihiro Y |
Official description
| “ | After you foiled a plan to destroy the Grand Tree things have been quiet in the gnome world. Brimstail has found a strange machine, built by Oaknock the Engineer, during the gnomes' Golden Age. What does the weird device do? Why on RuneScape was it built?
If you agree to help this gnome get his confusing device working, you will learn a little about gnome magicks, gnome history, and you will start to uncover a new threat (or is it an old one?) to gnome security - a threat that is a lot harder to see... |
” |
Walkthrough
| Start point: | ||
| Members only: | Yes | |
| Official difficulty: | ||
| Description: | None | |
| Length: | Medium | |
| Requirements: |
| |
| Items required: |
Recommended:
| |
| Enemies to defeat: | 6 evil creatures (1 lifepoint each) |

Digression
Travel to the south-western area of the Gnome Stronghold and enter Brimstail's cave. Talk to the gnome wizard, who starts to chat about his new cute pet that unknowingly wandered into his home, and has since been his closest companion. Ask him about his profession, to which he replies "I research the Arcane", synonymous to studying magic. Although most gnomes consider magic as a taboo, Brimstail says that this wasn't always so and offers to share some gnome history with you. Accept.
The Untrusted
Eons ago, during the reign of King Healthorg, was a gnomish mage by the name of Glouphrie, the King's Advisor. Glouphrie was known for his skills in light magic and illusions, which led to distrust amongst the gnomes, gaining him the title 'Glouphrie the Untrusted'. One amongst them was Oaknock, the great engineer that built most of the Stronghold, who disliked Glouphrie and never met eye-to-eye with him on any issue.
Ending his tale, Brimstail requests you to enter the next room and have a look at whatever you find in there.
Elven Mystery

Enter north-west into the inner cave and inspect everything - the machine, the exchanger and the singing bowl. Head back and tell Brimstail about your discovery, to which he says that that room belonged to Oaknock himself and it was where his workshop was located. Noting the elven nature of the bowl, he finds himself at great loss in explaining it, although he remembers someone who knew Oaknock, the King and Glouphrie himself - Hazelmere.
Brimstail asks you to talk to him and gather as much information as you can on Glouphrie. When you object, saying that you'd need to go through the tedious job of dictionary-flipping again, Brimstail calmly says that Hazelmere would eventually find a way to communicate as he loves to talk about the olden days.
Hazelmere is located on the island chain east of Yanille. There is a fairy ring directly beside his hut, code C-L-S, and the Yanille lodestone is quite close too. An alternate way is to cast the Watchtower teleport at level 58 magic.
Memories
Speak to Hazelmere; at first he blabbers incoherently, but eventually starts to poke inside your mind, enabling you to communicate with him. Hazelmere will ask you to clear your mind and think of nothing, so he can show you his memories of the gnomish history.
Conquest

During the Fourth Age, Healthorg had just become King and the gnomes occupied most of the northern regions, with the south inhabited by goblin tribes. Aiming control over the land, both the races eventually met in the Battle of Atarisundri. Easily outnumbered by the goblins, Glouphrie came up with a plan to use his special illusions to scare the goblins away from the land. He summoned an army of giant tortoises, successfully intimidating the goblins into retreating and thus gaining victory.
Shortly after this, Hazelmere recounts having a very special, old friend in a spirit tree, Argento. One day, he sensed the Anima Mundi leave his dear friend, although the "weather was fine and dry". Sure that one of the Old Ones had died, he conveyed his concerns to Oaknock, who immediately accused Glouphrie and his illusory practices. Oaknock, along with help from the elves, created an anti-illusion machine to dispel the illusion cast on Argento and prove Glouphrie's traitory.
Calling upon the council to the spirit tree, Oaknock switches on the machine and reveals the true nature of Argento. The King, furious at his audacity, banishes Glouphrie from the stronghold. According to rumours, Glouphrie went on to create the city of Arposandra and shrouded it in mist.
Incapacitated
Hazelmere deduces that since the machine used elven magic, it must probably be operated by some sort of crystals. He hands you a crystal disc for help in using the machine.

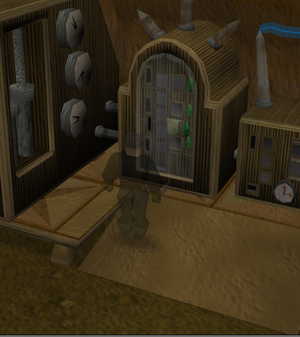
Go back to Brimstail, and share with him all that you've learnt so far. As you are talking to him about crystal discs, a saboteur enters the dungeon and damages the machine. After the cut-scene, head to the broken-down machine and inspect it. It says "it looks like it was made with 2 types of wood and a glue that smells like a coniferous tree and held together with something sticky". You need the following to repair it:
- 1 Maple log
- 1 Oak log
- 1 Mud rune (grind this with a pestle and mortar)
- 1 Bucket of sap (use a knife on an evergreen tree with an empty bucket in your inventory)
- Hammer
- Saw
Grind the mud rune with the pestle and mortar to get ground mud runes. Mix the ground mud runes with the bucket of sap to produce magic glue. Use the glue on the machine and your player will proceed to fix it.
Anti-Illusion
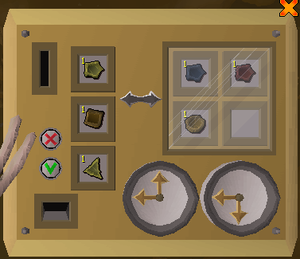
Talk to Brimstail and get all of the crystals from him to save time. The puzzle in the machine is different for every player.
Front Panel
The machine will present a number on the front. This number corresponds to the value of crystal that must be inserted to unlock it. The following table lists the value of each crystal.

| Colour | Value | |||||
|---|---|---|---|---|---|---|
| Circle | Triangle | Square | Pentagon | |||
| Red | 1 | 3 | 4 | 5 | ||
| Orange | 2 | 6 | 8 | 10 | ||
| Yellow | 3 | 9 | 12 | 15 | ||
| Green | 4 | 12 | 16 | 20 | ||
| Blue | 5 | 15 | 20 | 25 | ||
| Indigo | 6 | 18 | 24 | 30 | ||
| Violet | 7 | 21 | 28 | 35 | ||
The value of a crystal piece is the product of the ordinality of the colour in the rainbow and the number of sides the shape has. For example:
- A red circle is worth 1 points (1 * 1)
- A green triangle is worth 12 points (4 * 3)
- A violet square is worth 28 points (7 * 4)

There is an Oaknock's exchanger on the right, which allows you to insert and exchange discs of equivalent value. You will always receive the same value back, in different discs. If you can't use or don't like the discs offered to you, you can press the double grey arrows again and you get a different combination of discs.
For example, inserting a green square (16) into the exchanger can give you a blue triangle (15) and a red circle (1) as one of the many different combinations.
Control Panel

The operating panel requires 6 separate discs adding up to 3 different numbers. The first one must be exactly equal to the value of the disc used. The second must be a combination of two discs, and the third, a combination of three discs.
You can speak again to Brimstail to receive more discs, as the original amount may not be sufficient to unlock and repair the machine.
Assassination

Once you have unlocked the machine, speak to Brimstail again. The once "cute" creatures have now transformed to "evil" creatures, which leads you and Brimstail to the conclusion that the creatures are spies and were responsible in the manipulation of the machine. Brimstail tells you to inform King Narnode of the espionage.
Talk to the King, who believes you and requests you to kill all the spies. (Killing them before talking to the king is allowed) There are six creatures in total, and they have only 1 life point each:
- There is one by Brimstail.
- One by the main gate (south-east from Brimstail's cave).
- One by the stronghold spirit tree.
- One by the giant tortoises north-west of the Grand Tree.
- One at the top of the Grand Tree, by the prison.
- One by King Narnode. (You may have to range or mage this one, as it can get stuck behind a trapdoor)
Finally, talk to King Narnode again and obtain your reward.
Rewards

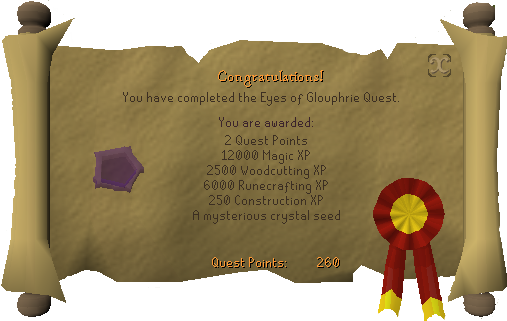
- 2 Quest points
- 12,000
 experience
 - 2,500
 experience
 - 6,000
 experience
 - 250
 experience
 - Small crystal seed; you can take it either to Ilfeen in Isafdar or the singing bowl in Brimstail's cave to turn it into a crystal saw. It allows you to make items that require a saw and 3 levels above your Construction level. It has only 28 charges; however, the recharge is free.
- 2 extra spins on the Squeal of Fortune
Music unlocked
- Brimstail's Scales (only if you have never been inside Brimstail's cave)
Required for completing
Completion of The Eyes of Glouphrie is required for the following:
Cultural references
- The crystalline discs and the puzzle machine are derived from a 1980s game show in the UK called The Adventure Game. The show is based around a futuristic world run by a sentient Aspidistra plant called Rangdo which quivers when it speaks.
- Upon searching the Aspidistra plant in Brimstail's cave, you'll receive the message "Gronda! Gronda!", an anagram for "Dragon! Dragon!" which pays extra homage to The Adventure Game. (As all characters on the show had names that were anagrams for Dragon, as they were supposedly dragons who had shape-shifted into humans)
- During the flashback scene, if you examine Oaknock it will say "Can he build it? Yes he can!" This is a reference to Bob the Builder, a children's television character and show.
- The examine text for Brimstail is "Small but wise, he is." This grammar is a strong reference to Yoda from the popular Star Wars movie series.
- Brimstail's cave entrance may be a reference to Bilbo's home in the Shire from The Lord of the Rings.
Trivia
- "Anima Mundi" is Latin for "the souls of the world".
- It's also a possibility that Oaknock's Machine is based off The Colossus, an early British computer used during World War II to crack the Enigma code.
- If you have started Monkey Madness, then you will mention Karam's camouflage if talking to Brimstail after the machine has been sabotaged.
- When the cute creatures in the Tree Gnome Stronghold change into evil creatures, the one in the Tree Gnome Village stays as a cute creature. This is because the activated machine does not reach the distance to the village. You activate a second machine to reveal its evil self in its sequel, The Path of Glouphrie.
- When the true form of the evil creatures is revealed, your character exclaims, "What on earth is that?", instead of the expected "What on RuneScape is that?"
- After completing the quest, if you talk to Juna, your character will say, "...The machine revealed that the cute creatures were actually Arposandran spies! I destroyed them, and King Narnode gave me a crystal seed that belonged to Oaknock the Engineer."
- If, by misunderstanding, you grind up pure essence and add it to the sap instead of mud runes, you will end up with a bucket of weird gloop.
- There is a typo when speaking to Brimstail. The player's character will say "It's hard to see what he could misuse light..." Instead of "It's hard to see how he could misuse light..."