King Bolren has a new pet. Unfortunately, it's another watcher, like the ones unmasked in the Tree Gnome Stronghold during The Eyes of Glouphrie. Has Glouphrie been watching the Tree Gnome Village, too? If you investigate further you'll find out more about Glouphrie, the history of the gnomes (and their unusual monarchy) and maybe you'll get within a hair's breadth of the lost city of Arposandra...
To start the quest, you need to go to the Tree Gnome Village. The fastest way to reach the village is by using a spirit tree. After entering the village, talk to King Bolren, who can be found next to the village spirit tree.
Dumpling, an evil watcher creature
The king tells you that he has acquired a new pet, Dumpling, who you immediately recognise as an evil creature in disguise. You try to warn Bolren about the evil spy and explain that it is shrouded by illusion magic, sending all the information back to Glouphrie.
Unsurprisingly, he refuses to believe you, so you must now devise a way to reveal the pet's true identity to Bolren. To do so, you require an anti-illusion similar to the Oaknock's machine used in the preceding quest. Since such a device hasn't been located by the gnomes, the king recommends you to look underground for a local gnome who might know something about an anti-illusion mechanism.
Souvenirs, Postcards
Items needed:Crystal saw or small crystal seed. It is recommended to have around 10-14 free inventory spaces to make room for crystalline disks.
Leave the village by squeezing through the south-west fence and walk east to a dungeon ladder. Go down and talk to Golrie in the western area of the cave. When you ask him about a machine powered by elven discs, he tells you that his grandfather used to travel the world and collect elven items to send it to him as souvenirs. He would keep the parcels and crates he received, in the storeroom located in the other part of the dungeon.
He will tell you to search his storeroom for a key (the same one from the Waterfall quest). Go to the eastern-most room and search all the stacked crates. Once you find the key, go back to where Golrie is, and use the key on the northern gate. Search the chest to obtain some crystalline disks; you can use the drop trick to obtain more.
Head back to Golrie and talk about the anti-illusion device. He will mention a tunnel in the eastern part of the cave, so head back to the storeroom and crawl into the opening on the northern wall. Note that summoning familiars are not allowed in here.
Yewnock
Once through, you will now have to pass a monolith puzzle. All you have to do is move the four monoliths a specific direction(s) and search all the crates and chests.
First, push the monolith north, then walk past it and search the chest to receive some crystalline disks.
Next, walk over to the next set of monoliths and push the south-west monolith north, then push the north-west monolith east. Search all the chests within the cave until you obtain a key and Yewnock's notes.
The book talks about Yewnock, the son of Oaknock, building an anti-illusion machine similar to his father's, for the Tree Gnome Village and about his father's research on elven singing bowls and their ability to create various objects with different chants, one of which includes making a crystal saw.
Third, push the small monolith south and push the north-west monolith west. Now go to the singing bowl, and use the crystal saw/seed on it. Right click the bowl and choose the "sing" option to transform the seed into some crystal chime. Now use the key to open the mahogany chest and get the strongroom key.
Finally, push the south-east monolith west and push the south-west monolith north. Use the strongroom key on the gate. The scene will fade out and back in with you now standing in the area with Yewnock's anti-illusion device and a lectern in the corner containing Bolrie's diary.
Consider reading Bolrie's diary on the lectern. Doing so is not required, but reading each part opens cut-scenes that provide insight to Golrie's grandfather, and unlocks the Bolrie's Diary music track.
Oaknock's Legacy
Token exchangerColour/Values keyDumpling exposed!
Yewnock's device operates on the principle of matching shapes of equal value. The value is determined by the colour of an item and the number of its sides. The machine has two operating panels. The right panel exchanges tokens and the left forms the puzzle.
The value of the token or tokens you insert need to add up to the same total value of the one(s) on the right. It's like the puzzle in Eyes of Glouphrie, except instead of a being given a number you are given token(s) to match. Calculate the total value of the token(s) to match, and then solve as before.
Each colour of crystal has a numerical value.
Colour
Value
Circle
Triangle
Square
Pentagon
Red
1
3
4
5
Orange
2
6
8
10
Yellow
3
9
12
15
Green
4
12
16
20
Blue
5
15
20
25
Indigo
6
18
24
30
Violet
7
21
28
35
The exchanger can be used by inserting higher valued discs in exchange for multiple lower valued ones, or combining two smaller discs into a bigger disc. The total value of the input and output will be the same.
Once you have started the machine, you may safely drop all the discs to free up inventory space. Head back up to the village, and kill the watcher. Talk to King Bolren again, and he will tell you of a lone gnome named Longramble, who went in search of the lost city, Arposandra, where Glouphrie resides. However, no one knows his location and only Gianne Jnr at the Grand Tree may be able to help.
Use the spirit tree to travel to the Grand Tree. Bank all unnecessary items and stock up on food and armour.
Climb up to the first floor of the grand tree and speak to Aluft Gianne Jnr in the north-west corner to learn about Longramble the explorer's whereabouts. He tells you that gnomes have been trying deliver a dish to the coordinates 2 degrees 7 minutes south and 3 degrees 7 minutes west.
Teleport to the Castle Wars arena and head west along the water to get to the co-ordinates. Alternatively, you can use the Fairy Ring code BKP and head north-west from there. Use the crossbow and grapple on the tree on the island to cross to the other side.
Talk to Longramble and he will share his findings regarding the sewer, which he believes is proof of gnomish involvement as elves do not pollute their environment. If desired, you can use the Tangled Toad Legs on him, and he will reward you with a mint cake. Note that the mint cake does not heal any health, but restores your run energy by 100%. Start heading north to the sewer entrance.
Mind melding with the dying Spirit Tree.
Halfway up, you will come across a dying spirit tree, by the name of Incomitatus. Incomitatus has lost his connection to the Anima Mundi as his roots have been corrupted by black ichor. Hazelmere, sensing your connection to the anima, contacts you and provides a way to heal the sick tree — as elven magic revolves around Seren, the divine aspect of the anima, you must use an object that will 'chant' the anima back into Incomitatus.
The Spirit Tree is healed!
Use the chimes on tree and it will be healed, allowing you to access the dungeon. If you do not have the crystal chimes, you must get them in the storeroom you visited earlier by using the crystal bowl there.
At this point, Incomitatus is available for teleportation to other spirit trees. You can use the spirit tree teleport to quickly bank at the Grand Exchange, and put the crossbow and grapple back in the bank to use the space for more food or potions.
Walk west into the dungeon entrance to explore. Be sure to bring along your chimes into the dungeon as you cannot fight the final boss monsters without them!
Once inside, players need to run a considerable distance to the end of the tunnel, all of which is a multi-combat zone. Protect from Missiles prayer is recommended, along with an energy restore potion.
There is a caged hallway at the half-way point where players can rest if they close the door behind them. Players can also rest just before entering the final battleground.
All monsters in the sewer require a crystal chime be used on them before they can be attacked. When the chimes are used on them, their colour changes slightly. Be aware that the "vulnerability" wears off after a short time. The chime must be used again to resume fighting.
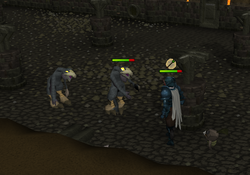
Fighting the Warped Terrorbirds.The end of the tunnel is a room (containing two Warped tortoises) with a pit in the centre, connected to three rooms. Ignore the north and west rooms. Enter the east room, which contains three level 143 Warped terrorbirds. Noting the below, kill them.
Players cannot teleport from the final room, so remain close to the entrance to facilitate quick escape. Staying close to the door also ensures that only one of the 3 terrorbirds can attack you with melee, at a single moment.
All three attack with their ranged attacks or with melee. Both attacks can hit up to 210, and the ranged attacks are highly accurate. Protect from Missiles is highly recommended.
Multiple uses of the chime may be needed to defeat a single monster. If players do not have the required Slayer level to kill the terrorbirds, a wild pie can be used to boost levels to kill them. It is highly recommended in this case to bring multiple wild pies, as the player's slayer level may fall below 56 again.
Leaving the room in the middle of the battle resets the room, including resurrecting any terrorbirds that players had already defeated.
The terrorbirds wil change colour slightly when they are vulnerable, so that you know if you've used the chimes correctly.
It is possible to get the birds stuck on the pillars while ranging them. As long as you have protect from missiles prayer on, they will not even attempt to fire on you and you can safely range them from behind the pillars, while the others are stuck as well.
Watching the Terrorbird guards.
After killing the three monsters, peek through the door on the other side and enjoy a long and remarkable cutscene. Players see terrorbirds Guard no.72 arguing with Guard no. 21, until they detect the player and trigger the traps in the battle room. During the cutscene, do nothing. Players are trapped in the battle room and are dealt multiple hits which do not do any actual damage. Don't try to escape. Wait until Hazelmere appears to help.
Taking any action during the cutscene makes the player appear outside the battle room. In that case, the battle does not need to be repeated. Re-enter the room without trying to escape and wait for Hazelmere.
At the end of the cutscene, players are teleported to Hazelmere's house. Talk to him to complete the quest.
The player is damaged by the magical spells and gasses.
Hazelmere comes to the rescue, and shields the player from the gasses.
The Bolrie poster in the cutscene from the diary is a parody of the United States' 'Uncle Sam' war poster.
If you examine Yewnock, it will say, "Can he copy it? Yes he can!" This is a reference to the children's TV show, Bob the Builder.
The two warped terrorbird guards No. 72 and 21 highly resemble the two guards at the abandoned laboratory in Fullmetal Alchemist, although the guards in the anime were named differently.
When Longramble mentions the edge of the world, this is a reference to when people thought the world was flat. However, it is unsure if this might be a reference to the RuneScape world which is flat, but one can't just walk off the edge. Your character replies with "If the world is spherical, though, you'll never find the edge."
When speaking to Golrie about finding the storeroom key, he muses about how all useful things are found in chests. When in a temple the other day, he found that someone had conveniently put all the keys to the locked doors in the chest in that room, but the chests were hard to reach. This is a reference to the Legend of Zelda series.
Trivia
On the day of release, if you clicked to see the rewards of the quest it said: Quest spoilers will not be released until we can convince Hazelmere to give them up. Please try again tomorrow.
Upon the completion of this quest, one's Adventurer's Log will read: "Proof of the lost city of Arposandra has been discovered! Glouphrie’s threats aren’t over!"
When speaking with Longramble for the 1st time your character will start by saying: "Mr Longramble, I presume?" This is a reference to what H. M. Stanley (a journalist) said to David Livingstone (a lost white Englishman, in the middle of the African jungles of Tanzania, where all other humans where black): "Dr. Livingstone, I presume?". The presumption would be more than obvious, and the calm greeting is typically 'English', because Livingstone was missing without a trace.
Gianne Jr. mentions that he couldn't find the coordinates of the delivery to Longramble the explorer on Doogle Maps (since his maps are written on dried doogle leaves). This is a reference to Google Maps.
When you speak with Longramble you mention a "Magic force that holds us all down" he replies with "I don't think you understand the gravity of the situation", being a pun on his words.
When talking to the sick Tree Spirit about Hazelmere, Hazelmere will say that the player is disturbing him in his contemplations, where he had a vision that might save his life in the future. It might well be that Hazelmere is referring to the something that might happen in While Guthix Sleeps.
Hazelmere's vision
The following text contains spoilers from While Guthix Sleeps. If you do not want the spoilers to be revealed to you, do not read further.
At the end of the quest, Hazelmere mentions a vision of the future, when eight will venture out to fight "The Mahjarrat Deceiver", but only two will return, one being a warrior and the other a slayer. He also predicts you to be wearing robes of black and autumn colours, showing loyalty to an order of evil but not belonging to it. This was indeed a vision of what would happen in While Guthix Sleeps. In the quest, the player gathers eight people (including Hazelmere) to fight Lucien and only two do return: Harrallak Menarous the warrior and Mazchna the slayer master. You also wear Dagon'hai robes, which are coloured black and autumn (gold/yellow and red). The Dagon'hai is an evil order, and you only wear the robes as a disguise.
nl:The Path of Glouphriefi:The Path of Glouphrie


 The player is damaged by the magical spells and gasses.
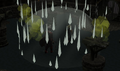 Hazelmere comes to the rescue, and shields the player from the gasses.
 Hazelmere makes the choice to save the player.


 Experience
 Experience
 Experience
 Experience