Haunted Mine
- This article is about the quest. For the haunted mine in which it is set, see Abandoned Mine. For the music track, see Haunted Mine (music track).
| File:Haunted Mine.jpg | |
| Release date | 21 December 2004 (Update) |
|---|---|
| Members only? | Yes |
| Quest series | None |
| Official difficulty | Experienced |
| Official length | Medium |
| Developer | Ian G |
Walkthrough
| Start point: | ||
| Members only: | Yes | |
| Official difficulty: | ||
| Description: | Recent forays into Morytania by some of Saradomin's more fanatical supporters have unearthed murky rumours concerning an abandoned mine in the south. Legend speaks of an unusual material, hidden in the depths of the mines, that is somehow linked to the desolation and fear that now surrounds the place. Do you have the nerve to find out more, and enter the haunted mines of Morytania? | |
| Length: | Medium | |
| Requirements: |
| |
| Items required: |
Recommended:
| |
| Enemies to defeat: | Treus Dayth (Level 95) |

Saradominist Zealot
A Saradominist zealot can be found in the south/western part of the Mort Myre Swamp. From Canifis head south-west along the River Salve. Take the long path to Mort'ton. At the most south-east part of the path is the starting point of this quest near the Haunted mines (grey area). It is recommended to get a recommendation for the haunted mine quest in Burthope from Drill Sergeant Hartman, for faster teleports.
In this area the Zealot is walking around. Tell him that you do not have someone that you follow and he will tell you about the secret cave and the Salve amulet. Alternatively, you can tell him that you follow Saradomin or Guthix and he will still tell you about the secret cave and the Salve amulet. He has a key, but won't trust it to someone else. Pickpocket the Zealot's key from the Zealot to get a key used for a part of the quest. South of the Zealot is a cart track with two carts. Jump over the first and walk past the second. Go through the cave entrance. Note: Using the Zealot's key on the mine entrance will cause you to lose the key. If you die or exit the cave, you must get another from the Saradomin Zealot.
Cave Level 1
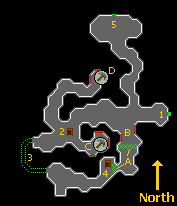
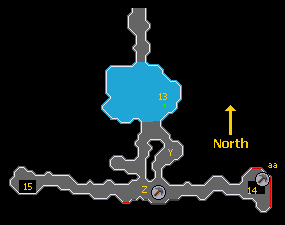
The first cave level has two ladders going down. The first ladder (marked 1 in the map) is west of the cave entrance. Don't use this ladder yet. At the end of the corridor is another cave exit. Any blockages in your path are marked with (D). Unfortunately the blockages block your path to the ladder so you have to go around, go past ladder 1 to point B go through the cave. You will be outside of the mine continue on the track and re enter at Point C. Continue in and go down ladder 2.
Cave Level 2
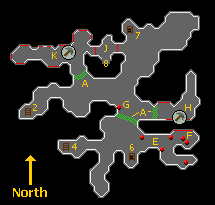
An easy level. From (2), go down the ladder directly east (3).
Cave Level 3
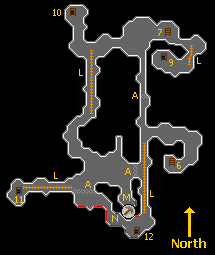
The ladder (3) puts you on the eastern side of cave level 3. Head west to the tracks and south on the track. Be careful, a cart (E) is moving up and down. The cart will hit all players that get in its way, causing some damage and pushing the player back to the end of its path. Fortunately, there are some safe spots along the track. Use them to get out of the path of the cart. Head south to the end of the track and head down the ladder (7) to cave level 4.
Cave Level 4
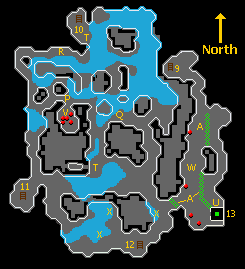
The level 4 cave has several key elements which are marked on the map:
- (F) the glowing fungi
- (G) the pointset (trackmap) panel
- (H) the cart
- (I) the levers A, B, C, D, and E
- (J) the levers F, G, H, I, J, and K
- (K) the water valve
- (L) a chisel spawn, if you didn't bring one
- (M) the water operated elevator
The map uses the corresponding numbers to indicate the locations of these key elements. There are three ladders on this level. When players go down the ladder from level 3, 7 on the map is where they find themselves on level 4.
Glowing fungi
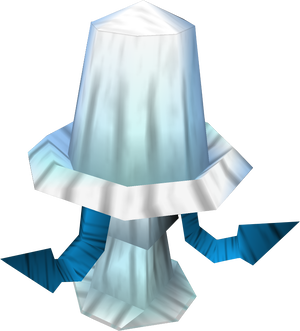
The glowing fungus is the light source required to access the deepest level of the mines. Unfortunately, daylight exposure will cause them to crumble to ashes and since the only path to the lowest level takes you outside, it is impossible to keep inside the inventory. The only option is to use a complicated system of carts that is still operational at this level. The carts can be used to transport the fungi light source to the other side of the rock slide blockades in the level 3 cave.
The Cart
After picking a glowing fungus (F) place the fungus in the cart (H). The trackmap operates the cart system. Right click the trackmap on the northern wall of the corridor indicated by (G). The trackmap displays inside the game window.
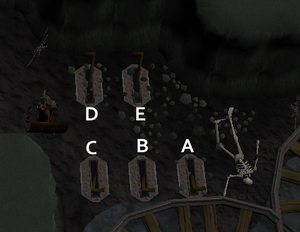
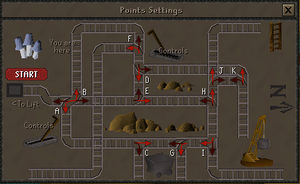
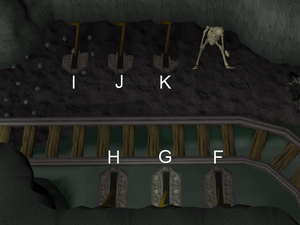
Pressing the orange start button sets the cart system in motion. The objective is to get the cart from the start position to the exit point next to the ladders on the trackmap. There are several other exit points as well. The path of the cart is determined by the levers shown on the trackmap. The switches A, B, C, D and E on the trackmap correspond to levers that can be found at location (I) on the cave level 4 map. Levers F, G, H, I, J and K are at location (J). Any time you need to know what letter(s) the lever(s) represents, examine the lever(s) to find out.
The path the cart needs to take is easy to determine by starting at the ladder's side. The setting of the switches that achieves this is given in the figure below.
The switches refer to the spot at which the tracks intersect. The correct switches to flip are: A, B, D, E, I, and J or B, E, D, I,and J . When your map resembles the Perfect Trackmap Setting to the left, and you have loaded the glowing fungi to the appropriate cart, press Start. If you have done this correctly, you will see a dialogue box with yourself wondering whether the cart ended up anywhere useful. If you have trouble, especially with A and B, try pulling them unevenly (A, B, B etc.) until you get it. Pulling B 3 times can sometimes work as well.
NOTE: If done incorrectly, and you sunk your cart, you must place another fungus into the cart in order to see the dialogue box.
Finding the cart again
Starting from cave level 4:
- Go up the ladder (7) near the glowing fungi spot (F) to level 3. Ladder (7) is located south.
- Walk north on track, avoid the cart (E) and go up on the ladder east (3) and arrive on level 2.
- Go west and up the ladder (2) to cave level 1.
- At cave level 1 go west and exit the cave (C) to outside.
- Enter the northern cave entrance (B) and take the ladder (1) east down to cave level 2.
- Go east and a little north and go down the ladder (4) to cave level 3.
- From the ladder at level 3, go to the north-west corner of the cave in that level and take the ladder (5) down. The cart is (N). Search the cart and take the fungus that you put in it earlier. If there is no fungus in the cart, you made a mistake at the trackmap. There is no alternative but to go back to the cart system, put a new fungus in and repeat the entire process.
Water Valve
With the fungus, go back up the ladder (5) to level 3 and head back east in the direction of the ladder going up to cave level 2. Walk east past this ladder (4), quickly cross the path of the cart (E) to get to another ladder (6) going down. This ladder leads down to the east part of cave level 4. If you go down this ladder on the west side you will be stuck!
This part of the cave features a water-powered elevator lift (M) that leads to the next level down. If you didn't bring your chisel, now is the time to get one at (L). As the water power is not going to the elevator, locate the water valve (K) and use Zealot's Key on it to activate the water flow. After activating the waterflow, a sneaky ghost will close the valve again if you take too long getting to the elevator. Therefore, run quickly around the water pipe system to the elevator and go down the lift (M) to cave level 5. The elevator remains operational after the initial activation, so the Zealot's key should no longer be needed (if required pickpocket Zealot again).
The Ghost Fight
WARNING: If you die, you will have to get another mushroom again!!!
After going down the elevator, there will be a chamber filled with water which will extinguish any light source, including the mining helmet, except the lighting fungus. Any tinderbox brought will become a damp tinderbox and cannot be used to relight any light source. The Seer's Headband will not function as a light source in the lower cave. Go a bit south and take the east corridor.
At the far east end of the corridor is a staircase (8) leading down. With the lighting fungus in the inventory the cave will be properly lit. Go through a door to a big room with cranes and carts. This quiet area is where the big fight will take place.
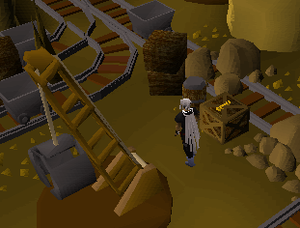
Familiarise yourself with the surroundings. Take note of carts and cranes. They will start to operate during the fight and can cause some harm. As the opponent will move around a lot, it may be useful to learn to navigate around the dungeon. The key to the battle is to avoid the cranes and the carts. The cranes are stationary, so just stay out of their reach. The carts can only move along the track they are on, similar to the other carts in the dungeon. These carts can hit hard (rapid 60's to 90's while dragging a player along the track). There also will be flying pickaxes. Note that the Protect from Missiles prayer will NOT stop all of the damage, but it will still reduce it.
NOTE: Take off auto-retaliate, otherwise you can misjudge in the timing of his moves.
To start the fight, try to pick up the innocent looking key (O). The ghost Treus Dayth will appear and starts the attack after a small cut scene introduction. He is level 95. The Ghost will be identified on the minimap by a flashing yellow arrow. When chasing the Ghost, try to stay out of the way from the moving carts and the cranes. The Ghost itself is not that strong. About 15 monkfish will do. An Emergency teleport, like the Ectophial, is useful too.
The ghost won't attack directly, instead, all his damage comes from the machinery.
It is not possible to freeze the Ghost from moving using magic or ancient magicks, and he is immune to Poison.
A character with a combat level of at least 90 shouldn't expect a difficult fight. For those planning to attack by using melee, higher defence and constitution levels are recommended. Saradomin brew offers maximum LP per slot of inventory and can be useful. Combat potions might be useful. Both magic and ranged are very effective against the ghost. The spell Iban Blast often hits for over 200 damage. Ranged and magic attacks are highly recommended, as you can attack over the physical obstacles that he tends to put between himself and you.
- If you are having too much trouble with this boss, then you may try using the spell Crumble Undead on him. As a ghost, he is very vulnerable to it...and it can often deal 100+ damage to him easily.
- Special attack with Dragon dagger will land one hit on him causing him to become unattackable, then the second slash will automatically hit him next time he becomes unattackable so you can land two hits chasing him down once.
Getting the Crystal
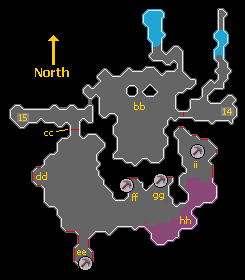
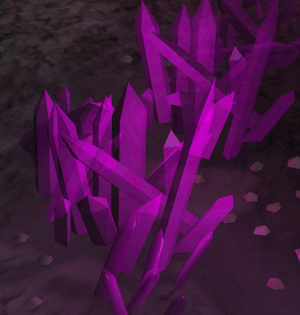
After defeating the Ghost, you can easily pick up the innocent looking key (Crystal-mine key). Now head back to the stairs (8) and go one level up. Walk the entire corridor west to the other staircase (9). The mining key opens the door (P) to the area where you can find the crystal outcrop (Q) (in the south east region). Use a Chisel (or Dwarven Army Axe) to cut a piece from one of the Crystal outcrops in the Crystal mine to obtain a Salve shard and complete the quest.
- You can take as many Salve shards as you want by first crafting a completed Salve amulet, dropping it, then taking shards and dropping those. When the required amount has been picked, pick up the shards first, and then the amulet last. This method requires you to carry only one Ball of wool. The rest can be collected later.
- You now have access to the Lair of Tarn Razorlor, Which allows you to enchant your salve amulet increasing its bonus.
- If you die, you will have to get another mushroom again!!!
Reward
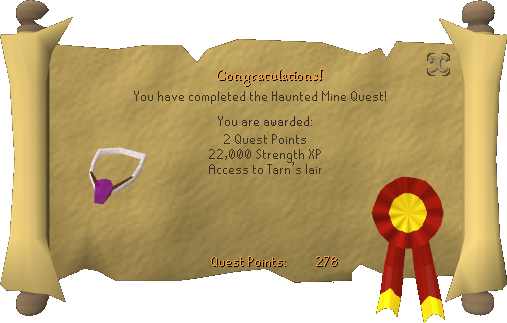
- 2 Quest Points
- 22,000
 Experience
 - Crystal-mine key (which can be added to the Steel key ring)
- Access to The Lair of Tarn Razorlor
- Ability to make Salve amulets, which gives combat bonuses against: Zombies, Skeletons, Ghosts, Banshees, Crawling Hands, Aberrant Spectres, Revenants, Shades, Ankous, and any other undead creatures. It has been confirmed that it does NOT give any bonus against any of the Barrows brothers.
- 2 extra spins on the Squeal of Fortune
Required for completing
Music unlocked
Trivia
- A beast of burden or quest kit can both carry a light source and a tinderbox without dampening it. However, this is useless along with any of the seer's headbands, since the quest requires the fungus in order to advance.
- Upon completing this quest your Adventurers Log will read "Deep beneath Morytania, I dodged pickaxes, puzzled with minecarts and collected fungi. Not only that, but I defeated Treus and collected a salve shard!"
- If you have Zealot's key in your possession, you can give it back to him by saying you did it and then saying correction, the key that was in your possession.
- Even when wearing an Amulet of Ghostspeak, the sneaky ghost will still say, "Ooooo oooooo!"