The Temple at Senntisten

| File:Temple at Senntisten.jpg | |
| Also called? | TaS |
|---|---|
| Release date | 3 December 2009 (Update) |
| Members only? | Yes |
| Quest series | Mahjarrat (#4) |
| Official difficulty | Master |
| Official length | Medium |
| Developer | Rod C, Paul G, Matt H |
- This article is about the quest. For the temple, see Senntisten Temple.
Official description
| “ | Ali the Wise has been talking to one of his 'old friends' - a certain Dr. Nabanik - about your various dealings with the mysterious Mahjarrat. As a result, Dr. Nabanik thinks you would be the perfect candidate to aid him in his restoration of the temple beneath the Digsite, but to what end?
And who really is the mysterious Dr. Nabanik? |
” |
Walkthrough
| Start point: | ||
| Members only: | Yes | |
| Official difficulty: | ||
| Description: | None | |
| Length: | Long | |
| Requirements: |
| |
| Items required: |
Recommended:
| |
| Enemies to defeat: |
|

The Mysterious Archaeologist
Start the quest by talking to Ali the Wise in the small north-western most building in Nardah. Consider using Fairy ring code D-L-Q and heading south to get into Nardah.
Ali starts conversing about Zaros and his conquests over the world, with the help of the Mahjarrat. He remembers talking to one of his colleagues on the matter, Dr. Nabanik who, acquainted to you as well, had asked for your help. He will inform you that Nabanik can be found in the courtyard of the Exam Centre, near the Digsite. Ali gives you a digsite pendant (5) in order to conveniently reach Nabanik.
At Your Service!
.png)
Outside the exam centre, Dr. Nabanik reveals that he is in fact Azzanadra, the Zaros-loyal Mahjarrat who was freed during the events of the Desert Treasure quest. He will tell the player that he needs consent and authorization from the lead archaeologist to start reconstructing the Zarosian altar beneath the Digsite.
Talk to the Archaeological expert inside the exam centre. As a reference for Dr. Nabanik, you will now be quizzed on Dr. Nabanik's credentials; any answers will do. After convincing the lead archaeologist that Nabanik can be trusted, he will give the player a Restoration certificate. Head back to Azzanadra, who takes the certificate off you and tells you to meet him at the altar. To access the site, he provides you with rope.
You may use another charge on the pendant for speedy travel. In the Digsite, use the rope on the western-most winch and operate it to enter the Digsite Dungeon. Walk to the ruined altar in the southern part of the dungeon, and meet up with Azzanadra.
To-Do List
To rebuild the altar, Azzanadra requests you to obtain two rare items for him:
- The Barrows icon, obtained by looting their chest after killing all the six Barrows brothers.
- The Frostenhorn, from a cold fortress in the Wilderness.
Azzanadra hands you a ruined backpack, containing a battered letter and a heat globe. The letter advises you to bring runes to "draw them to me just a short distance", speaking of more heat globes in the fortress.
Players MUST talk to Azzanadra about each mission, or they will not be able to complete either of them. Also, the order of retreiving the artefacts can be chosen by the player.
Barrows Icon
- For more information on how to kill the Barrows brothers, see this page.
The Barrows is an area located in the interiors of Morytania, east of the town of Mort'ton.

First, kill the 5 Barrows brothers found in their tombs below the mounds. Enter the underground crypt via the tomb of the missing brother and find your way to the centre of the dungeon.
Keep in mind that you do need to kill the final brother in order to receive the Barrows icon, along with the regular Barrows rewards. After killing all the 6 brothers, search the chest to get the Barrows icon.
The icon simply absorbs the power of prayer surrounding it, and does not cause the prayer-draining effect in the Barrows crypt itself, thus the effect still remains after the quest.
Frostenhorn
Warning: Iron and steel dragons are present outside the fortress, so an anti-dragon shield and/or antifire potions are highly advised. Once inside the courtyard players will be safe from dragonfire, but the dungeon floor will still have aggressive, high-level Icefiends with melee and ranged attacks, waterfiends with ranged and magic-based ranged attacks, and an Ice demon with magic and ranged attacks. Food and armour are highly recommended, even for players with a high-level combat.
Items needed:
- Telekinetic Grab. It is highly recommended to bring several sets, possibly an Air Staff so that, if you mess up, you don't have to start over. (40 law runes and 300 air runes can be looted from the crate in the lower dungeon, although few players have reported being unable to find them)
- Anti-dragon shield or other anti-fire measures.
- Heat globe. (supplied from the backpack earlier, make sure you actually bring it)
Items suggested:
- Anything to prepare yourself for a lengthy fight, including:
- Prayer potions
- Attack and Strength potions (if using melee)
- Food
- A one-click teleport for emergency
- A healing familiar (Unicorn stallion, Bunyip, etc.) to aid you in the multicombat dungeon.
- High quality melee and/or range defence armour. Torag's set is highly recommended, which in combination with the protect from magic prayer, will give you good defence against the fiends in the fortress.
Magnifying Power
The Frozen Waste Plateau, containing the Ghorrock Fortress, is commonly used for player killing. However, since the Wilderness and Free Trade update, there is an alternate, safe entrance into the fortress. The fortress is not considered part of the Wilderness, so once in it, the player is entirely safe from player killers and can teleport out of it.
-
Ghorrock Fortress as it appears on the world map
-
 The archway to the south
 -
 The safer western entrance to Ghorrock


Suggested routes to reach the Ghorrock Fortress are as follows:
- (Safe) Travel to Ghorrock Fortress using the canoe by Erjolf, the Fremennik met during The Tale of the Muspah. Once near the Mahjarrat Ritual Site Cavern, marked on the minimap with a dungeon icon, go east.
- (Unsafe at arrival, safe after moving west) Level 89 Ice Plateau Teleport on the Lunar spellbook.
- (Unsafe at arrival, safe after moving north) Level 96 Ghorrock Teleport using Ancient Magicks.
- (Unsafe for around 20 Wilderness levels) Edgeville or Ardougne teleport lever to reach the area, then travelling west through the Frozen Waste Plateau.
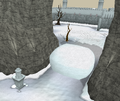
The entrance to the fortress grounds is blocked by a large block of ice and snow. Place the heat globe you obtained from Azzanadra on the pedestal just on the north side of the entrance; the pedestal will develop an aura of orange light and the block of ice/snow slightly melts. A "Squeeze-past" option becomes available from the ice block. This has no Agility level requirement.
Beware of the metal dragons past this point.
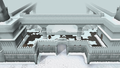
The Frozen Fortress

- Run through the arched entrance of the fortress and climb up the stairs to the west.
- Run to the south-east corner of the castle, then climb down the nearby stairs back into the courtyard.
- Next to the door, a few squares to the north, is a damaged wall; scale up it.
- Continue to the north-west corner of the floor, past the broken pedestal, then climb down the smashed rampart/wall.
- Enter the trapdoor in front of you to delve into the first level of the dungeon, bearing in mind that there are waterfiends and icefiends inside.
-
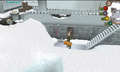 Scale up east damaged wall.
 -
 Climb down north-west smashed rampart.


Upper Level
It is recommended that Auto Retaliate be set to 'OFF' while in the dungeon to avoid being distracted by the waterfiends and icefiends. Also, protect from magic will prevent you from taking damage from the fiends.
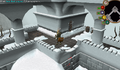
You find yourself in the upper level of the fortress dungeon. The area you want to reach is the south-west corner of this level. Unfortunately, the direct path is blocked by ice, therefore you must melt some of it by using the heat globes you will find inside the fortress.
- Go into the eastern room and pick up the heat globe from the pedestal. Something nearby may freeze further.
- Return to the middle room, and place the heat globe on the pedestal. This will melt an ice block, which will unfreeze a formidable waterfiend.
- Pass through the gap where the ice was into the western room, ignoring the waterfiend. You must now telegrab the heat orb you just placed, from this room. Doing this will retrieve the globe, refreeze the ice, and may turn the waterfiend into an icefiend if it has not been defeated.
- Use the globe on the pedestal in this room to melt the ice to the trapdoor, and spawn another waterfiend. Go down the trapdoor, leaving the orb in place.
Lower Level (1)
- Pick up the heat globe from the floor of the southern room.
- The crate in this room may be looted for 40 law runes, 300 air runes or a hammer, after the ice block has been melted.
- Use the heat globe on the pedestal back in the north room, melting various ice deposits and spawning two waterfiends.
- Travel east until you find another pedestal ("Radiant pedestal"), and remove the imperfect heat orb from it.
- Exit the dungeon the way you entered, returning to the surface castle courtyard.
Surface

- Scale the damaged wall, then head to the north-east corner to the destroyed pedestal. Use the imperfect heat orb on the "smashed globe-holder" on the ground, next to the "smashed pedestal".
- Once you have added the globe, select the "Push" right-click option. A small cut-scene will play, wherein the player pushes the orb down the snowdrift and into the hole at the centre of the courtyard.
- Return to the lower level of the dungeon, re-entering the trapdoor and choosing the option "Yes, carry on from where I was."
Lower Level (2)
- When you make it back down to the lower dungeon, head back to the area where the imperfect heat globe was acquired.
- Go south, then west to find and pick up another heat globe.
- Head back east, to the point where the path forks north, and you will see a pipe in an alcove on the south wall. The pipe appears as a small tunnel on the minimap but is NOT marked in red, unlike the other openings; use the globe to get it stuck in the mouth of the pipe.
- Use the hammer on the globe, or simply select the 'Whack-pipe' option. The globe will be expelled from the other end of the pipe and land on a pedestal in the other room. This will melt another ice block and spawn another waterfiend, but allowing the player to pass through the passage.
- Run west, along the path, till you reach the south-eastern room.
- Climb the ladder and be prepared to fight an Ice demon. If you are low on food, then you can restock at this point.
Frosty Foe

- After climbing the ladder, run west a few rooms to engage with the level 177 Ice demon.
The Ice demon is reported to be extremely weak against Ranged attacks. It attacks with both ranged and magic, but as its magic attacks hit harder, Protect from Magic is recommended over the range counterpart. A 150+ ranged defence bonus ensures minimal need of food. Kill the Ice demon to get the Frostenhorn as a drop.
If you die or teleport away after killing the Ice Demon but before retrieving the Frostenhorn, it will appear outside the trapdoor leading underground.
The Big Bang
Return to Azzanadra however you wish. Teleporting to him via Ali's Digsite pendant is a suggested route. Make sure you bring the two items requested by Azzanadra: the Barrows icon and the Frostenhorn. Azzanadra will be in the Digsite Dungeon where you left him, but he will have finished restoring the altar, in quite an impressive fashion.
He will tell you that you need to retrieve a last item from someone just outside, by the winch. Go up the winch and you find the assassin who tricked you during Devious Minds. Talk to him and he will give you the item Azzanadra wants – the relic you unwittingly helped him steal from Entrana. Pass on the relic to Azzanadra downstairs.
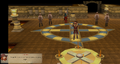
A cutscene plays, where Azzanadra opens a communication portal and contacts Zaros himself. As the connection between worlds is established, Zaros's influence apparently returns to the world in a small way. This is seen in the cutscene as, throughout the world, strange things occur.
Talk to Azzanadra again to complete the quest and receive your reward.
-
 Azzanadra praying for Zaros to return.
 -
Zaros' first words in thousands of years, trying to say "Azzanadra".
-
 Azzanadra receiving power. (Click to view)
 -
 The digsite workmen receive some power. Something's happening...
 -
 A statue of Zamorak is destroyed invoking the anger of Zamorakian monks against Saradomin.
 -
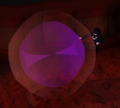 The portal almost exploding.


Congratulations! Quest complete!
Rewards

- 2 Quest points
- 1 × Experience lamp providing 23,000 experience in any chosen skill (level 50 or above)
- 2 × Combat lamps providing 20,000 experience each in a chosen combat skill other than Prayer (level 50 or above)
- 10,000
 experience
 - Access to a new set of prayers, known as the Ancient Curses. Players must read the Ancient hymnal, given to you by Azzanadra, in order to actually activate them.
- Access to the Altar of Zaros in the Senntisten Temple, located below the Digsite. Praying at this altar boosts your prayer points to 15% over your current maximum level.
- 2 extra spins on the Squeal of Fortune
- Access to Ghorrock - a fortress, inhospitable and dangerous to reach, but where iron and steel dragons, waterfiends, and icefiends can be found.
Music unlocked
- The Horn of Chill (unlocked when facing the Ice demon; also possible to unlock by standing next to the central ice block on the first floor)
- Zaros Stirs (unlocked at the end of the quest after entering the newly-refurnished altar.)
Required for completing
Completion of The Temple at Senntisten is required for the following:
- Ritual of the Mahjarrat
- Varrock Tasks:
- Elite: "Splitting Headache"
- Falador Tasks:
- Elite: "Altar-ed State"
Cultural References
- The player says to Dr. Nabanik Dr. Nabanik, I presume?. This is a play on the famous quote Dr. Livingstone, I presume? by Henry Morton Stanley.
- If you talk to the Strange Old Man with the Barrows icon in your inventory, he will say: Run to him, run as fast as you can! This is a quote from the novel and film Charlie and the Chocolate Factory.
Trivia
- On the day of release, the spoiler read: Curses! The connection with the rewards has been temporarily lost. Normal service will resume shortly.
- This is the fourth time a god has been seen in-game, the first being Amascut in the form of the Wanderer, in Icthlarin's Little Helper.
- After completing the quest, one of the chat options after asking Azzanadra about Zaros is: "Is Zaros a cat?". This is a reference to a popular theory, which states that Bob the Jagex cat is Zaros. Azzanadra confirms that Zaros is not a cat.
- Attempting to return the Relic to Entrana will result in failure. Speaking to the High Priest with the relic in the inventory will make him say: Argh! Look out, he's got a boulder! The game interface will state that The High Priest objects to the relic's menacing appearance. Players who do so will be shipped back to Port Sarim, with their characters knocked unconscious and in the "bowed-over" position upon waking.
- On the week of release, the message on the start-up screen was: Guess who's back! This most likely refers to Azzanadra, or possibly to Zaros.
- If you tell the archaeological expert that Dr Nabanik made his fortune selling magical staves, he will say he has heard something about that around Varrock, a reference to the money-making methods involving battlestaves at the Grand Exchange.
- Speaking to the assassin during the quest leads you to an option where he says "There are literally thousands of adventurers born just like you every day!" This is a reference to the daily RuneScape account creations.
- When telling Juna about this quest, your character will say, "...And, with the communication portal restored, Azzanadra could talk to Zaros again." to which Juna replies, "Finally, the order shifts towards balance once again. You know, of course, that Zamorak is merely a pretender-god. For a mortal to assume such power is really not good for balance."
| Mysteries of the Mahjarrat |
1. The Tale of the Muspah • 2. Missing My Mummy • 3. The Curse of Arrav • 4. The Temple at Senntisten • 5. Ritual of the Mahjarrat |
| Rise of Lucien |
1. Temple of Ikov • 2. While Guthix Sleeps • 3. Ritual of the Mahjarrat |
| Rise of Zaros |
1. The Dig Site • 2. Desert Treasure • (Devious Minds) • 3. The Temple at Senntisten • (Ritual of the Mahjarrat) |
| Arrav |
1. Shield of Arrav • 2. Defender of Varrock • 3. The Curse of Arrav • 4. Ritual of the Mahjarrat |
| Other quests |
Hazeel Cult • Fight Arena • Enakhra's Lament • The Firemaker's Curse |
| Related miniquests | |
| Related lores | |
nl:Temple at Senntisten fi:The Temple at Senntisten pt:Um templo em Senntisten