Abandoned Mine
- This article is about the dungeon, the Abandoned Mine. For the quest that takes place here, see Haunted Mine. For the lair adjoining the mine, see Lair of Tarn Razorlor.
| File:Abandoned mining cave.png | |
| Also known as? | Haunted Mine(s), Mort Ridge Mine |
|---|---|
| Location | South-west Morytania |
| Members only? | Yes |
| Rocks | 4 Clay rocks 11 Copper rocks 15 Tin rocks 15 Iron rock 26 Coal rocks 12 Mithril rocks 18 Adamantite rocks |
| Monsters | Possessed Pickaxe, Animated Spade |
| Requirements | Haunted Mine |
| File:Abandoned mine.png | |
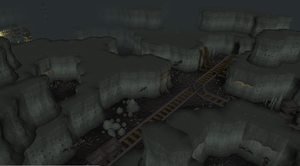
The deserted Mort Ridge Mine, hence more commonly known as the Abandoned Mine, is an old, multi-level mine under Morytania that once was the site of an extensive mining operation. It is now abandoned and partially flooded by the River Salve. The mine features prominently in the Haunted Mine quest.
The mine has six levels. It has many ore veins, which yield clay, tin, copper, iron, coal, mithril, and adamantite ore, and the crystal mine. In the quest, you cut a piece of crystal to make a Salve amulet. After the quest, you can cut more crystal to make a new amulet if you lost your Salve amulet.
The mine also contains the entrance to the Lair of Tarn Razorlor (dungeon), which can be found through a passageway in the northern part of the mine's level 1. This is the location of The Lair of Tarn Razorlor miniquest, in which you can fight Tarn Razorlor and enchant a Salve Amulet. The lair also has Terror dogs, which are sometimes assigned as Slayer tasks.
History
Morytania had been under the rule of the Vampyres for some time. Lord Lowerniel Vergidiyad Drakan aided Zamorak in his rebellion against the god Zaros and was rewarded with Morytania as his land to rule, provided he could conquer its inhabitants. He quickly mastered Hallowvale (later called Meiyerditch), the land's chief city, during the God Wars, which gave him complete control over Morytania.
During the Fourth Age, the hordes of Morytania were engaged in a constant struggle with the people of Misthalin and Asgarnia. The Zamorakians, seeking to expand their empire to include Misthalin, launched assault after assault across the River Salve against that land. The Salve, a large river with many defensible cliffs, effectively separated Morytania from Misthalin. The only crossing point was at a small spit of land west of modern-day Canifis. The battles were endless, and the people of Misthalin began to lose hope when six of the Seven Priestly Warriors were killed at the site.
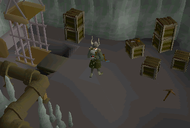
In a desperate attempt to end the wars, a number of priests invoked the powers of Saradomin to bless the River Salve, which would, it was hoped, prevent the unholy Morytanians from crossing. Soon, the Paterdomus Temple was built at the sight of the battles, effectively ending the war between Morytania and the humans.
Years later, during the late Fourth Age, a large ore vein was discovered west of modern-day Burgh de Rott. The Drakan family used a massive number of enslaved humans gathered throughout Morytania to work the mine. The mine was dug deep and rich veins of ore including mithril and adamant were found. The mine became one of the largest in the known world at the time.
The miners, after digging far deeper beyond the limits of safety, discovered something hidden in the mine's depths. As soon as Lord Drakan was informed of this, he ordered the mine be shut down. Worse yet, all within the mine, slaves, vampyres, and crewmen alike, were slaughtered or trapped in the ensuing collapse. What was discovered in the mine remained a secret.
During the Haunted Mine quest, players venture into the now-haunted mine as they attempt to discover what the miners found, and why Lord Drakan feared it so.
The quest reveals that the holy River Salve had been seeping into the lowest reaches of the mine. Although most of the water was tainted by the land's twisted soil, some remained pure and retained Saradomin's blessing. This collected in the mine's lowest shaft, with purple crystals growing in it. These crystals absorbed the blessing and, when exposed to the unholy creatures of the land, could severely weaken or even kill them. Drakan thus had the mine destroyed to prevent the crystals from falling into the hands of Saradominists. To further protect the crystals, Drakan imprisoned Treus Dayth, one of his followers, on the lowest level. Even after Treus Dayth died, his tortured soul continued to serve as the mine's guardian.
A tour of the mine
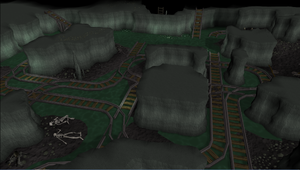
- The levels are numbered in the order the player encounters them in the Haunted Mine quest, with level 1 being the closest to the surface and level 6 being the deepest.
It should be noted that a player will need a light source and a tinderbox (light source gets extinguished as soon as you go down the stairs) if they wish to enter the part which contains the crystal mines.
Be aware that each level of the mine contains two or more separate zones. You cannot get directly from one zone to another when on that level! Instead, you may have to ascend or descend to other levels, or go outside, to get from zone to zone. A few zones are completely inaccessible.
All of the ladders and stairs between levels are labelled to make finding them convenient. For example, ladder 2 on level 1 and ladder 2 on level 2 are the same ladder, connecting the two levels.
This tour assumes the player has completed the Haunted Mine quest. For players playing that quest, see its article for the special things that must be done in the mine.
Entrances
The mine can be approached from the Mort Myre Swamp to the north. Level 61 Vampyres infest this path. Follow the mine cart tracks to find the main entrance. Most mine carts can simply be walked around, although one near the entrance itself must be climbed over (clicked on). There are also two back entrances near the River Salve, where part of the mine cart tracks temporarily leave the mine. All three of these entrances go to level 1.
There is also a secret entrance to the mine. This goes to a room on level 2. However, both doors to this room are locked and require the Crystal mine key to be unlocked. The player acquires this key during the Haunted Mine quest.
For those who have aided the Burgh de Rott in the quest In Aid of the Myreque, a new path opens to the east. Jumping over the low fence (no Agility level required) will bring the player near the Mine. Just run west a little and then choose your entrance. Note: Vampyres also plague this area.
Level 1
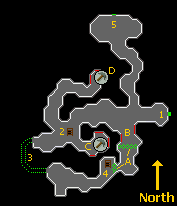
| Map Label | Description |
|---|---|
| 1 | Exit to the main entrance of the mine. |
| 2 | Ladder down to level 2. |
| 3 | Mine cart tracks pass outside the mine here. You can crawl through the mine cart tunnels to follow the tracks. |
| 4 | Ladder down to level 2. |
| 5 | Passageway to the Lair of Tarn Razorlor (dungeon). |
| A | Obstructions that block passage. |
| B | 4 clay ore veins. |
| C | 5 tin ore veins. |
| D | 4 copper ore veins. |
Level 2
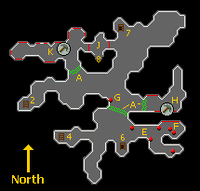
| Map Label | Description |
|---|---|
| 2 | Ladder to level 1. |
| 4 | Ladder to level 1. |
| 6 | Ladder to level 3. |
| 7 | Ladder to level 3. |
| 8 | Stairs up to secret entrance on surface. |
| A | Obstructions that block passage. |
| E | Two bronze daggers, a bronze spear, a bronze pickaxe, a steel pickaxe, and a steel longsword. |
| F | 5 tin ore veins, all but one unreachable. |
| G | A bronze pickaxe. |
| H | 4 copper, 2 tin, 2 other (perhaps tin, can't be seen) ore veins, all unreachable. |
| J | Room with two locked doors. Doors can be unlocked with the crystal mine key. |
| K | 8 coal, 5 mithril, 5 adamantite ore veins. |
Level 3
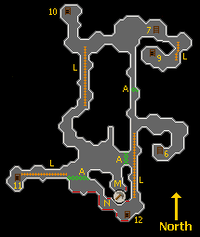
| Map Label | Description |
|---|---|
| 6 | Ladder to level 2. |
| 7 | Ladder to level 2. |
| 9 | Ladder to level 4. |
| 10 | Ladder to level 4. |
| 11 | Ladder to level 4. |
| 12 | Ladder to level 4. |
| A | Obstructions that block passage. |
| L | Haunted mine carts. Each cart moves along a portion of the mine cart tracks, as shown on the map. Players can avoid carts by walking or running behind or ahead of them and using the occasional wall nooks to let the carts pass. (Be careful; a few nooks are full of abandoned equipment and cannot be entered.) If a cart bumps into the player, the player will be pushed down the cart's route, periodically taking minor damage. |
| M | 2 tin ore veins. |
| N | 8 tin and 7 copper ore veins. |
Level 4
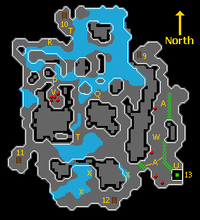
| Map Label | Description |
|---|---|
| 9 | Ladder to level 3. |
| 10 | Ladder to level 3. |
| 11 | Ladder to level 3. |
| 12 | Ladder to level 3. |
| 13 | Lift (elevator) to level 5. This is made operable during the quest and remains operable afterwards. |
| A | Obstructions that block passage. Note that the northernmost set of obstructions do not reach the mine's outer wall and thus can be traversed there. |
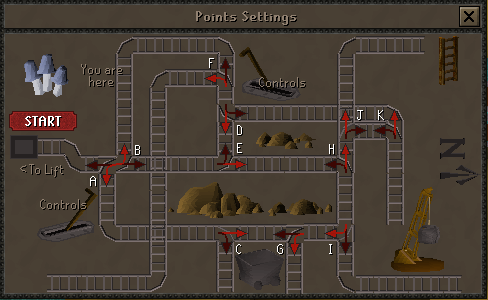
| P | Point settings showing how the track switches are set on this level. Pressing 'Start' on this panel moves the mine cart (see T). |
| Q | Levers for track switches A, B, C, D, and E. |
| R | Levers for track switches F, G, H, I, J, and K. |
| T | "Searchable" mine carts. To move a glowing fungus from the central T cart to the northern T cart (by ladder 10), put a fungus in the cart, operate the point settings (P) correctly, go through the mine to get down ladder 10, and search the cart there for the fungus. |
| U | Water valve. Used during the quest, with the Zealot's key, to make the lift operable. Does not need to be used after the quest. |
| V | Iron pick and several coin spawns. |
| W | Chamber contains two bronze pickaxes and two chisels (useful for cutting crystal). |
| X | Glowing fungus spawns. The fungus is the only way to light the dark portion of level 6. It turns to ashes if exposed to sunlight, it must be transported using the point settings (P) and mine carts (T). The fungus is quite fragile and immediately turns to ashes if dropped. |
If you need to move a glowing fungus across level 4 to ladder 10, use these points settings:
Level 5
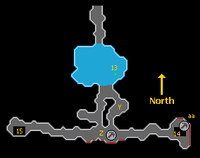
| Map Label | Description |
|---|---|
| 13 | Lift to level 4. When players descend to level 5 on the lift, they appear in the flooded chamber and wade to the south shore. Any light source other than a glowing fungus is extinguished and any tinderbox in inventory becomes damp and unusable. (A light source is not needed on this level but is needed on part of level 6.)
Players can return to the lift by click on it when standing near the water. (Players cannot just wade into the water from the shore but must click the lift.) |
| 14 | Stairs down to level 6 (Treus Dayth zone). |
| 15 | Stairs down to level 6 (crystal mine zone). |
| Y | Several iron pickaxes litter the floor of this level. If the player attempts to pick them up, they turn into Possessed Pickaxes and attack. (If the player kills a Possessed Pickaxe, it drops an iron pickaxe, which can be picked up.) A player taking the corridor containing the 'Y' on the map will always be attacked by a Possessed Pickaxe. (The other corridor is safe as long as the player does not try to pick up a pickaxe there.) |
| Z | 8 coal veins. |
| aa | 9 iron ore veins (1 cannot be reached). |
Level 6
Players must have a glowing fungus in inventory to light this level. Nothing else, not even the Seers' headband, works as a light source here.
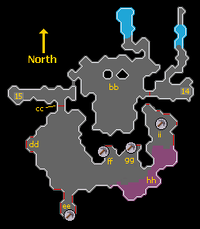
| Map Label | Description |
|---|---|
| 14 | Stairs up to level 5. |
| 15 | Stairs up to level 5. |
| bb | Treus Dayth's chamber. This is where the player fights Treus Dayth's ghost in the quest. After the quest, the cranes and mine carts in this chamber are not dangerous. 'bb' marks the spot of the Innocent-looking Key, which becomes the Crystal mine key when picked up. |
| cc | Locked door. The crystal mine key unlocks this door. |
| dd | 4 coal veins. |
| ee | 13 adamantite ore veins. |
| ff | 3 coal veins. |
| gg | 3 coal veins. |
| hh | Salve crystal area. A chisel can be used to cut pieces of crystal. Players cannot cut the crystal if they already possess a purple crystal (alone or part of a Salve amulet). The Drop trick can be done to get multiple crystals. |
| ii | 8 mithril ore veins (1 not reachable). |
Getting around in the mine
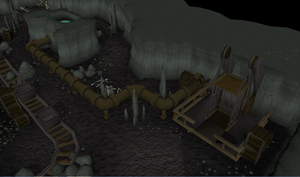
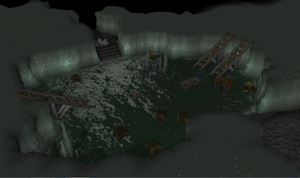
This section is based on the map labels and provides a compact guide to getting to the more interesting areas of the mine.
To get to point P on level 4 from the surface (and move a glowing fungus by mine cart):
- Surface: Enter the main entrance.
- Level 1: Go 1 - 3 - 4; climb down.
- Level 2: Go 4 - 6; climb down.
- Level 3: Go 6 - 12; climb down.
- Level 4: Go 12 - X (get fungus) - central T (put fungus in cart) - P. Also go Q and R as necessary to set switches correctly. Push 'Start' at P.
To get to point 10 on level 4 from point P (to get the glowing fungus after moving it):
- Level 4: Go P - 12; climb up.
- Level 3: Go 12 - 6; climb up.
- Level 2: Go 6 - 4; climb up.
- Level 1: Go 4 - 3 - 2; climb down.
- Level 2: Go 2 - 7; climb down.
- Level 3: Go 7 - 10; climb down.
- Level 4: Go 10 - T (search cart for fungus).
To get to point bb on level 6 from point T on level 4 (to get crystal mine key):
- Level 4: Go T - 10; climb up.
- Level 3: Go 10 - 9; climb down.
- Level 4: Go 9 - 13; take lift down.
- Level 5: Go 13 - 14; climb down.
- Level 6: Go 14 - bb (take innocent-looking key; turns into crystal mine key).
To get to point hh on level 6 from point bb on level 6 (to get to crystal mine):
- Level 6: Go bb - 14; climb up.
- Level 5: Go 14 - 15; climb down.
- Level 6: Go 15 - cc (unlock door with key) - hh (crystal mine).
To get to point hh on level 6 from the surface (to get to crystal mine; already have crystal key):
- Follow the above steps until the fungus is retaken at point T
- Level 4: Go T - 10
- Level 3: Go 10 - 9; climb down.
- Level 4: Go 9 - 13; take lift down.
- Level 5: Go 13 - 15; climb down.
- Level 6: Go 15 - cc (unlock door with key) - hh (crystal mine).
To get to point K on level 2 from the surface (to mine level 2 ore veins):
- Surface: Enter secret entrance.
- Level 2: Go J (unlock door with key) - K; mine veins.
Monsters
Those that were killed in the mine were forced to remain even after death. These spirits now wander the mine, taking their revenge upon all who enter. Some of the abandoned mining equipment has also become possessed, potentially making anything a threat. Much more dangerous beasts await those that venture into Tarn's lair.
- Treus Dayth (level 95, only present during the quest)
- Vampyre (level 61, outside mine to the east and north)
- Possessed Pickaxe (level 50)
- Animated spade (level 50)
- Skeletal Miner (level 42)
- Skeleton (level 40)
- Ghost (level 29, only present during the quest)
- Giant Bat (level 27)
- Bat (level 6)
- Rat (level 1)
- Haze (level not given; cannot be fought)
Also beware of mining equipment such as:
- Cranes (on level 6, only dangerous during the quest)
- Mine carts (on level 4, dangerous at all times; on level 6, only dangerous during the quest)
- Iron pickaxes (on level 5, become Possessed Pickaxes if picked up)
Mining and Ores
Despite years of heavy use, the mine is still rich in ore. Although many of the veins are too deep to reasonably reach, some are accessible throughout the upper levels of the mine.
Banking and Profit
The nearest bank can be found to the east in Burgh De Rott, although it is not open until it is repaired during the quest, In Aid of the Myreque. Numerous aggressive Vampyres plague the land between the mine and Burgh de Rott, but players can greatly lessen the threat by wearing good armour, running, and turning auto-retaliate off. A furnace is also in the city, which is useful for smelting the ore.
There is also a bank in Tarn's Lair, although the path to it is guarded by aggressive Zombies and Skeletons as well as numerous traps. A fee of 100 coins is required for each use of this bank.
The ore veins on level 2, with coal, mithril, and adamantite, are quite practical to mine, although few players seem to realise this. After the Haunted Mine quest, players will have the Crystal mine key, which can be used to unlock the doors to the veins on level 2. Also after the quest, players can use the secret entrance, which is right next to the level 2 veins. This makes the round trip between the Burgh de Rott bank and the level 2 veins fairly fast, equivalent in time to other high-value mines like the Mining Guild and the mine on Jatizso.
How to mine with the Possesed Pickaxes
Level 50 possessed pickaxes will attack anyone. A way to mine without the pickaxes constantly attacking is to run to the mining spot, animate the pickaxes, then run away until the pickaxes no longer target you, then wait for the yellow dots to disappear. The pickaxes will then be on the ground and unanimated. They will not reanimate unless clicked on, allowing the ores to be mined. Leaving and returning will not cause the pickaxes to reanimate.
List of Ores
All ore is found in ore veins in the mine's walls, rather than in ore rocks like in many other mines. Some veins are in areas that cannot be reached and others are blocked by debris or abandoned equipment. Many veins nonetheless are accessible, and these provide:
- Clay (4)
- Copper ore (11)
- Tin ore (15)
- Iron ore (8)
- Coal (26)
- Mithril ore (12)
- Adamantite ore (18)
Personalities
- Zealot - A Saradominist zealot that recently ventured through Mort Myre Swamp to investigate the area. He is found north of the mine and is the starting point for the Haunted Mine quest.
Quests
There are two quests involved with the Mort Ridge Mine.
- Haunted Mine, wherein players explore the mine and defeat its guardian to obtain a salve crystal
- The Lair of Tarn Razorlor miniquest, wherein players explore the lair of an old necromancer who once came to seek his fortune in the mine and defeat him
Music
Trivia
- Parts of some mines levels can be seen from other levels in the mine. This is suspected to be an artefact of how Jagex stores the levels rather than an intended feature of the mine. (For example, there is no elevation change on any level like there is in the Asgarnian Ice Dungeon.)
- Part of level 4 can be seen from the southern part of level 2.
- Part of level 5 can be seen from the southern part of level 3.
- Part of level 6 can be seen from the southern part of level 4.
- Part of level 6 can be seen from the eastern part of level 5.
- As mentioned above, the ore veins on level 2 are practical for mining. Unlike other mines with valuable ore, the level 2 veins almost never have anyone present, competing for the ore. It is likely that most players who complete the quest do not think to check out the locked doors on level 2 and do not discover that the newly-gained crystal mine key unlocks these doors. They thus are unaware that valuable ore veins are there (and likely would expect less-valuable or, as elsewhere on the upper levels there are veins for only clay, tin, and copper).
- It should be noted that even though a tinderbox is un-usable you can use your dwarven axe to light lanterns again.