Four adventurers arrive in Daemonheim, looking to gain experience, fight creatures, and generally search for treasure. After defeating one room of enemies and charging through to the next, it becomes clear that they have left a lone survivor behind. This survivor has reacted somewhat badly to the attack, and has retribution on their mind.
In the first part of the saga, the player controls Kay Thanxby, the leader of a band of four adventurers exploring Daemonheim. They are Kay Thanxby (warrior), Lotheria Seldorina (ranger), Lola Wut (warrior), and Ican Haz (quick-chat mage). In the second part of the saga, the player controls a poisoned forgotten warrior. The main objective is to complete the dungeon without dying. Achieving only this results in the "abridged" reward. The saga also has an "unabridged" reward which can be earned by additionally completing three side-objectives.
The poisoned warrior can follow a noble or ruthless path of vengeance. The player can decide either path or a mixture. However, the special attack of the warrior's sword reflects the path. The more noble the path, the more damage is healed by the attack. The more ruthless the path, the more damage is dealt by the attack. Taking the noble path is recommended because it makes the special attack a much needed additional source of lifepoints.
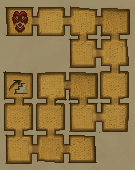
Starting room
Meet the adventurers.
First room
Taevas dies.
Enter the first room and kill the four level 86 forgotten warriors inside. Use the crush style of your Gorgonite 2h sword to kill them off slightly faster.
Skaldrun will then move onto the next part of the tale.
A cut scene will follow and the player will then control a surviving forgotten warrior.
(Ruthless) Choose to keep the fish. The silver crescent key will be taken from his corpse.
(Noble) Give Orin the fish in exchange for the key.
Use the key to open the door.
There is currently a bug with this section. If you interrupt the conversation right after agreeing to keep the fish, Orin will die but you would not receive the key.
Flip tile room
(Ruthless) Avoid being spotted by Lotheria Seldorina and hide behind the pillars. Attack from behind and kill the ranger in combat.
(Noble) Kill the ranger Lotheria Seldorina in standard combat.
It is better to follow the noble path as Lotheria is of a relatively low level, and being a ranger, which is defeated by melee in the combat triangle, she is unlikely to deal much damage before she is slain.
You will always deal 375 damage as the first hit if you strike Lotheria from behind. She will then exclaim that she is bleeding, and her life points will be rapidly chipped away.
Run through the next room. Kill the spiders if needed for more Giant flatfish.
Killing Ican Haz
(Ruthless) Pull the blue lever behind the summoning obelisk, summoning a horde of skeletons.
(Noble) Do not pull the blue lever behind the summoning obelisk.
Kill the mage Ican Haz. Despite that fact that he is of the lowest combat of all four of the party, He is a mage, which defeats warriors in the combat triangle. This makes the fight one of the most difficult. He might also cast Entangle and walk away to mage. It is strongly recommended to follow the ruthless path for once here.
If you insist to follow the noble path, go in, attract his attention and go out before he binds you with magic. This lures him to the entrance. From then on, fight him right there as you could easily escape when he casts Entangle.
If Ican is attacking you when you pull the switch, he will continue to do so after the skeletons appear. To reduce damage, run out of the room. His magic attacks can hit through the giant summoning obelisk in the middle of the room, so don't rely on it.
Have some food at all costs. Ican usually hits high, and there's some Dungeon spiders in the room before his that
Unlike most monsters, Ican will not turn to attack you if you are behind his back, much like Lotheria Seldorina. Thus, you can possibly pull the switch and run out without being hit once by seizing the chance when he turns his back to you.
Ican always prioritizes The Forgotten Warrior above Skeletons, so it is best to re-enter after he is defeated. If he casts a spell just before he is defeated, it won't deal damage.
The Skeletons are level 68, only have an examine option and can not be attacked.
You can kill the level 60 hellhounds for antipoison elixir. The elixir eliminates the poison effects for a while. It is not recommend to kill them as they are tougher than the spiders and the elixir only pauses the poison for a short time. However they can be killed without taking damage by hitting a hellhound once then hiding behind a wall until its health bar disappears then hitting it again and running behind the wall again. Overall, it is not worth the effort.
Killing level 50 dungeon spiders for food is strongly recommended. They always drop two to seven giant flatfish, with a tendency to drop high amounts. However if they hit you, and you've drunk an antipoison elixir, they will restart the poison, otherwise they will deal extra poison damage.
Argax
One room will contain one dungeon spider and a dying warrior named Argax.
(Ruthless) Encourage Argax to continue to fight the attacking party.
(Noble) Allow Argax to die peacefully.
Lever room
There are five levers to pull within a time limit.
Doing so unlocks the next door.
Korel
Talk to Korel in the second room after the lever room.
(Ruthless) Choose to kill him.
(Noble) Let him live.
Killing Lola Wut
Killing Lola Wut.
After a few more rooms down the path, the player will find Lola Wut.
(Ruthless) Search the table in the southeast corner for a vial of poison.
Check the north door to get Lola to start moving towards the fishing spot.
Go through the west door.
Use the poison on the fishing spot.
Check the north door to complete the circuit of the four rooms.
Wait for Lola to use the fishing spot. View Shianna's body in the room to keep from accumulating poison damage. The poison will damage her severely, knocking her to 1 life point, or kill her if she was already damaged. Finish killing her if needed.
(Noble) Kill Lola in standard combat. This will be hard to do because she is in Katagon with a Flameburst defender and a Gorgonite dagger, but she will most likely be unable to hit you as hard.
Check Shianna's body (It's recommended that you do so before talking to Peleas to save time).
Go through the north door and then the east door.
Talk to Peleas.
(Ruthless) Tell him the truth to spur his hatred.
(Noble) Choose to lie to him so he will die at ease.
Dead children litter the floor.
Unlock the door with the key and continue though several more rooms.
Side objectives
The following must be completed to reach 100% completion and receive the unabridged tome:
Find and talk to Agrax, allowing her to die peacefully or telling her to keep fighting.
Confront Korel about the key, either sparing him or punishing him.
Talk to Peleas after examining the remains of his lover Shianna, either lying to comfort him or telling the truth about her death.
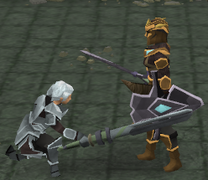
Killing Kay Thanxby
Attack Kay Thankxby.
She attacks with her Gorgonite 2h sword on crush, which is fairly accurate.
If she casts Entangle once you enter, exit the room. This prevents damage and lures her to the entrance.
She will often teleport and the player will have to re-engage into combat. If the player attacks her while she is still teleporting, she will say "Oof!" and the hit will be much higher. When she says "Catch me if you can!", immediately click to attack her to take advantage of this. However, if you fail to hit her during her teleport, she will cast entangle, then cast two magic attacks in rapid succession, hitting up to around 200 damage each, and often follows up with another one after a small delay. This is her most dangerous Killing Kay Thanxby. Vengeance has been done for Taevas...move. For this reason, keeping over 400 life points during the fight is advised to avoid death. After doing so, she will temporarily be non-aggressive to the forgotten warrior, allowing time to eat and heal.
The noble special attack of the Fractite longsword helps a lot here as you can heal up to 250 life points in one hit for a maximum of 4 times in one go, without needing time to eat.
If the Fracitite longsword is fully powered ruthlessly, she should only teleport twice before defeated. If you are going on the ruthless path and are confident of your clicking skills, it is recommended to go "berserk" and defeat Kay before she kills you. You are strongly advised against eating during battle as she frequently hits higher than 100 and eating would easily make you miss a teleport. Either way, if done correctly, you shouldn't need any food.
Ending the saga
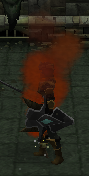
The Forgotten Warrior transforms into Vengeance.Once Kay is defeated, choose any of the four options to end the saga.
The first two options will not be available if you have acted too ruthlessly and the last two options will not be available if you have acted too nobly. However, this does not affect the rewards, only the ending.
(Ruthless Ending - unabridged) The player will torture Kay for hours until she gives in and willingly embrace death. Then the warrior will merge with the spectre of Taevas and morph into Vengeance and escape from Daemonheim, cutting down many of the Fremmenik and eventually disappearing.
(Noble Ending - unabridged) The player will take Kay back a room and show her the dead children, after which the warrior will figure out that there were no children, and that it was only rage and sadness that made them appear as such. Upon that realization the warrior will let Kay go. The warrior will then claw her way out of the dungeons. Assisted by Kay, the warrior travels to Rellekka and tells Taevas' partner of his devotion, but dies during the night from the poison. The body is not found and "dissappears".
In addition to the two above endings, there are two options to kill Kay outright, available for those on either noble or ruthless path. If a secondary objective is missed (only the abridged story is earned) only the endings where Kay is killed outright are available.
Skaldrun will then give the player their reward, the Vengeance book. Upon reading the book, it will disappear and the player will gain some experience.
The saga is always re-playable regardless the completion percentage. However, the player will only receive the rewards the first time that the objectives are completed.
Trivia
It is possible to talk to NPCs, halt the poison's process while naturally healing, and optionally the noble special attack of the Fractite longsword to heal so many life points that The Forgotten Warrior could withstand the whole poison period. Therefore, she could have escaped the dungeon with full life points and unpoisoned. However, Skaldrun would still say she succumbed to poison and her wounds.
Assuming that you did not engage in any conversation for more than 18 seconds and you did not consume any antipoison elixir, it would take 9 minutes for the poison to be cleansed, and it would deal 1170 damage in this period. 90 life points would be recovered through natural healing.
The healing of the sword if you follow the noble path takes 25% of the special bar, and heals 10, 40, 90, 160, 250 for each level. You must choose the noble path for at least all but once to get the maximum effect.
When fully powered nobly, the Fractite longsword heals 250 life points at the cost of 25% special attack energy, meaning that 1000 life points in total could be restored for a full bar, surpassing both the Saradomin Godsword and the upgraded Enhanced Excalibur, two popular healing weapons, by a large margin. In order to have the same effect, the Saradomin Godsword must deal 2000 damage in two hits, which is currently impossible. It would take 2.5 full special attack bars for the Enhanced Excalibur to heal as much. However, this sword could only be used during the saga.
There is a glitch that makes it so your character can not attack, this can be fixed by logging out and switching worlds.
Upon the start of the saga, the party begins looking for food to survive. However, ingame, players do not have to constantly eat food to survive naturally, only when being killed.
There is a glitch that makes Lola Wut not visible after starting the saga.
On the day of release, the Knowledge Base said the memory fragment could only be obtained on the floors 12-17 while the news post claimed it could be found on any floors 12-21.
There is also a glitch that when using one of the dead party's rings that a message comes up and says, "bah! That no interest Thok."
Completing the flip tile puzzle before killing Lotheria Seldorina yields the normal message, "You hear a click as the last tile flips. All the doors in the room are now unlocked." However, the door will not actually unlock until the battle is complete.
On the day of release, the dead Forgotten mage in the room with the levers examine was 'He knew more dirty jokes than anyone.' This was later changed to 'He could outdrink anyone.' Most likely because Orin has the same examine info.
Three of the four adventurers' names at the beginning of the saga are references to commonly used and grammatically incorrect text phrases: I can haz?, kthxbye and Lolwut.
If you have a male title, e.g. Lord, it will be changed to the female variant, e.g. Lady, whilst you play as the forgotten warrior.
There is a glitch that after you defeat Kay Thanxby and show her the children she will walk and kneel repeatedly.
Another glitch can be committed if the player has followed the unabridged ruthless path, when Vengeance's Fire overcomes the Forgotten warrior and if you're quick enough in ending the story, you'll see the same fire consuming your player. This, however does not affect you in anyway.
During the Saga, Giant Flatfish appear as Members' items, with yellow text, but in Daemonheim outside of the saga, they are a Free item, with grey text.
There is currently a glitch where Lola Wut's face will be warped due to one of the joints in her face being stuck in the same spot forever.
.png)


