Char (monster)

| |
| Release date | 11 January 2012 (Update) |
|---|---|
| Members? | Yes |
| Combat level | 501 |
| Life points | 30,000 |
| Slayer level | Not assigned |
| Aggressive? | Yes |
| Poisonous? | No |
| Immune to poison? |
Yes |
| Attack style | Melee |
| Attack speed | |
| Max hit | 250 (approx), 990 when enraged |
| Weakness | Ranged |
| Always drops | Nothing |
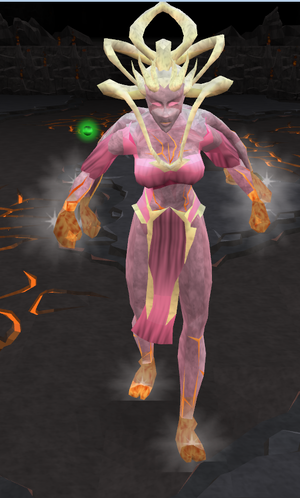
| Examine text | Her entire form burns with rage! |

Char is the boss of The Firemaker's Curse quest. However, the boss is safe, meaning that if you die, you will not lose your items.
Setup
Armour makes no difference during the fight and will even hinder you as there is a lot of running around to be done. As such, weight reducing equipment is the ideal selection.
- Wicked cape > Spottier cape > Spotted cape
- Gold athlete's hat
- Agile top > Wicked robe top > Gold athlete's shirt
- Agile legs > Wicked legs > Gold athlete's legs
- Penance gloves
- Boots of lightness
Super energy potions are a useful addition to aid in energy restoration. Alternatively, if As a First Resort has been completed, it is highly advisable to use the salt-water spring in Oo'glog. Light food such as Summer pies or stackable food like Purple sweets or Biscuits are the best options, although Monkfish or Sharks will suffice.
A healing familiar such as a Unicorn stallion or Bunyip could be of use, or a Beast of burden like a Spirit terrorbird to hold any extra food. Tireless run scrolls are a good idea to bring along should you choose to take a terrorbird with you to aid in energy restoration.
Weapons do not affect your damage or accuracy, however they do affect your attack speed and allow you to attack from a distance if using a ranged weapon. Therefore, fast ranged weapons such as Throwing knives or Darts are most effective.
Attacks
- Fire burst (A stomping attack which will put out your fires as well as harm you)
- A standard melee attack with her fists. This normally deals up to about 250 damage, but can hit as high as 990 if she is enraged.
- Fire Wall (at half health, she can conjure fire walls similar to the rooms you passed earlier)
- She will occasionally summon small sparks that veer toward you, but they deal small amounts of damage.
Strategy
Char, after brief dialogue with the player, will turn larger and grow several more arms. She moves slowly, and running from her prevents any damage, as she can only attack within melee range. The player's objective is to light as many fires as possible with the pitch can, as this will strengthen the player considerably. The damage the players deal with their weapon is equal to the number of fires times 101 (so if 5 fires are lit, successful attacks will always deal 505 damage; it is still possible to miss). The fires serve as obstacles for both the player and Char. That is, neither the player nor Char can move through them. Players are advised to bear this in mind during the fight and incorporate it into their strategy. Lighting randomly placed fires will slow down her movement and make her charges easier to avoid. A good strategy for players is to randomly run around the room, lighting fires as they go, and then begin attacking her after lighting about seven to ten fires, using a hit-and-run method. Lighting several fires at once can make this a quick battle. However, players should avoid letting Char get too close to their fires, as she is able to put them out with her stomp attack, although she seems only to use this attack periodically, as opposed to whenever a fire is in reach. Lighting fires in clumps is highly advised against, or she will extinguish many fires simultaneously if she does happen to stomp. It is strongly advised for players to watch their fire count, and try to avoid letting it get any lower than 4.
Sometimes Char will summon a small "spark" that will veer toward the player. If the spark hits the player, it will deal small amounts of damage (around 15-20), but if the spark comes near a fire, that fire will absorb the spark, and give the player a small boost, or "buff", as they are referred to ingame. Buffs include faster Lifepoint regeneration/healing, faster run energy regeneration, a "cooling" buff that slows Char's attack rate, and "glittering" buff that deals small damage to Char. These boosts usually last around 10 seconds.

Occasionally, Char will become enraged and glow brighter and burn a bit more. PLAYERS SHOULD STAY AWAY FROM HER AT ALL COSTS IN THIS FORM. If she gets within melee range before she cools down, she will be able to hit VERY hard, often hitting over 700 damage, and possibly as high as 990, thus killing the player in one hit. Char will cool off shortly after she becomes enraged, but to cool her off quicker, players can lure her to the pools of water on the southern end of the area; getting her in those pools will cool her down immediately.
At around half health, Char will begin summoning fire walls, similar to the ones the player had to dodge earlier in the quest, at random. These have openings that the player can pass through unharmed, just like the previous ones, but the player should be more careful to avoid getting near Char when passing through the openings. Getting hit by these fire walls usually deals between 100-450 damage. It appears as though running through the wall in the opposite direction as it will nullify/avoid damage under certain circumstances, possibly while on the outside wall.
Fast-firing ranged weapons (such as darts, or blisterwood stakes) are the most effective weapons for this boss fight, as the player's guaranteed hits of 500+ (with at least 5 fires lit) can quickly finish her off if the player can employ an effective hit-and-run tactic.
Inventory: the pitch can, the firemaker's guide, 2 super energy potions, a full inventory of sharks and a terrorbird(or higher) filled with sharks to maximize the chance of victory. Alternatively, a Unicorn stallion is feasible for those with 88 summoning.
Steps:
- Talk to her.
- When she changes move away from her. Assuming you have approached her from the south, return in that direction to avoid unnecessary damage.
- Light a "base" number of fires- this is the minimum fires that should be lit at all times. 5 is a good number.
- Attack her, keep moving when you have to, but don't bother lighting more fires unless the number of fires fall below the base number.
- When she starts raging, just keep running and lighting fires. keep this going until she stops. Then resume attacking.
- If you run out of run energy and she isn't at around 1/2 health, DO NOT drink a potion. Instead, trap her behind a waterfall. This is done by going to the west pond and waiting for her to draw near(but not too close). then run over to the east pond and hide east of the waterfall. She wil get trapped. Rest, ignoring the small damage the sparks do.
- Relight the fires to the base number and repeat from step 2.
- Once she is around half-health, the hiding technique will no longer work, as she will use her fire wall attacks which may harm you. As a result, you will have to start healing.
- When she uses her fire wall attack (always be on guard for it) do not try to run away, as this will usually lead to death. Instead, ironically, you may have to run right into them if you run into them fast enough facing forward you will take little or no damage. Try to be as quick as possible; the later you run into them, the more damage you'll take. If a hole in the wall is nearby, running into them guarantees no damage. However, if Char is nearby (particularly if she is enraged) do not take the risk, as a mediocre hit from her (in the 500s and 600s) plus mediocre damage from the firewalls can kill a person at full health.
Follow the above steps and the battle shouldn't be too hard. if you get damaged, run away from Char before healing. Attempting to eat without running away will almost always guarantee a death. Since Char is slow, running a good distance away and eating food as you go along should keep you alive. If you have just been hit and the firewalls are coming, run away (worst case scenario) from the fire walls and eat, tanking the damage from the fire wall (a maximum of around 450) and eating again. This is better than taking the risk of running into the fire with 100 lp left.
Tip: Do not use the fires as safespots for you to relax a bit, she will stamp out the fire and if you weren't far enough, attack you immediately, potentially causing death.
Since the battle is safe, fight to the death. You don't need to waste inventory space with an emergency teleport, but you can still use one to resupply if you are defeated.
Since theoretically all of Char's damage can be avoided, this battle ranges from very easy (best case scenarios and avoidance of most, if not all attacks) to hard (worst case scenarios, maximum damage and lag).
Trivia
- Char currently has the fourth most life points out of all monsters, only behind the Party demon, the Queen Black Dragon, Har-Aken, and tied with Nex.