Myths of the White Lands

| File:Myths of the White Lands.png | |
| Release date | 16 December 2008 (Update) |
|---|---|
| Members only? | Previously |
| Quest series | None |
| Official difficulty | Novice |
| Official length | Medium |
| Developer | Frédérique M |
Myths of the White Lands is a quest where the player investigates into rumours of riches that Explorer Jack has found. Heading into the Land of Snow, you navigate several ice puzzles and elude a yeti to discover some stones which turn out to be nothing more than frozen yeti dung.
Official description
| “ | Explorer Jack may have taken a break from exploring, but he hasn't given up his old habits quite yet. His constant search for myths that could potentially hold secrets to rare trinkets and other trophies has led him to a passing snow imp, who told him a tale of riches in the distant Land of Snow. Just the task for any wannabe explorer! He now wants you to go and investigate the imp's story to discover if it holds any truth... | ” |
Walkthrough
| Start point: | |
| Members only: | No |
| Official difficulty: | |
| Description: | None |
| Length: | Medium |
| Requirements: |
(requirements for bonus rewards can be boosted and may be obtained after the quest) |
| Items required: | None
|
| Enemies to defeat: | None |

Explorer Jack
Start by talking to Explorer Jack in Lumbridge, in his house just west of the general store. Ask him how to get to the Land of Snow, the phrase 'Ectosum Glissendo' will be seen (this is the same for everyone). Head over to the Wizard's Tower (fairy ring code DIS) and talk to Isidor. He can be found in the lower level of the Wizard's Tower (near Sedridor). Speak to him and he will teleport the player to the Land of Snow. Players are not allowed to teleport with their own snow imp.
Icy Maze Caves of Extreme Slipperiness
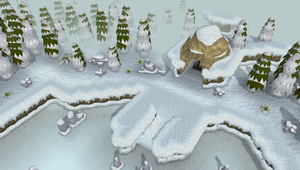
Notes:
- Players are also able to move diagonally on ice.
- The puzzle rooms may be encountered in a different order.
- If the puzzle is too difficult to solve, either teleport out and then come back or log out (this will allow to begin from the entrance of the room) and start over.
- Crafting 2,000 experience bonus for clearing wall cave maze room. (30 crafting needed, bring hammer and chisel)
- Agility 10,000 experience bonus for climbing roots in a cave maze room. (55 agility needed)
- Woodcutting 20,000 experience bonus for clearing wall next to final entrance (on platform) before final cave maze room. (80 woodcutting needed, bring hatchet)
Entrance
To get to the caves, an 'Ice game' will need to be played. The player will slide around and only stop when an obstacle is reached, similar to fighting Plane-freezer Lakhrahnaz within Daemonheim. (Before starting your sliding, check your compass directions to North.) To get to the cave from the start, directions are as follows:
- South
- East
- North
- East
Another faster route is:
- West
- South-East
- East
First Cavern
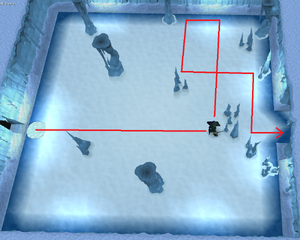
- North-East
- East
- North
- South-East
Second Cavern (Crafting cavern)
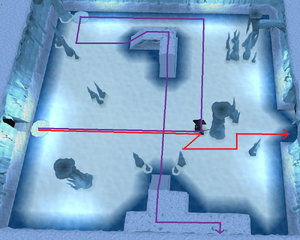
Enter the next cave. This is the second puzzle room. To move diagonally, carefully click diagonally from your character. A top down view makes this easier. This can be solved by the following steps:
- East
- South-west
- East
- North
- East
In this room, the etching needed to be cleared to gain 2,000 Crafting experience is on the ramp. Players will need a chisel, hammer and a crafting level of 30 to gather stalagmites on cave wall. The crafting spot can be reached by the following steps from the entrance:
- East
- North-West
- South
- East
- South
- East
Third Cavern
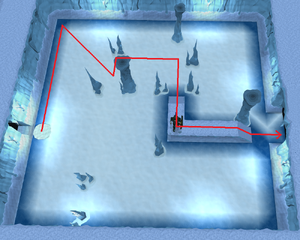
Passing through room 2 leads you to the third puzzle room.
- North
- South-east
- North
- East
- South
- East
Fourth Cavern (Agility cavern)
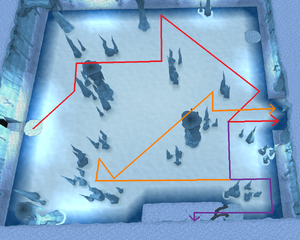
After this, the player will enter a fourth cave room. Following this, it is easy (it is possible to climb the roots onto the risen platform if you are a member and study the wall for 10,000 agility experience; players will need Level 55 Agility to do so, or 50 if using the summer pie's skill boost).
- North-east
- North
- East
- North
- South-East
- South-West
- East to go to next room
If you plan to obtain the agility reward first, trace the dark blue path followed by the purple one on the image shown:
- South
- East
- South
- West
- Climb vine for Agility experience, study Wall and climb back down
- East
- North
- West
- North
- South-East
- North-East
- South
- East
Fifth Cavern
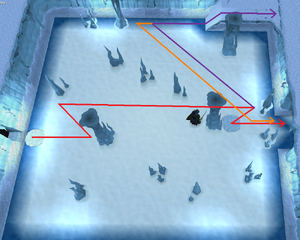
- north
- east
- south
- east
- north
- east
After moving blocks in the Sixth cavern, see below; squeeze through the crevice and head east across the walkway and squeeze through the crevice on the other side.
Sixth Cavern
-
Room 6 - Block 1
-
Room 6 - Block 2
For the sixth puzzle room the first objective is to move east and enter the next room. A Yeti inside screams and the sound pushes you back to the starting point in the sixth room. Now, push the two blocks into the niches in the ledge along the north wall. (The blocks cannot be moved before the yeti's scream loosens them. If the player just keeps re-entering the yeti's room without putting the blocks in place, from the third consecutive try, players are prompted to push the blocks in room 6.) One solution to the room is this (Warning May Not Work Right):
|
|
|
Players will end up at your starting point in the sixth room. Then exit back to the fifth room. (If you try to enter the seventh room directly, the Yeti there will still scream and force you back.)
Seventh Cavern (and Woodcutting Cavern)
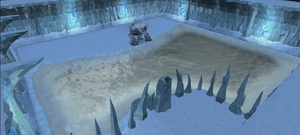
After pushing the two snow blocks into place in the sixth room, make your way back into the fifth room and go to the crevice (North, West, North, East). Go through the crevice, and enter the sixth room on an ice platform along the northern edge. The two blocks you pushed into place close gaps that you could not cross. Go east across the platform to the crevice in the eastern wall. South of the crevice are roots that can be cleared with a hatchet at level 80 Woodcutting and studied to gain 20,000 woodcutting experience. Squeeze through the eastern crevice into the seventh room. Players will be on an ice platform north-west of the yeti.

Study the nearby wall. The option on the pipe, which is on the railing of the ledge, should now say 'shout-in'. Click this to shout down the pipe. The yeti should faint.
Squeeze back through both crevices and go back to the final room (west, south-east, east). Simply walk east into the yeti room. Pick up the stones. Backtrack through all of the caves, or alternatively, right click and select 'exit-cave' on archway in any of the previous rooms.
Meeting the ice imps
Do not teleport until the imps transform the stones. Let the imps enchant the "riches" (now revealed to be extremely stinky yeti dung). It will turn into enchanted stones. Home teleport to Lumbridge.
Head back to Explorer Jack. Choose "carry on with the imps' prank" or "tell the truth about what the stones are". Both choices will yield the same results, eventually; they only affect how the conversation will continue.
Wrapping up
If players go back to Explorer Jack after 5 minutes or so, he will give you 5000 coins: your share of the money from selling the yeti dung to a witch. He also says he's been to the cave and "sliding is great fun. You should go back there sometime."
Congratulations, quest complete!
Music
Rewards
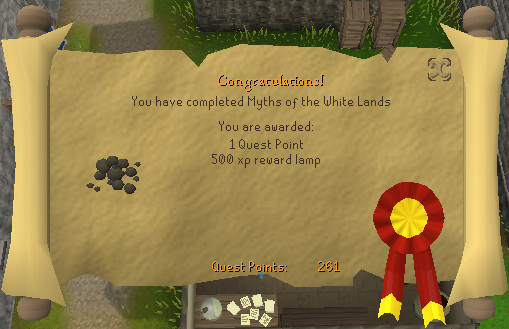
- 1 or 2 Quest Points, depending on whether you finished Sheep Shearer /Witch's Potion before their removal.
- Antique lamp (500 exp)
- 5,000 coins (if you talk to Jack after logging out or speaking to Explorer Jack later on)
- Access to Land of Snow
- 2 extra spins on the Squeal of Fortune
Extra rewards
- 2,000
 Experience (if minimum level of 30 Crafting is fulfilled)
 - 10,000
 Experience (if minimum level of 55 Agility is fulfilled)
 - 20,000
 Experience (if minimum level of 80 Woodcutting is fulfilled)
Trivia
- Upon the completion of this quest, one's Adventurer's Log will read: "The imps had been playing a prank on Explorer Jack all along! That should teach him a smelly lesson!"
- On the day the quest was released the spoilers read: The rewards are kept in an icy room, and we still haven't figured out how to get across it unscathed.
- During the 2008 Christmas Event, you could ask one of the Head Snow Imps to Teleport you to the Land of Snow as opposed to Isidor.
- You can only walk diagonally on certain tiles.
- When the quest first came out it was marked as a members quest, though you could still do it as a non member. It was available to non members during the holiday; afterward it was restricted to members. Just like Swept Away, it was later made available to free players.
- Upon the releases of Task System, completing the quest has become one of the tasks for Lumbridge/Draynor.
- If you use the Lumbridge Teleport (NOT the Home Teleport!) while sliding on ice, you will stop sliding.
| Novice |
Black Knights' Fortress • The Blood Pact • Cook's Assistant • Demon Slayer • Ernest the Chicken • Goblin Diplomacy • Gunnar's Ground • Imp Catcher • Myths of the White Lands • Pirate's Treasure • The Restless Ghost • Rune Mysteries • Shield of Arrav • Stolen Hearts • Swept Away • Vampyre Slayer • What's Mine is Yours |
| Intermediate | |
| Experienced | |
| Removed quests |
Learning the Ropes • Prince Ali Rescue • Romeo & Juliet • Sheep Shearer • Unstable Foundations • Witch's Potion • Doric's Quest |
|
Italics denote that the removed quest was later made into a miniquest. | |
es:Myths of the White Lands nl:Myths of the White Lands fi:Myths of the White Lands pl:Myths of the White Lands


